

This post contains affiliate links. If you purchase through my links, I may earn a small commission at no extra cost to you. Thank you for supporting Room Revival Studio!
Most DIY crafts end up in a drawer. You make them once, they look a little rough, you feel vaguely guilty about the supplies you bought, and three weeks later they are in a bin at Goodwill. This list is not that. These are the easy DIY crafts that actually look good on your shelves, on your walls, and on your coffee table, the kind that make guests ask where you bought them.
Every project here uses basic materials, takes a weekend or less, and produces something worth keeping. No woodworking. No power tools. No skills required beyond patience and a willingness to try. Start with the one that matches whatever corner of your home needs the most help right now.
1. Macrame Wall Hanging
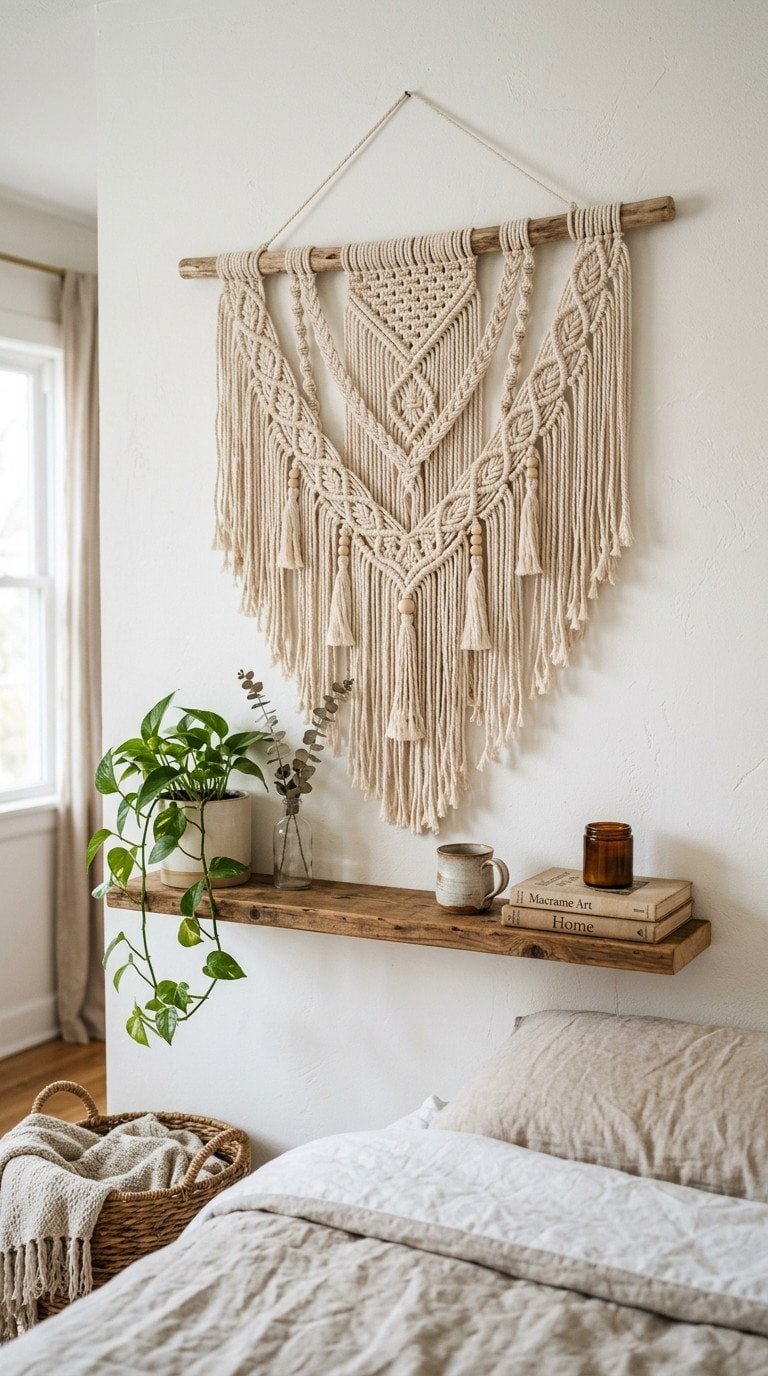
Macrame wall hangings look like they take forever, but a simple beginner version requires only two knots: the square knot and the lark’s head knot. Mount a dowel rod, attach your cord lengths, and follow a basic square knot pattern down the piece. Finish with a fringe trim and you have something that looks like it came from a boutique home store and cost sixty dollars.
Hot tip: Natural cotton macrame cord in 3mm or 5mm thickness is the easiest to work with for a first project. Thicker cord means fewer knots, faster completion, and a more substantial finished piece. A beginner piece that takes 90 minutes in 5mm cord would take four hours in 2mm cord and look the same from across the room. (The wall suddenly has texture and warmth it did not have before.)
Honest caveat: Measure and cut your cord at three to four times the finished length you want before you start. Running out of cord halfway through a section means starting over or having visible splice points. Cut generously and trim the excess at the end. The hanging on the wall makes the room look immediately more styled and intentional.
Shop the Look
- Natural Cotton Macrame Cord 5mm
- Wooden Dowel Rod for Crafts
- Macrame Fringe Comb
- Beginner Macrame Wall Hanging Kit
2. Painted Terracotta Pots

A plain terracotta pot is one of the most satisfying canvases in the DIY world. Paint the exterior in a solid color, add a geometric pattern with painter’s tape, or freehand a simple botanical design. Seal it with a clear coat to protect the paint from watering, add a plant, and set it anywhere that needs a little life. The result looks like something you would find in a curated plant shop.
Hot tip: Chalk paint in neutral tones like cream, sage, and warm white gives terracotta pots an organic, matte finish that photographs beautifully and pairs with almost any decor style. It adheres directly to terracotta without priming and dries in about 30 minutes. Paint a set of three different sizes in coordinating colors for a grouping that looks intentionally styled. (The plants in the corner actually look like a design choice now.)
Honest caveat: Seal painted terracotta with at least two coats of clear outdoor sealer if the pots are going outside or getting watered directly. Paint without sealant will peel and chip within a few weeks of regular moisture exposure. The sealing step takes five minutes and makes the difference between a project that lasts a season and one that lasts years. The pots on the windowsill look like a styled vignette every morning.
Shop the Look
- Terracotta Pots Set for Crafts
- Chalk Paint in Neutral Tones
- Clear Outdoor Craft Sealer
- Thin Painter’s Tape for Patterns
3. Tassel Garland

A tassel garland takes about an hour to make and looks like a permanent decoration worthy of staying up year round. Cut lengths of yarn or embroidery floss, fold each bundle in half, loop it onto a strand of twine, and wrap the top to form the tassel head. String them across a mantel, above a bed, or along a gallery wall. The texture and movement it adds to a flat surface is immediate and dramatic.
Here is what nobody tells you: tassels made from a mix of chunky yarn, silk ribbon, and thin thread all on the same garland look far more expensive than tassels made from a single material. The variety of textures in a tonal color palette reads as intentional and high-end. Stick to three to four colors in the same warm or cool family and vary the material types rather than the colors. (The garland above the bed looks like a boutique hotel styling choice.)
Honest caveat: Secure the beginning and end of the garland to the mounting surface before hanging the full weight of the tassels. A garland that slips loose in the middle drops the whole piece and damages the tassels at the fall points. Use a small adhesive hook or a tack behind a picture frame to anchor each end. The garland stays put and the room feels completely transformed by the addition of one handmade element.
Shop the Look
- Chunky Yarn for Craft Projects
- Embroidery Floss Mixed Colors
- Natural Jute Twine
- Silk Ribbon Assortment for Crafts
4. Rope Bowl

A coiled rope bowl is one of those crafts that looks technically impressive but is actually just patience and hot glue applied in circles. Start with the center coil, glue and build upward layer by layer, and finish with a clean edge. The resulting bowl holds fruit, keys, remote controls, or nothing at all and still looks like a considered decor piece. Natural jute, cotton rope, and braided cord all work beautifully.
Hot tip: A low-heat glue gun with strong adhesive gives the cleanest coils without burns and without the glue cooling too fast to bond properly. Work quickly and press each new coil firmly against the previous one for a tight, even seam. A loose seam at any point becomes the weak spot of the entire bowl and the coils will eventually separate there. (The finished bowl on the counter is one of those things that makes the whole kitchen look more thoughtfully decorated.)
Honest caveat: Rope bowls are for light decorative use only. They are not designed to hold liquids or anything heavy and should not be used as fruit bowls for produce that might be wet or condensation. Keep them dry and they will last indefinitely. The bowl as a display piece, holding decorative balls, dried botanicals, or small objects, always looks like a styling choice rather than a craft project.
Shop the Look
- Natural Jute Rope for Crafts
- Low Temp Hot Glue Gun
- Clear Hot Glue Sticks
- Cotton Braided Rope for Crafts
5. Pressed Flower Frame

Pressed flower art is one of the most elegant things you can make with almost no skill. Collect flowers and leaves, press them flat between heavy books for one to two weeks, arrange them on watercolor paper or cardstock in a composition you like, adhere them down with a tiny dab of craft glue, and frame them. The result is something that belongs in a botanical print gallery and costs about eight dollars to make.
Hot tip: Ferns, pansies, daisies, and small wildflowers press the most successfully because they are thin and dry evenly. Thick flowers like roses and dahlias can be pressed but require much longer drying time and often turn brown at the center. For a guaranteed beautiful result, use whatever grows in your yard or neighborhood and accept the randomness of what presses well. (The framed botanical on the wall makes the bedroom feel curated and intentional.)
Honest caveat: Pressed flower art will fade if displayed in direct sunlight. The colors naturally shift over time anyway, trending toward softer, more antique tones, but sunlight accelerates the process dramatically. Hang the piece out of direct sun and the colors stay vibrant for years. The faded effect is actually beautiful in its own right, but only if it happens gradually rather than in a single summer.
Shop the Look
6. Decoupage Vase

Decoupage transforms a plain glass vase into a textured, layered piece that looks like something out of an art gallery. Tear tissue paper or rice paper into irregular pieces, apply Mod Podge to a section of the vase, press the paper on, smooth it down, and repeat until the vase is fully covered. Finish with a top coat. The crinkled, layered texture and soft color reads as handmade in the best possible way.
Here is what nobody tells you: layering two or three colors of tissue paper and letting them overlap creates a watercolor-like effect on the finished vase that is impossible to replicate intentionally and always looks beautiful. The happy accident of overlapping translucent layers is one of those moments where the craft does the work for you. Blush over cream over soft white creates a piece that looks gallery-worthy. (The vase on the shelf makes the whole corner feel styled.)
Honest caveat: Decoupage vases are for dried or faux florals only. Water inside a decoupage vase will cause the paper layers to bubble, warp, and eventually peel. A glass insert inside the vase works perfectly for fresh flowers while keeping the exterior completely dry. The finished piece on a shelf looks like it belongs in a high-end home goods store and costs almost nothing to make.
Shop the Look
- Mod Podge Gloss for Crafts
- Tissue Paper Blush and Cream Assortment
- Plain Clear Glass Vase
- Foam Brush Set for Crafts
7. Concrete Candle Holders
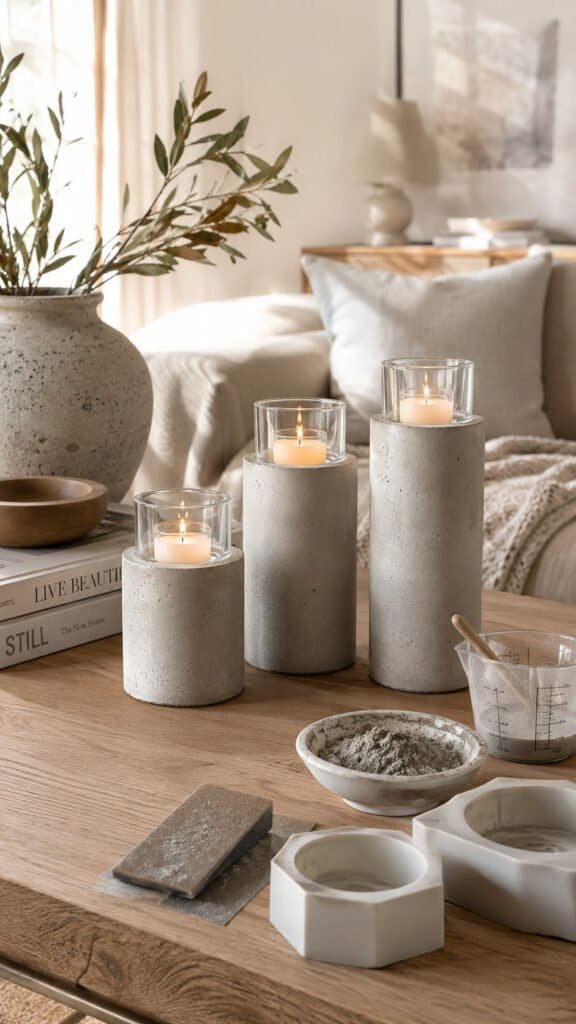
Concrete candle holders look expensive, architectural, and are genuinely one of the easiest things you can make. Mix a small batch of concrete, pour it into molds like paper cups or silicone baking molds, press a small glass votive cup into the center to create the candle cavity, and let it cure overnight. Unmold, sand any rough edges, and you have something that looks like it belongs in a minimalist design shop.
Hot tip: Quick-setting concrete mix produces clean, dense results for small decorative objects. Mix it to a thick peanut butter consistency rather than a soupy one, thicker mix holds its shape better in the mold and produces sharper edges. Make three different heights using cups of different sizes and display them as a grouping. The set of three looks more designed than any single piece would on its own. (The concrete holders on the shelf make the room feel like a carefully edited interior.)
Honest caveat: Always use a glass votive insert inside concrete candle holders and never place bare flame directly on the concrete surface. Concrete is highly porous and absorbs wax, which can be a fire hazard at high temperatures. LED candles are the safest option and look identical to real flame inside the votive insert. The holders on the coffee table are a conversation piece every time someone visits.
Shop the Look
- Quick Setting Concrete Mix
- Cylinder Silicone Molds for Crafts
- Glass Votive Candle Cups
- Fine Grit Sanding Sponge
8. Resin Coasters
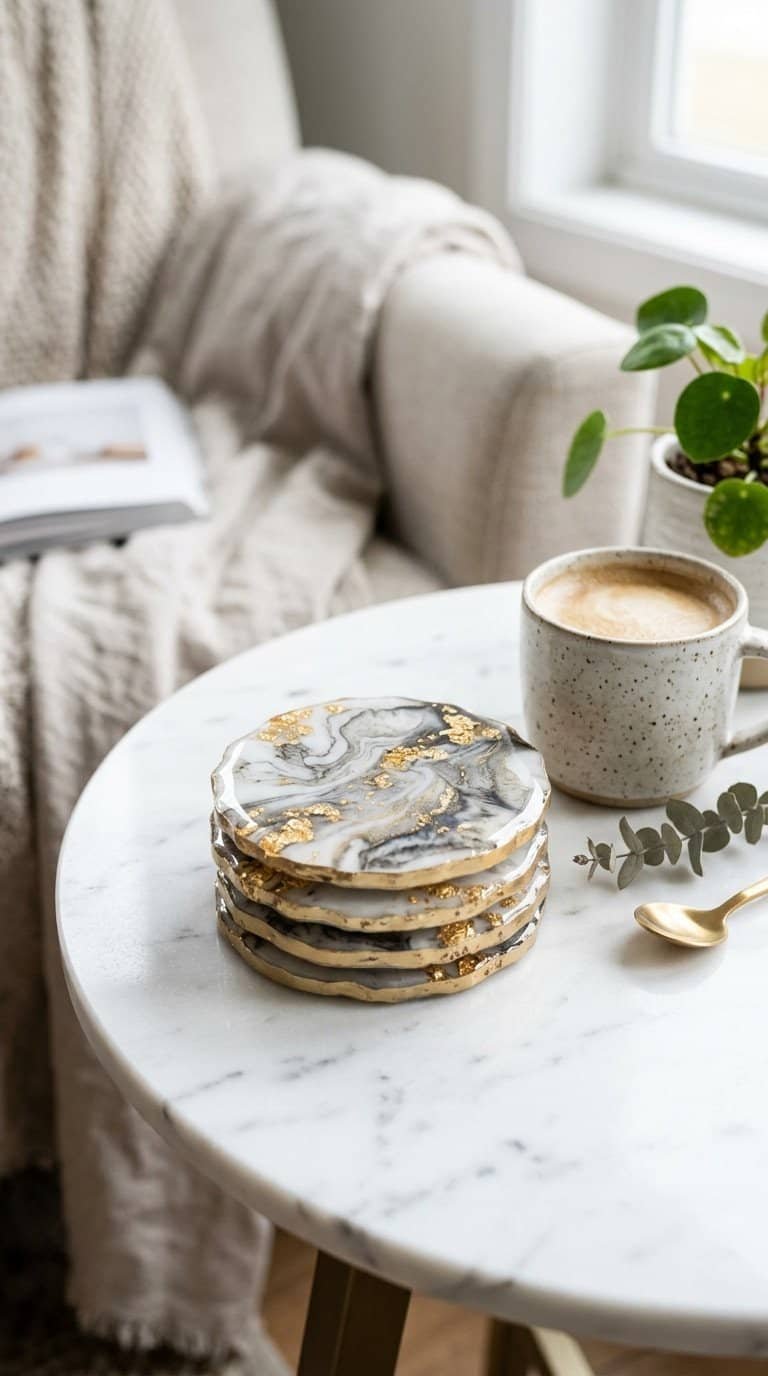
Epoxy resin coasters look like something you would see in a boutique for forty dollars each. Mix the two-part resin, add alcohol ink, gold leaf flakes, or pigment powder, pour into circular silicone molds, and swirl with a toothpick. Let cure for 24 to 48 hours, pop them out, and you have a set that looks completely unique because no two pours are ever the same. The marbled effect is non-negotiable, which is exactly what makes every set feel custom.
Hot tip: Alcohol inks produce the most vivid, swirled effects in resin because they float and move through the liquid rather than sinking or mixing. Black, white, and gold is the most striking combination for a marble look, but dusty rose, cream, and champagne creates a softer, feminine result. Pour the colors separately and drag a toothpick through the layers in one slow continuous motion to get clean marble veining. (The coasters on the coffee table are the first thing people pick up to look at more closely.)
Honest caveat: Work in a well-ventilated area when mixing resin and wear nitrile gloves the entire time. Uncured resin is a skin irritant and the fumes require fresh air. Fully cured resin at 48 to 72 hours is completely inert and safe for use. The protective measures during the pour are simple and the finished coasters are genuinely beautiful, durable objects that last indefinitely with normal use.
Shop the Look
- Beginner Epoxy Resin Kit
- Alcohol Ink Set for Crafts
- Round Silicone Coaster Molds
- Gold Leaf Flakes for Resin
9. Yarn Pom Pom Wreath

A pom pom wreath is one of those crafts that looks like it took tremendous effort but is actually just repetition. Wrap yarn around a pom pom maker or a piece of cardboard, tie, trim, and fluff. Make twenty to thirty pom poms in a tonal color palette and hot glue them onto a wire wreath form. The finished wreath looks textural, expensive, and completely handmade in the best way.
Hot tip: A plastic pom pom maker tool speeds up production dramatically and produces more uniformly round results than the cardboard fork method. Make pom poms in two or three sizes and mix them as you glue them to the wreath form, larger pom poms in the back and smaller ones filling gaps in front. A mix of chunky wool, smooth acrylic, and textured boucle yarn in the same color family adds dimension without looking chaotic. (The wreath on the front door makes the whole entryway feel welcoming.)
Honest caveat: Yarn pom pom wreaths are best displayed indoors or in a covered outdoor space. Extended rain and humidity make the pom poms lose their shape and the colors may bleed or felt. Keep it away from direct sun and moisture and it will hold its shape and color indefinitely. The wreath in the entryway or on a bedroom wall is a conversation starter every single time.
Shop the Look
- Pom Pom Maker Set in Multiple Sizes
- Chunky Wool Yarn in Cream and Neutral
- Wire Wreath Form 12 Inch
- Boucle Yarn for Crafts
10. Painted Glass Bottles

Wine bottles and sauce jars are free canvases that most people throw away. Paint the exterior with chalk paint or spray paint, add a simple design in a contrasting color or leave them solid, and arrange them as a vase grouping or standalone display. A set of three bottles in varying heights painted in the same tonal palette becomes a cohesive, intentional display piece that looks styled rather than recycled.
Here is what nobody tells you: matte spray paint in trending colors like terracotta, sage, and warm cream gives glass bottles a completely elevated finish that reads as ceramic from across the room. The matte surface also photographs beautifully with no glare or reflections. Add a single line of trim paint in a contrasting tone around the bottle neck and the piece looks like a deliberate design choice rather than a craft project. (The bottle grouping on the shelf is a permanent fixture that gets noticed by everyone.)
Honest caveat: Paint the outside of the bottles only and keep the painted exterior dry. Filled with water for fresh flowers, the paint will eventually peel at the waterline. Use the painted bottles for dried botanicals, faux stems, or purely as sculptural display objects. The bottles arranged on a shelf or mantel need nothing inside them to look good. The arrangement as decor is the point.
Shop the Look
- Matte Spray Paint in Terracotta
- Chalk Paint in Sage Green
- Dried Pampas Grass Stems
- Small Foam Brushes for Crafts
11. Wood Slice Clock

A natural wood slice with a clock mechanism inserted through the center is one of those DIY pieces that people genuinely cannot believe you made yourself. Source a wood slice, drill a hole through the center, insert a clock movement kit, add clock hands, and hang it on the wall. The natural grain, bark edge, and organic shape make it look like a piece from a rustic-modern home goods brand that costs ninety dollars retail.
Hot tip: Add gold clock hands rather than standard black ones for a warm, elevated look that works in bohemian, organic modern, and farmhouse interiors alike. You can also lightly sand the face of the wood slice and add a simple watercolor wash in a neutral tone if you want color without losing the natural grain texture. The combination of organic material and minimal gold hardware looks intentional and high-end. (The clock on the wall makes that wall feel complete for the first time.)
Honest caveat: Source your wood slice from a craft store or online rather than cutting fresh wood yourself. Fresh-cut wood has high moisture content that causes cracking and splitting as it dries, which can damage the clock mechanism or change the shape of the piece. Kiln-dried or craft-store wood slices are stable, clean, and ready to use immediately. The finished clock is a functional piece of wall art that draws a comment from literally everyone who notices it.
Shop the Look
- Large Wood Slice for Crafts
- ,DIY Clock Movement Kit
- Gold Clock Hands Replacement
- Wood Burning Tool for Details
12. Fabric-Wrapped Letter Art

A large cardboard or wood letter wrapped in fabric becomes a piece of personalized wall art or shelf decor that looks completely custom. Cut fabric into strips or use whole pieces, apply craft glue to the letter form, and wrap the fabric tightly and evenly around the surface. Secure the ends at the back, let it dry, and display it on a shelf, on a gallery wall, or leaning against a stack of books. The monogram letter is one of the easiest meaningful gifts you can make.
Hot tip: Linen, burlap, and neutral woven fabrics give the letter a clean, modern result that works in almost any home aesthetic. Wrapping fabric at a slight diagonal rather than straight across the letter gives a more polished, even coverage with fewer visible gaps at the curves. Use a brush to apply glue one small section at a time rather than trying to cover the whole surface at once. (The letter on the shelf immediately personalizes the space and makes it feel like a room rather than just a collection of furniture.)
Honest caveat: Use a fabric that is tightly woven without stretch. Knit fabrics and stretchy materials pull away from curves and corners after the glue dries, leaving lifted edges. Woven fabrics with no give stay perfectly adhered at every angle. The finished letter looks like a shop-bought piece and the cost difference between making it and buying something comparable is significant. Display it wherever the room needs a personal touch.
Shop the Look
- Large Cardboard Letters for Decor
- Neutral Linen Fabric by the Yard
- Tacky Fabric Craft Glue
- Fabric Scissors for Crafts
13. Washi Tape Gallery Wall

Washi tape creates the look of a gallery wall without putting a single nail hole in your wall. Use it to create rectangular frames directly on the wall in varying sizes, mix tape widths for visual interest, and arrange them in a grid or organic pattern. Add real framed prints inside some of the tape frames and leave others as pure tape art. The result is a gallery wall effect that costs almost nothing and comes down without a trace.
Hot tip: Metallic gold and black washi tape in two different widths, a thin line and a slightly wider tape, creates a sophisticated gallery wall frame effect that reads as intentional interior design rather than a craft project. Use a level to keep the rectangular frames straight and space them deliberately rather than haphazardly. The arrangement should feel like you curated it with intention even if it came together in an afternoon. (The wall goes from blank to gallery in two hours without a drill.)
Honest caveat: Test the washi tape on a small section of your wall before committing to the full arrangement. Most washi tape removes cleanly from painted walls, but some finishes, particularly flat or matte paints, can lift slightly with aggressive tape removal. Remove it slowly and at a low angle for the cleanest result. The entire gallery arrangement comes down completely cleanly when you are ready for a new look.
Shop the Look
- Gold Metallic Washi Tape
- Black Washi Tape Set
- Small Level Tool for Hanging
- Printable Art Print for Gallery Wall
14. Dried Flower Arrangement

A dried flower arrangement is the lowest-maintenance, longest-lasting piece of decor you can make. Gather pampas grass, wheat stems, dried eucalyptus, and dried wildflowers, arrange them in a vase or wrapped in kraft paper with twine, and display them anywhere in the house. Dried arrangements never need water, never wilt, and look better as they age into softer, more muted tones. They are the rare craft project that genuinely improves over time.
Here is what nobody tells you: a loose, slightly wild arrangement looks far more designed than a tight, symmetrical one when it comes to dried flowers. The organic chaos of stems pointing in different directions at varying heights is the whole point. Do not force the stems into a grid. Let them fall naturally once they are in the vase and then adjust only the obvious outliers. (The arrangement on the dining table makes the whole room feel effortlessly styled.)
Honest caveat: Dried flowers are fragile and brittle, especially after several months. Handle the arrangement gently and avoid placing it anywhere with strong drafts or regular physical contact. Some stems like pampas grass shed at the tips — a very light coat of hairspray over the entire arrangement helps contain the shedding without changing the look. The arrangement on the shelf or table is a long-term fixture that requires no care at all beyond the occasional gentle dusting.
Shop the Look
- Dried Pampas Grass Bundle
- Dried Wheat Stems Natural
- Preserved Eucalyptus Stems
- Kraft Paper for Floral Wrapping
15. Layered Sand Art Bottles

Layered colored sand inside clear glass bottles creates a stunning gradient effect that looks like a sunset captured in a jar. Use craft sand in three to five complementary colors, pour them in slow angled layers using a narrow funnel or folded paper, and seal the top with a cork or cap. The bottles look like art objects and the technique is meditative and almost impossible to mess up. Each one is unique.
Hot tip: Terracotta, blush, cream, dusty rose, and warm white in graduated layers creates the most sophisticated sand art palette for home decor. These earthy tones read as intentional decor rather than a beach souvenir from the 90s. Choose bottles with interesting shapes, apothecary jars, angular bottles, or bud vases and the sand palette does the rest. Arrange three bottles of different heights and widths as a grouping for the most polished display. (The arrangement on the bookshelf looks like something from an organic modern lifestyle shop.)
Honest caveat: Do not overfill the bottles with sand, leave a small gap at the top so the layers are not compressed and the colors remain distinct. Overly compressed sand blurs the layer lines and mixes the colors together. Fill to about 90 percent and seal immediately. The bottles look spectacular on a shelf, on a windowsill in natural light, or as a bookend. They are genuinely one of the most display-worthy easy crafts on this list.
Shop the Look
- Colored Craft Sand Set Neutral Tones
- Clear Glass Apothecary Jars
- Narrow Craft Funnel
- Cork Bottle Stoppers Set
16. Painted Rock Garden Markers

Painted rock garden markers are one of the most satisfying outdoor DIY projects because they are functional, beautiful, and cost essentially nothing. Collect smooth river rocks, paint a base coat in white or cream, let dry, and use a paint pen or fine brush to letter herb or plant names on the surface. Seal with clear outdoor sealer and press them into the garden soil. They look better than any store-bought marker you will find.
Hot tip: A white paint pen over a dark rock base creates a crisp, graphic look, while hand-lettered cursive in black pen over a white rock feels more cottagecore and botanical. Neither requires calligraphy skills. Simple block letters look intentional and clean, and the natural variation in rock size and shape makes the set feel collected rather than manufactured. Add a simple botanical illustration beside each name if you want to go further. (The garden bed with the painted rock markers looks like a styled herb garden rather than a random patch of plants.)
Honest caveat: Use outdoor-rated paint and sealer on anything going in the garden. Indoor craft paint and sealers will peel, chip, and fade within one growing season of regular rain and sun exposure. Two coats of outdoor sealer after the paint is fully dry makes the markers nearly indestructible. The finished markers look beautiful in the garden and last through multiple seasons without touching up.
Shop the Look
- Smooth River Rocks for Painting
- White Outdoor Paint Pen
- Outdoor Acrylic Paint Set
- Outdoor Clear Coat Sealer
17. DIY Linen Table Runner

A plain linen table runner stamped with a simple leaf or geometric print becomes one of the most functional and beautiful things you can add to a dining table. Cut a length of linen fabric, hem the edges with fabric glue or iron-on hem tape, press a potato or foam stamp in fabric paint, and stamp a repeating pattern across the surface. Let dry, heat set with an iron, and it is machine washable from that point forward.
Hot tip: A simple leaf silhouette stamp in warm brown, sage, or terracotta on natural linen creates a result that looks like a Scandinavian artisan made it. The key is spacing the stamps slightly unevenly rather than in a perfect grid, subtle variation makes the pattern look hand-printed rather than manufactured, which is actually the more desirable and expensive-looking result. Add a second smaller stamp between the main stamps for a more layered look. (The table with this runner looks like it belongs in a design-forward home with a real dining room.)
Honest caveat: Heat-set fabric paint is essential for washability. Iron over the stamped design on the reverse side using the fabric setting for at least 30 seconds once the paint is completely dry. Without heat setting, the paint will wash out in the first laundry cycle. After heat setting, the runner handles regular washing beautifully and the print stays crisp. The finished runner on the dining table is one of those details that makes the whole room feel more considered and complete.
Shop the Look
- Natural Linen Fabric by the Yard
- Fabric Paint Set in Earthy Tones
- Foam Leaf Stamp for Crafts
- Iron-On Hem Tape for Fabric
Pick One and Make It This Weekend

Every craft on this list produces something worth keeping, worth giving, or worth displaying permanently in your home. Start with the one that matches the hole in your decor right now, a blank wall, a bare shelf, a plain coffee table that needs one interesting object. The macrame wall hanging for a bedroom wall. The rope bowl for the entry table. The resin coasters for the living room. Any one of them solves a real problem and looks good doing it. If you are ready to explore more creative projects that turn simple materials into something stunning, check out 18 Air Dry Clay Projects You Can Make and Sell This Summer for another approachable medium with completely different results.


Great content! Keep up the good work!