This post contains affiliate links. If you purchase through my links, I earn a small commission at no extra cost to you. Thank you for supporting Room Revival Studio!
School supply shopping is a sport. The list comes home, you spend two hours at Target, and somehow you still land at the wrong color of composition notebook. Here is what nobody warns you about: when kids walk in with personalized supplies, those supplies walk back out again at the end of the day. A Cricut makes personalized the easy option, not the expensive one.
These 14 back-to-school Cricut projects work for every grade level, every machine model, and every kind of kid. Each one uses either heat transfer vinyl for fabric or adhesive vinyl for hard surfaces. Pick the ones fitting your supply list and spend an afternoon making the whole haul feel like it belongs to someone specific.
1. Iron-On Backpack Name Label

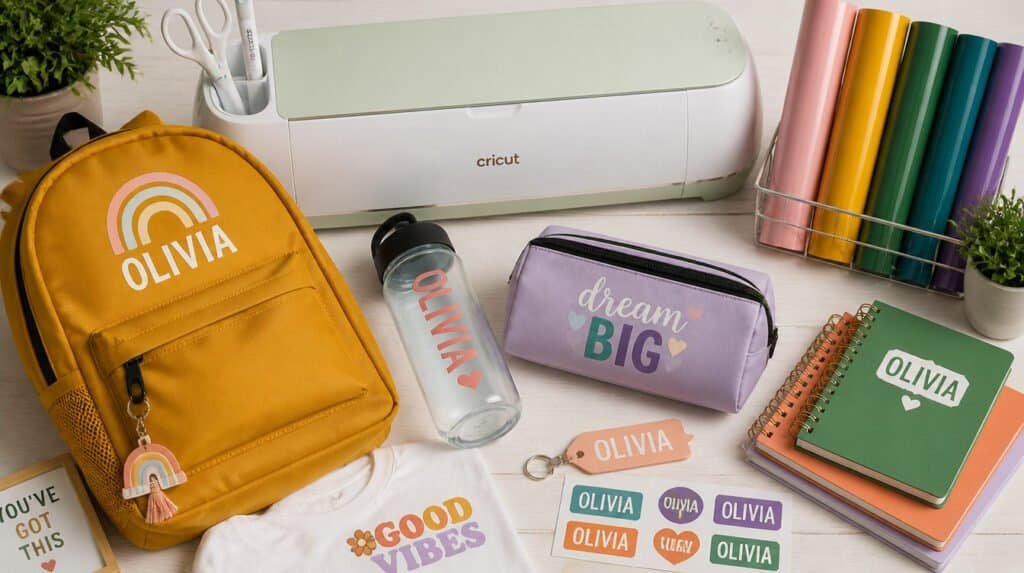
The most stolen item in any elementary school is a backpack without a name on it. A Cricut iron-on name label fixes it and gives kids something to be proud of carrying. Cut the name in bold heat transfer vinyl, let the kid choose the color, press it onto the front pocket with an EasyPress, and the backpack now belongs to someone specific.
Hot tip: use a thick, blocky font for backpack labels. Thin fonts with fine detail lines lift at the edges after a few washes. Bold and chunky survives the whole school year. One honest caveat: always test your press temperature on a scrap piece of the same fabric first. Nylon bags need lower heat than the standard setting recommends, and there is no fixing a scorched strap.
The label lasts. The backpack comes home. Worth every minute of prep.
Shop the Look
- Siser EasyWeed Heat Transfer Vinyl Assorted Pack
- Cricut EasyPress Mini
- Cricut EasyPress Mat
- Cricut Weeding Tools Set
2. Custom Lunch Box Decal

A vinyl name decal on a hard-sided lunch box is a two-minute Cricut project with a year-long payoff. Cut the name in permanent adhesive vinyl, apply it to the front or lid, burnish it down with a scraper, and peel the transfer tape. The decal stays put through daily hand washing and 180 days of being opened and shut in a lunch line.
The trick here: use Oracal 651 or any permanent outdoor-grade adhesive vinyl for lunch boxes. Standard removable vinyl lifts at the corners after a few weeks of heavy use. Permanent vinyl costs the same and holds through the whole school year. (Some lessons get learned the hard way in October. Consider this a heads-up.)
A named lunch box finds its way back from the cafeteria. A plain one takes a different route.
Shop the Look
- Oracal 651 Permanent Adhesive Vinyl Assorted Pack
- Transfer Tape for Cricut Vinyl
- Cricut Scraper Smoothing Tool
- Kids Insulated Hard-Sided Lunch Box
3. Personalized Water Bottle Vinyl

A stainless steel water bottle with a kid’s name on it comes home from school at a rate a plain bottle never achieves. Adhesive vinyl in a glitter or holographic finish makes the bottle feel special enough for kids to care about carrying it. Cut the name, weed it, apply to the bottle, and smooth it down firmly before peeling the liner.
Hot tip: apply the vinyl in a slight upward curve rather than perfectly straight. Names on rounded bottle surfaces sit better visually when they follow the slight arc of where the eye expects to read them. One honest caveat: run the vinyl through a burnishing tool or a coin wrapped in a cloth before peeling the carrier sheet. Adhesive vinyl on a curved surface lifts easily when peeled too fast without proper pressure.
Named water bottles complete the school day and make it home. The math on hydration improves immediately.
Shop the Look
- Holographic Adhesive Vinyl for Cricut
- Glitter Permanent Vinyl Cricut Pack
- Kids Stainless Steel Water Bottle School
- Vinyl Burnisher Scraper Tool
4. DIY Pencil Case Iron-On Design

A plain zippered pencil case gets a full personality upgrade with a single Cricut iron-on design. Cut a name, a fun phrase like “Pencils Out,” or a small graphic in heat transfer vinyl and press it onto the front panel. Glitter HTV on a solid-colored canvas case looks like something from a boutique stationery shop without the boutique price tag.
One honest caveat: not every pencil case fabric works with heat transfer vinyl equally. Canvas and polyester blends press beautifully. Thin nylon cases need a low-heat press and a protective layer in between. Test a small scrap of HTV on an inside seam before pressing the front panel. It adds 30 seconds to the project and saves the whole thing from a press disaster.
The finished pencil case goes to school and earns comments from the teacher. Kids notice these things more than anyone admits.
Shop the Look
- Glitter Heat Transfer Vinyl for Cricut
- Canvas Pencil Case Zipper Blank
- Teflon Sheet for Vinyl Pressing
- Cricut BrightPad for Weeding
5. First Day of School Shirt

A first-day-of-school shirt with the grade level or school year ironed on is a tradition worth starting. Cut the design in bold heat transfer vinyl, press it onto a plain white or neutral tee, and you have a shirt worn once for the photos and kept forever. Add the name, the year, or a clean “3rd Grade” in a font the kid picks themselves.
Hot tip: layer two colors of HTV for extra impact. A white base layer with a bright color on top gives a thick, dimensional look with no extra equipment needed. Press the bottom layer first, let it cool fully, then press the second layer on top. Start simple on the first layered press and build confidence from there. One honest caveat: pre-wash the shirt before pressing. Fabric softener residue keeps the vinyl from bonding correctly and the design peels within a week.
The first-day photos come out better when there is something worth photographing. This shirt does the work.
Shop the Look
- Plain White Kids T-Shirt Pack
- Siser EasyWeed Electric HTV
- Cricut EasyPress 2 10×10
- Cricut Explore Air 2 Machine
6. Custom Library Book Tote

A canvas tote bag with a vinyl book design is the library bag kids want to be seen carrying. Cut a stacked books graphic with the child’s name below it, press or apply it to a natural canvas tote, and the bag has a finished look holding up all year. Kids at this age care about their stuff looking good far more than most adults expect them to.
The trick here: a vertical stacked-books silhouette reads clearly from across the room. Horizontal or scattered designs get lost on the bag’s broad surface. Keep the graphic centered and the name below it in a clean sans-serif font. Simple and bold reads better on a tote bag every time. One honest caveat: natural canvas takes iron-on vinyl beautifully but goes through a dedicated press cycle. Let it heat fully before laying the design down for best adhesion.
Library books come home in the tote. The tote comes home too. Progress in the right direction.
Shop the Look
- Natural Canvas Tote Bags Blank Bulk Pack
- Navy Heat Transfer Vinyl Siser
- Cricut Explore Air 3 Machine
- HTV Vinyl Sampler Pack for Cricut
7. Vinyl Binder Cover

A binder cover with a vinyl design goes from forgettable to eye-catching in one Cricut session. Cut geometric shapes, a name, a monogram, or a color-block pattern in adhesive vinyl, apply it to the front panel of a clear-front binder, and the design shows through the plastic cover. No laminating required. No mess. The whole project finishes while the glue dries on someone else’s binder decoration.
Hot tip: insert the vinyl design into the clear-front pocket of the binder instead of applying it directly to the binder surface. The design swaps out for next semester without any peeling or residue. Reusable and fully customizable. One honest caveat: dark-colored binders hide vinyl designs almost completely. Use a clear-front, white, or light-colored binder for the design to show with full impact.
A binder with a vinyl cover is the one organized student at the table who has their color-coded system figured out from day one. Aspire to be them.
Shop the Look
- Clear Front 3-Ring Binder 1 Inch
- Cricut Adhesive Vinyl Sampler Pack
- Cricut Maker 3 Machine
- Cricut Transfer Tape Roll
8. Cricut Locker Labels

Locker labels in adhesive vinyl keep middle school organizational chaos to a minimum. Cut labels for Books, Binders, Gym Stuff, and whatever specific categories the student needs. Apply them to magnetic bins or directly to the locker shelf surfaces and the system runs itself. Color-coded vinyl by subject makes the whole thing visual and fast to use.
The trick here: magnetic bins with vinyl labels are the right move for metal lockers. Adhesive vinyl applied directly to painted locker walls sometimes lifts in the metal groove gaps. A label on a magnetic bin stays put, relocates when needed, and leaves no trace at the end of the year. (Getting through a spring locker cleanout and finding clean walls underneath is its own kind of satisfying.)
A labeled locker means the right thing goes in the right spot most of the time. For middle schoolers, most of the time is a win.
Shop the Look
- Magnetic Locker Bins Organizer Set
- Colorful Adhesive Vinyl Pack for Cricut
- Magnetic Locker Shelf Organizer
- Cricut Joy Machine for Small Vinyl Projects
9. Back-to-School Grade Level Hoodie

A grade-level hoodie is one of those back-to-school Cricut projects kids request by name once they see one. Iron “4th Grade,” “Middle School,” or the school year onto the chest of a plain hoodie in bold iron-on vinyl and the hoodie becomes part of the school year story. It photographs well on the first day and gets worn every Friday after.
One honest caveat: hoodies with a thick interior fleece need a firm press and full dwell time for proper adhesion. The texture absorbs heat unevenly. Press for the full recommended time, let it cool completely before peeling the carrier sheet, and do a test pull on one corner before removing everything. A second press fixes most adhesion issues before they become permanent ones.
The hoodie becomes the one they want to wear on spirit day, field trips, and honestly most Mondays. That is the goal.
Shop the Look
- Kids Plain Hoodie Blank Pack
- Siser EasyWeed White HTV Roll
- Cricut EasyPress 2 12×10
- Cricut StandardGrip Cutting Mat
10. Personalized Pencil Pouch

A zippered pencil pouch with an iron-on appliqué steps up from a plain pencil case without requiring embroidery skills or a sewing machine. Cut a small rainbow, star cluster, or simple graphic in heat transfer vinyl and press it onto the front of any fabric pouch. Kids love having something on their supplies other kids in the class do not have.
Hot tip: glow-in-the-dark heat transfer vinyl exists and is exactly as popular with kids as you would expect. It looks like standard light-colored vinyl in regular lighting and glows under UV or in the dark. Completely unnecessary. Completely worth it. One honest caveat: glow-in-the-dark HTV needs a slightly lower press temperature than standard HTV. Check the brand-specific instructions before pressing to avoid scorching the finish.
The pouch becomes their favorite thing in the backpack for at least the first two weeks. After that it is the pencils’ job to stay interesting.
Shop the Look
- Glow in the Dark Heat Transfer Vinyl
- Zippered Canvas Pencil Pouch Blank
- Cricut Vinyl Starter Kit
- Rainbow HTV Vinyl Bundle for Cricut
11. Name Tag Keychain

A name tag keychain clipped to the backpack zipper pull is a Cricut project finishing in under 15 minutes from cut to done. Use acrylic blanks as the base, cut the name in adhesive vinyl, apply it to the surface, and seal with a coat of Mod Podge for durability. Clip it on with a lobster clasp or a simple keyring and it is ready for the first day.
The trick here: layered vinyl on a clear acrylic blank gives a professional-looking result without extra equipment. The clear base lets colored vinyl show through from both sides, making a two-sided tag from one piece of material. Put the name on the front and a phone number or address on the back. (Elementary-aged kids and backpacks have a complicated relationship. A phone number on the tag makes the reunion process faster for everyone.)
Functional, personalized, and done before the school orientation night ends. A solid combo.
Shop the Look
- Clear Acrylic Keychain Blanks Bulk Pack
- Lobster Clasp Key Rings Bulk Craft Pack
- Mod Podge Hard Coat Sealer
- Permanent Vinyl Assorted Colors for Cricut
12. Custom Notebook and Folder Covers

Matching notebook and folder covers in coordinating vinyl patterns turn a five-dollar school supply set into something looking intentional and put together. Cut geometric shapes, a color-block design, or a repeating pattern in adhesive vinyl and apply it across composition notebooks, three-ring folders, and spiral notebooks in the same color palette for a cohesive set.
Hot tip: color-code by subject with matching vinyl across all notebooks and folders. Math is blue. English is yellow. Science is green. When everything looks deliberate, finding the right binder in a locker takes two seconds instead of twenty. One honest caveat: composition notebook covers have a slightly waxy surface coating. Wipe each one down with rubbing alcohol and let it dry fully before applying vinyl for adhesion worth counting on.
The finished set looks like a back-to-school haul worth photographing. The kid made it in one afternoon. Even better.
Shop the Look
- Composition Notebooks Bulk School Pack
- Cricut Smart Vinyl Permanent Rolls
- Isopropyl Alcohol Wipes for Craft Prep
- Cricut Scraper and Spatula Tool Set
13. Teacher Appreciation Gift Tote

A back-to-school teacher gift tote takes ten minutes to press and makes an impression on the first day. Iron the teacher’s name or a simple phrase like “Best Teacher” onto a canvas tote in bold vinyl, fill it with pens, sticky notes, a snack, and a gift card, and drop it off at drop-off. Teachers remember the families arriving with something kind on day one.
The trick here: a clean, large-font teacher name feels more personal than a generic phrase. “Ms. Williams” in a bold serif font beats “World’s Greatest Teacher” every time. Teachers are people, not a category. Use the name, confirm the spelling, and make it count. One honest caveat: confirm the spelling of the teacher’s name before pressing. Adhesive vinyl is not forgiving and the school office line at 11pm the night before school starts goes nowhere.
First-day impressions are real, and a thoughtful tote bag made with your own Cricut starts the year on the right note.
Shop the Look
- Natural Canvas Tote Bag 12oz Blank
- Black Heat Transfer Vinyl Roll Siser
- Teacher Gift Tote Filler Set
- Cricut Access Premium Design Library
14. First Week Memory Photo Print

A Cricut-cut memory print frame turns first-week photos into something worth displaying all year. Cut a decorative mat from cardstock in a school theme with pencils, stars, and ruler designs along the border. Frame it in a standard 8×10 frame and slide the first-day photo behind it. The display goes up in September and holds its place on the wall through June.
Hot tip: free SVG files sized for standard photo frames exist across every Cricut design community and many are styled specifically for school memory mats. Load one into Design Space, cut on cardstock, and frame it in under 20 minutes. One honest caveat: photos printed at home on standard copy paper look flat behind a beautiful Cricut mat. Order photo prints from an online service or use a photo printer for a result worth the frame it goes into.
The framed print on the wall becomes the thing guests notice and ask about every time. Worth every step of the process.
Shop the Look
- Cricut Cardstock Heavyweight Assorted Pack
- 8×10 White Picture Frame
- Cricut Fine-Point Blade Replacement
- Cricut LightGrip Cutting Mat 12×12
Load the Machine. Make the Morning.

Back-to-school Cricut projects are one of the easiest ways to personalize school supplies while making the new school year feel extra special. Whether you are creating custom backpack tags, personalized notebooks, teacher gifts, or lunch box accessories, each project is beginner-friendly and can be finished in a single crafting session. Pick your favorite design, load your Cricut, and create something your child will be excited to take to school.
Looking for more creative Cricut inspiration? Check out 12 Cricut Summer Projects That Sell at Craft Fairs for even more fun DIY ideas you can create throughout the year.