Affiliate Disclosure: This post may contain affiliate links. As an Amazon Associate, Room Revival Studio earns from qualifying purchases at no additional cost to you.
If you’ve ever spent money on summer decorations only to pack them away a few weeks later, this is your sign to try something different. These DIY summer crafts are not only fun to make, but they also double as beautiful decor you can display throughout the season. From colorful porch accents to charming indoor displays, these projects help you personalize your space without blowing your budget. Whether you’re crafting with kids, friends, or enjoying a creative afternoon on your own, these summer crafts decorations will make your home feel brighter, more inviting, and full of seasonal personality.
1. Painted Terra Cotta Pot Herb Display

This is one of those DIY summer crafts that looks far more expensive than it actually is. A collection of painted terra cotta pots instantly adds color, texture, and life to a porch, patio, kitchen windowsill, or outdoor dining space. The best part is that these pots serve double duty as both decorative summer crafts decor and functional herb planters. You can coordinate the colors with your existing summer decorations or mix bright shades for a cheerful seasonal display. This project is beginner-friendly, budget-friendly, and easy to customize for any decorating style.
Step-by-Step Instructions
- Gather 3–5 terra cotta pots, acrylic paint, paint brushes, clear outdoor sealer, potting soil, and herb plants.
- Wipe each terra cotta pot clean with a damp cloth and allow it to dry completely.
- Paint the exterior of each pot using your chosen summer color palette. Apply two coats for full coverage.
- Let the paint dry completely before adding decorative patterns, stripes, or simple designs.
- Spray or brush on a clear outdoor sealer to help protect the finish from sun and moisture.
- Fill each pot with potting soil and plant your favorite herbs.
- Arrange the pots together on a patio table, porch step, windowsill, or decorative tray for a finished display.
Shop the Look
2. Coastal Rope Wrapped Vases

If you’re looking for DIY summer decorations that instantly make a room feel relaxed and beachy, rope-wrapped vases are hard to beat. The natural texture of jute rope adds warmth and a coastal vibe that works beautifully with summer crafts decor. These vases look stunning on dining tables, entryway consoles, bathroom shelves, or outdoor entertaining spaces. Fill them with faux greenery, dried grasses, or fresh summer blooms for an effortless seasonal display. Best of all, you can make them in less than an hour using inexpensive supplies.
Step-by-Step Instructions
- Gather a glass vase, jute rope, hot glue gun, glue sticks, and faux greenery or flowers.
- Clean and dry the glass vase thoroughly so the rope adheres properly.
- Apply a small line of hot glue near the base of the vase and begin wrapping the rope tightly around it.
- Continue gluing and wrapping until the entire vase is covered or stop partway up for a mixed-material look.
- Trim the rope and secure the end with a final dab of hot glue.
- Allow the glue to cool completely before handling.
- Fill the vase with faux greenery, pampas grass, eucalyptus stems, or fresh flowers.
- Display the finished vase on a tray, shelf, dining table, or porch table as part of your summer decorations.
Shop the Look
3. DIY Summer Lanterns

Nothing makes an outdoor space feel more inviting than the warm glow of lanterns on a summer evening. These DIY summer crafts are simple enough for beginners but look beautiful scattered across a patio, deck, porch, or backyard table. Using mason jars and LED candles creates a safe, budget-friendly decoration that can be customized with any color scheme. They work just as well for everyday summer decorations as they do for barbecues, parties, and outdoor gatherings. Group several together for a cozy, Pinterest-worthy display.
Step-by-Step Instructions
- Gather mason jars, LED tea lights, twine, decorative stones, and optional acrylic paint or ribbon.
- Wash and dry the jars thoroughly before decorating.
- Wrap twine around the neck of each jar and secure it with a knot or small amount of glue.
- Add decorative ribbon, paint details, or seasonal embellishments if desired.
- Place a layer of decorative stones or pebbles inside each jar.
- Set an LED tea light on top of the stones.
- Arrange the lanterns in groups of varying heights on a patio table, porch steps, or outdoor dining area.
- Turn on the candles at dusk to create a warm summer ambiance.
Shop the Look
4. Seashell Shadow Box Art

If you’ve collected seashells from beach trips over the years, this project is a beautiful way to display them instead of storing them away in a drawer. Seashell shadow boxes bring a coastal feel to your summer crafts decor while adding a personal touch to your walls or shelves. The finished piece looks like something you’d find in a boutique beach house and can easily be customized with different shell sizes, colors, and layouts. It’s one of those DIY summer decorations that feels meaningful because it showcases memories while enhancing your home. Display it in a living room, bathroom, entryway, or vacation-inspired guest room.
Step-by-Step Instructions
- Gather a shadow box frame, seashells, hot glue gun, decorative sand, and cardstock or scrapbook paper for the background.
- Clean the shells thoroughly and allow them to dry completely.
- Remove the backing from the shadow box and add your chosen background paper.
- Arrange the shells on the background until you’re happy with the design.
- Add a small amount of decorative sand to the bottom if desired for a beach-inspired look.
- Glue each shell into place using a hot glue gun.
- Allow the glue to dry completely before reassembling the frame.
- Display the finished shadow box on a shelf or hang it on the wall as part of your summer decorations.
Shop the Look
5. Colorful Pool Noodle Wreath

Don’t underestimate the humble pool noodle. With a little creativity, it can become a bright and cheerful summer wreath that looks perfect on a front door, porch wall, or backyard fence. This is one of the most budget-friendly DIY summer crafts on the list and it’s easy enough for older kids and beginners to make. Add faux flowers, ribbon, or greenery to match your outdoor decor style. The finished wreath brings a fun pop of color and instantly makes your summer decorations feel more welcoming.
Step-by-Step Instructions
- Gather a pool noodle, duct tape, floral wire, ribbon, faux flowers, and wire cutters.
- Bend the pool noodle into a circle and secure the ends together using duct tape.
- Wrap ribbon around the entire wreath form, securing it with small amounts of hot glue as needed.
- Create small floral bundles using faux flowers and greenery.
- Attach the floral bundles to the wreath using floral wire.
- Continue filling sections of the wreath until you achieve your desired look.
- Add a hanging loop to the back of the wreath.
- Hang the finished wreath on a front door, porch wall, or outdoor entertaining area.
Shop the Look
6. Painted Rock Garden Markers

These painted rock garden markers are one of the easiest DIY summer crafts you can make, and they add both personality and function to your outdoor spaces. They’re perfect for herb gardens, flower beds, vegetable gardens, or even potted plants on a patio. The colorful designs bring a playful touch to your summer decorations while helping you keep track of what you’ve planted. This project is family-friendly, budget-friendly, and a great way to spend an afternoon outdoors. Plus, the finished markers can last for multiple seasons when properly sealed.
Step-by-Step Instructions
- Gather smooth river rocks, acrylic paint, paint brushes, paint pens, and an outdoor sealer.
- Wash the rocks thoroughly and allow them to dry completely.
- Paint the rocks with a solid base color and let them dry.
- Use paint pens or small brushes to write plant names or create decorative summer designs.
- Add details such as flowers, leaves, bees, or fruit illustrations if desired.
- Allow all paint to dry completely before applying a clear outdoor sealer.
- Let the sealer cure according to the manufacturer’s instructions.
- Place the finished markers in garden beds, planters, or herb pots throughout your outdoor space.
Shop the Look
7. Lemon-Themed Table Centerpiece
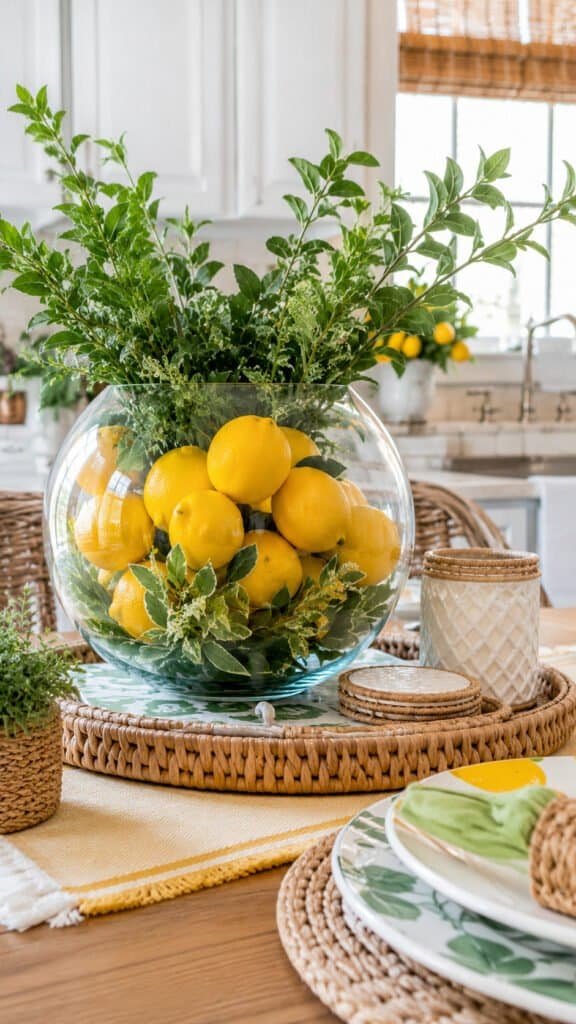
Nothing says summer quite like bright yellow lemons. This cheerful centerpiece instantly adds color to a dining table, kitchen island, coffee table, or outdoor entertaining space without spending a fortune. The combination of lemons and greenery creates a fresh, clean look that works with farmhouse, coastal, modern, and cottage-style decor. It’s one of those DIY summer decorations that looks professionally styled but takes only minutes to put together. Use real or faux lemons depending on how long you’d like the display to last.
Step-by-Step Instructions
- Gather a large glass bowl or vase, faux or fresh lemons, faux greenery, and a decorative tray.
- Clean the container thoroughly and place it in the center of your tray.
- Fill the container with lemons until it appears full and balanced.
- Tuck greenery around the lemons to soften the arrangement and add texture.
- Adjust the placement of the lemons and greenery until the display looks full from every angle.
- Add small decorative accents if desired, such as candles or woven coasters.
- Place the completed centerpiece on a dining table, kitchen island, or outdoor table.
- Refresh fresh lemons as needed throughout the season.
Shop the Look
8. DIY Driftwood Wall Hanging

Natural textures always make summer decorating feel effortless, and a driftwood wall hanging is a perfect example. This project brings a relaxed coastal vibe to any room while adding visual interest through texture and movement. Whether you hang it in a living room, covered porch, bedroom, or entryway, it instantly feels like a piece of boutique beach-house decor. It’s one of those DIY summer crafts that looks artistic without requiring advanced crafting skills. The neutral tones also blend beautifully with almost any decorating style.
Step-by-Step Instructions
- Gather several pieces of driftwood, cotton cord, scissors, wood beads, and hanging hardware.
- Clean the driftwood and allow it to dry completely before assembling.
- Arrange the driftwood pieces from largest to smallest until you find a layout you like.
- Cut lengths of cotton cord and tie them securely around each driftwood piece.
- Thread decorative wood beads onto selected cords for added texture and detail.
- Attach all sections to a larger piece of driftwood or a sturdy hanging rod.
- Secure a hanging loop to the top of the project.
- Display the finished wall hanging indoors or on a covered porch as part of your summer crafts decor.
Shop the Look
9. Decorative Wind Chime From Recycled Materials

If you love giving old items a second life, this decorative wind chime is one of the most creative DIY summer crafts you can make. Using recycled materials keeps costs low while creating a unique piece of outdoor decor that no one else will have. The gentle sound adds a relaxing touch to patios, porches, gardens, and outdoor seating areas. You can customize the colors and materials to match your existing summer decorations or create a bright, playful design. It’s a fun project for both adults and older kids who enjoy hands-on crafting.
Step-by-Step Instructions
- Gather recycled metal lids, old keys, beads, fishing line, a metal ring, and a drill with a small bit.
- Clean all recycled materials thoroughly before assembling.
- Carefully drill small holes in any pieces that need hanging points.
- Cut several lengths of fishing line in varying sizes.
- Thread beads onto the fishing line and secure them with knots.
- Attach recycled materials to the ends of the lines to create hanging strands.
- Tie all strands evenly around the metal ring.
- Add a hanging loop to the top and display the wind chime on a porch, tree branch, or pergola.
Shop the Look
10. Pressed Flower Picture Frames

Pressed flowers are a beautiful way to preserve summer blooms and turn them into meaningful decor. These frames add a soft, botanical touch to shelves, nightstands, gallery walls, or entryway tables. The delicate colors and natural textures make them feel both timeless and seasonal. This is one of those DIY summer decorations that looks high-end but costs very little to create. They also make thoughtful handmade gifts for friends, family, or teachers.
Step-by-Step Instructions
- Gather wooden or glass picture frames, pressed flowers, craft glue, tweezers, and a clear sealant.
- Remove the backing from the frame and clean the glass thoroughly.
- Arrange the pressed flowers on the glass or frame insert until you’re happy with the design.
- Use tweezers to carefully position smaller flowers and leaves.
- Apply small dots of craft glue to secure each flower in place.
- Allow the glue to dry completely before moving the frame.
- Apply a light coat of clear sealant if desired to help preserve the flowers.
- Reassemble the frame and display it on a shelf, mantel, or wall as part of your summer crafts decor.
Shop the Look
11. Patriotic Mason Jar Luminaries

These patriotic mason jar luminaries are perfect for summer holidays, backyard barbecues, and outdoor entertaining. The red, white, and blue color palette feels festive without requiring a lot of supplies or crafting experience. During the day, they serve as decorative accents, and at night they create a warm glow that makes outdoor spaces feel inviting. They’re budget-friendly, easy to customize, and can be reused year after year. Display them on porch steps, outdoor tables, or along a walkway for a simple seasonal statement.
Step-by-Step Instructions
- Gather mason jars, red, white, and blue acrylic paint, paint brushes, painter’s tape, LED tea lights, and ribbon.
- Clean and dry the jars thoroughly before decorating.
- Use painter’s tape to create stripes, stars, or other patriotic designs on the jars.
- Apply paint and allow it to dry completely before removing the tape.
- Add additional details or embellishments if desired.
- Tie ribbon around the neck of each jar for a finished look.
- Place an LED tea light inside each jar.
- Arrange the luminaries on a porch, patio table, or outdoor entertaining space.
Shop the Look
12. Fabric Scrap Summer Banner

If you have leftover fabric from previous projects, this summer banner is a great way to turn those scraps into colorful decor. The mix of patterns, textures, and colors creates a casual, festive look that’s perfect for patios, porches, playrooms, craft rooms, or summer parties. Since there’s no sewing required, it’s beginner-friendly and easy to customize for any color palette. This project adds movement and visual interest while helping you use materials you may already have on hand. It’s one of the easiest DIY summer crafts for creating a big decorating impact on a small budget.
Step-by-Step Instructions
- Gather fabric scraps, jute twine, fabric scissors, decorative tassels, and a measuring tape.
- Cut fabric into strips approximately 1 to 2 inches wide and 10 to 15 inches long.
- Lay out the fabric strips to create a balanced mix of colors and patterns.
- Tie each strip around the twine using a simple knot.
- Continue adding strips until the banner reaches your desired fullness.
- Add decorative tassels to the ends of the banner if desired.
- Trim any uneven fabric pieces for a polished look.
- Hang the banner across a mantel, porch railing, patio pergola, or party backdrop.
Shop the Look
13. DIY Succulent Teacup Planters

These charming teacup planters bring a touch of whimsy to your summer decorations while giving old teacups a new purpose. They’re perfect for coffee tables, kitchen shelves, windowsills, and outdoor dining tables. The combination of vintage-inspired containers and modern succulents creates a look that feels both collected and stylish. Since succulents require minimal care, these planters are as practical as they are pretty. They also make thoughtful handmade gifts for summer birthdays, housewarmings, or garden lovers.
Step-by-Step Instructions
- Gather vintage teacups, small succulents, cactus or succulent potting mix, decorative pebbles, and a spoon.
- Add a thin layer of decorative pebbles to the bottom of each teacup.
- Fill the teacup about two-thirds full with succulent potting mix.
- Carefully remove the succulent from its nursery container and loosen the roots slightly.
- Place the succulent in the center of the teacup and add additional soil around the base.
- Gently press the soil into place to secure the plant.
- Add a few decorative pebbles on top of the soil for a finished look.
- Display the planters on a tray, shelf, windowsill, or outdoor table where they can receive bright indirect light.
Shop the Look
14. Wooden Bead Garland With Summer Tassels

Wooden bead garlands have become a decorating staple because they work with almost every design style, from coastal and farmhouse to modern and boho. This summer version uses bright colors and playful tassels to bring a seasonal twist to a classic decor piece. Drape it across a mantel, style it on a decorative tray, or layer it over coffee table books for an effortless designer look. It’s one of the easiest DIY summer crafts to personalize because you can paint the beads in any color combination you love. The finished piece adds texture and charm without overwhelming your space.
Step-by-Step Instructions
- Gather unfinished wooden beads, cotton string, craft paint, paint brushes, yarn, and scissors.
- Paint selected wooden beads in summer-inspired colors and allow them to dry completely.
- Cut a length of cotton string long enough for your desired garland size.
- Thread the beads onto the string, alternating painted and natural wood beads.
- Tie a secure knot at both ends of the garland.
- Create tassels using yarn and trim them to your preferred length.
- Attach one tassel to each end of the garland.
- Style the finished garland on shelves, trays, mantels, or coffee tables as part of your summer crafts decor.
Shop the Look
15. Painted Watering Can Flower Display

A painted watering can flower display is one of those DIY summer decorations that instantly makes a porch, patio, or garden corner feel more welcoming. Thrift stores are full of inexpensive watering cans that can be transformed into colorful seasonal decor with just a little paint. Whether you choose bright summer hues, soft pastels, or classic neutrals, the finished piece becomes a charming focal point. Fill it with faux flowers for a long-lasting display or fresh blooms for a garden-inspired look. This project is simple enough for beginners but delivers a high-end decorative result.
Step-by-Step Instructions
- Gather a metal watering can, chalk paint or outdoor paint, paint brushes, sandpaper, clear sealer, and faux or fresh flowers.
- Clean the watering can thoroughly and allow it to dry completely.
- Lightly sand any rough spots or peeling paint on the surface.
- Apply two coats of paint, allowing each coat to dry before adding the next.
- Distress the edges lightly with sandpaper if you prefer a vintage look.
- Apply a clear sealer to help protect the finish.
- Allow the watering can to dry completely before styling.
- Fill it with fresh or faux flowers and display it on a porch, patio table, entryway, or garden bench.
Shop the Look
16. Outdoor Pallet Welcome Sign

An outdoor pallet welcome sign is a simple project that makes a big impact on your summer curb appeal. Whether placed beside a front door, on a porch, or near a garden entrance, it creates a warm and inviting first impression. This DIY summer craft combines rustic charm with seasonal style and can be customized with colors, sayings, or designs that match your home. It’s a budget-friendly way to decorate using reclaimed materials while adding personality to your outdoor space. Once finished, it becomes a statement piece you’ll look forward to displaying every summer.
Step-by-Step Instructions
- Gather pallet boards, sandpaper, outdoor paint, paint brushes, stencils, and a clear outdoor sealer.
- Sand the pallet wood to remove rough edges and splinters.
- Wipe away dust with a clean cloth before painting.
- Apply a base coat of outdoor paint and allow it to dry completely.
- Position your stencil and carefully paint your chosen word or summer design.
- Allow all paint to dry before adding any decorative accents or details.
- Apply a clear outdoor sealer to protect the sign from weather and sun exposure.
- Lean the finished sign against a porch wall or secure it near your front entry for a welcoming summer display.
Shop the Look

The best DIY summer crafts are the ones that continue to bring joy long after the glue dries and the paint dries. These projects prove that summer crafts decorations can be both beautiful and functional, helping you personalize your home, porch, patio, and garden without spending a fortune. Whether you’re drawn to coastal-inspired decor, colorful outdoor accents, or nature-inspired displays, there’s a project here for every style and skill level. Even better, many of these DIY summer decorations can be refreshed and reused year after year, making them a smart addition to your seasonal decorating routine.
If you love affordable decorating ideas, be sure to check out 18 Summer Crafts for Preschool and Kindergarten Kids for even more creative ways to transform your space on a budget.