Affiliate Disclosure – This post may contain affiliate links. If you make a purchase through one of these links, I may earn a small commission at no additional cost to you.
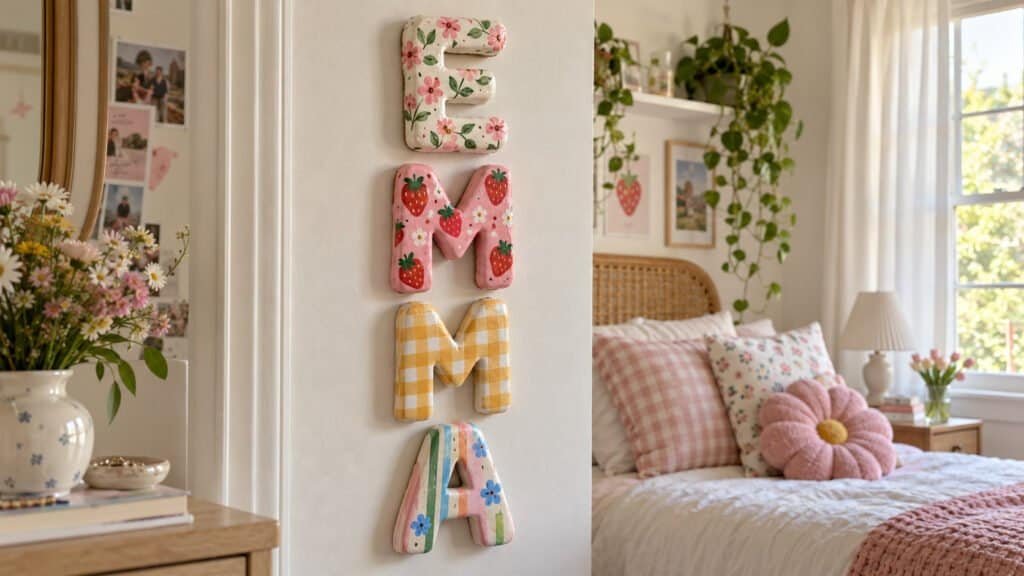
Personalized wall decor always feels a little more special, especially when you can make it completely from scratch. These chunky 3D bubble letters turn a simple name into colorful DIY wall decor that can be customized with florals, gingham, fruit, stripes, hearts, or whatever patterns fit your space. Instead of connecting the letters into a traditional hanging, we’re creating individual personalized wall letters that can be arranged vertically or horizontally and mounted directly to the wall. The result is a playful custom name sign that works beautifully in bedrooms, nurseries, playrooms, dorm rooms, and creative spaces.
1. What You’ll Need to Make Personalized Clay Letters

You don’t need a huge collection of specialty tools for this project. The most important thing is choosing an air-dry clay that can hold a chunky shape without requiring a kiln. Since the finished bubble letters will be mounted directly to the wall, keeping them reasonably lightweight is also important.
- Air-Dry Clay
- Acrylic Craft Paint Set
- Small Detail Paint Brushes
- Clay Sculpting Tools
- Small Clay Rolling Pin
- Silicone Craft Mat
- Fine-Grit Sandpaper
- Clear Matte Craft Sealer
- Double-Sided Mounting Tape
- Removable Adhesive Strips
Supplies
Before you begin shaping anything, decide which name or word you want to create. That will tell you exactly how many clay letters you need and make it easier to estimate how much clay to prepare.
For the painted designs, choose a small color palette before you start. You can give every letter a completely different pattern while repeating a few colors throughout the name. That repetition is what helps florals, fruit, checks, stripes, dots, and other playful designs look intentional together instead of mismatched.
2. Choose the Name and Plan Your 3D Bubble Letters

Before shaping the clay, decide how you want your finished custom name sign to look on the wall. You can arrange the personalized wall letters vertically for a playful stacked look or horizontally for a more traditional name display. Sketch the name on paper first, keeping each bubble letter roughly the same height and width so the finished arrangement feels balanced.
For that chunky 3D bubble letter look, keep the shapes rounded, thick, and slightly exaggerated rather than using narrow or perfectly structured lettering. Letters do not have to be identical, and a little variation actually works well with this handmade style.
Think about the finished design at this stage too. You might pair a floral letter with gingham, strawberries, stripes, polka dots, or tiny hearts while repeating a few colors throughout the entire name. Planning the patterns before you start will make it much easier to create DIY wall decor that feels colorful and coordinated rather than random.
3. Shape the Clay Into Chunky 3D Bubble Letters

Start by working a portion of air-dry clay between your hands until it feels soft and easy to shape. Roll or press the clay into a thick, even piece, then form each letter using your sketch as a guide. Keep the letters chunky with rounded edges to create that soft 3D bubble letter look rather than making them thin like traditional clay cutouts.
Use your fingers and clay sculpting tools to round the curves, define openings in letters like A or R, and smooth away fingerprints as you work. Aim for a similar thickness across every letter so the finished personalized wall letters look cohesive when displayed together.
Keep the backs as flat as possible since this is where the double-sided tape or adhesive strips will eventually sit. Before setting each letter aside, place it on your work surface and check that it rests flat without rocking.
4. Refine and Smooth Your Bubble Letters Before Drying

Before the clay starts to set, take a few minutes to clean up each letter. Use your fingertips or a clay smoothing tool to soften uneven edges, remove noticeable fingerprints, and round out any areas that need a fuller bubble shape.
Pay extra attention to the back of each letter. Since the personalized wall letters will eventually be attached with double-sided tape or adhesive strips, the backs should be as flat and even as possible.
Place all of the letters together before drying and compare their size, thickness, and overall shape. This is your last chance to reshape a curve, widen a section, or fix an uneven letter while the clay is still workable.
5. Let the Clay Letters Dry Completely

Once you’re happy with the shapes, place the letters flat on a clean, dry surface and allow them to air dry according to the clay manufacturer’s instructions. Avoid moving or painting them too soon because chunky 3D bubble letters can feel dry on the outside while still holding moisture inside.
Depending on the clay, thickness, and humidity, drying may take 24 to 72 hours or longer. Flip the letters carefully partway through the drying process so the backs get adequate airflow and dry evenly.
Before moving on, check that each letter feels firm and dry on the front, back, sides, and thickest areas. If a letter still feels cool, soft, or noticeably darker in certain spots, give it more drying time.
6. Smooth and Prep the Dried Letters for Paint

Once the clay letters are completely dry, check each one for rough edges, small bumps, or uneven areas. Use fine-grit sandpaper to gently smooth the front, sides, and edges without sanding away the rounded 3D bubble letter shape.
Pay special attention to any areas that will be noticeable once painted. You can also lightly sand the back to create a flatter surface for the adhesive strips or double-sided mounting tape.
Wipe away all sanding dust with a clean, dry cloth before painting. Starting with a smooth, dust-free surface will help the acrylic paint apply more evenly and give your personalized wall letters a cleaner finished look.
7. Paint Each Bubble Letter With a Different Design

Now for the part that makes these personalized wall letters stand out. Start by painting each letter with a solid base color, then allow the paint to dry before adding your smaller decorative details. Two thin coats will usually give you a smoother finish than one heavy coat.
Give each bubble letter its own design while repeating a few colors throughout the name to keep everything cohesive. Try mixing patterns such as:
- Tiny florals or daisies
- Strawberries, cherries, or other fruit
- Gingham checks
- Polka dots
- Stripes or wavy lines
- Hearts or mini bows
Use small detail brushes for the patterns and keep some letters simpler than others. Mixing busier designs with more minimal patterns helps the finished custom name sign feel playful without becoming visually overwhelming.
8. Add the Finishing Details to Your Painted Letters

Once the main patterns are dry, go back in with a small detail brush to add the tiny elements that make the personalized wall letters feel finished. Add flower centers, strawberry seeds, small leaves, dots, outlines, highlights, or other details that complement each design.
Keep these additions small so they enhance the patterns without covering the chunky bubble letter shape. You can also touch up uneven paint lines or add a second coat anywhere the color looks patchy.
Before moving on, place all the finished letters together in the order of the name. This is a good time to check that the colors and patterns feel balanced as one complete custom name sign.
9. Seal the Finished Personalized Wall Letters

Once all of the paint and decorative details are completely dry, protect the finished letters with a clear craft sealer. A matte or satin finish works especially well because it protects the painted surface without taking away from the handmade clay look.
Apply the sealer in light, even coats, making sure to cover the front and sides of each letter. Follow the product instructions for drying time between coats and allow the final coat to cure completely before mounting the letters.
Avoid attaching adhesive while the sealer still feels tacky. The letters should be completely dry and firm before you move on to arranging your custom name sign on the wall.
10. Mount Your Personalized Clay Letters on the Wall

Before attaching anything, arrange the finished letters on the floor or a table in the same layout you want on the wall. Measure the total arrangement and decide how much space you want between each letter. A vertical layout creates that playful stacked-name look, while a horizontal arrangement feels more like a traditional custom name sign.
Once you’re happy with the placement, use small pieces of double-sided mounting tape or removable adhesive strips on the flat back of each letter. Choose an adhesive rated to support the weight of your finished clay pieces and appropriate for your wall surface.
Mount one letter at a time, checking the spacing and alignment as you go. Press each letter into place according to the adhesive manufacturer’s instructions, then step back occasionally to make sure the entire name looks balanced.
Create DIY Wall Decor That Feels Completely Personal

Making your own personalized clay letter wall hanging gives you complete control over the name, colors, patterns, and overall style. From chunky 3D bubble letters covered in tiny florals to gingham, fruit, stripes, and playful dots, every letter can have its own personality while still working together as one custom name sign.
This project is especially cute for kids’ bedrooms, nurseries, playrooms, dorm rooms, or even as a handmade gift. Once you know the basic process, you can also skip the full name and create initials or short words using the same technique.
For another creative project you can make from scratch, check out DIY Plaster Painting Kits: A Step-by-Step Guide.