
Affiliate Disclosure – This post contains affiliate links. I may earn a small commission if you shop through these links at no extra cost to you.
If your home never quite smells as good as it looks, this is the fix you didn’t know you needed. I’ve been testing different ways to keep spaces fresh without candles or plug-ins, and these DIY scented clay diffuser stones are easily one of the best upgrades. They’re minimal, aesthetic, and actually work. Plus, you can customize the scent, shape, and texture so they feel styled, not crafty. Let’s get into it.
Why DIY Clay Diffuser Stones Are Worth Making
If you’re tired of overpowering sprays or candles that burn out too fast, clay diffuser stones are the quiet upgrade your home needs. They absorb essential oils and slowly release scent throughout the day, giving you that clean, subtle fragrance without trying too hard. It’s low-maintenance, flame-free, and honestly looks better than most store-bought options.
What makes these stand out is the visual. When you use stamped textures and clean shapes, they double as decor. Think matte clay finishes, soft impressions, and pieces that sit beautifully on trays, nightstands, or inside a styled bathroom moment. This isn’t just DIY. It’s functional decor that blends right into a luxe, curated space.
They’re also incredibly flexible. You can:
- Match them to your color palette
- Switch scents whenever you want
- Make extras for drawers, closets, or small corners
And once you make your first batch, you’ll realize how easy it is to create a full set for your home.
Master Shopping List
- Air Dry Clay
- Essential Oils Set
- Rolling Pin for Clay
- Parchment Paper
- Fine Grit Sandpaper
- Clay Stamps and Texture Tools
- Cookie Cutters Set
- Matte Acrylic Sealer Spray
- Small Dropper Bottles
Before You Start: The Finish, Texture, and Shape Strategy
Before you even touch the clay, this is where most people either make something that looks elevated… or something that looks like a kid’s craft project. The difference comes down to finish, texture, and shape. If you get this part right, everything else falls into place.
Start with the finish. For that bright, luxe vibe, you want a smooth, matte surface with clean edges. Avoid overworking the clay because too much handling creates cracks and uneven spots once it dries. Think minimal, soft, and intentional.
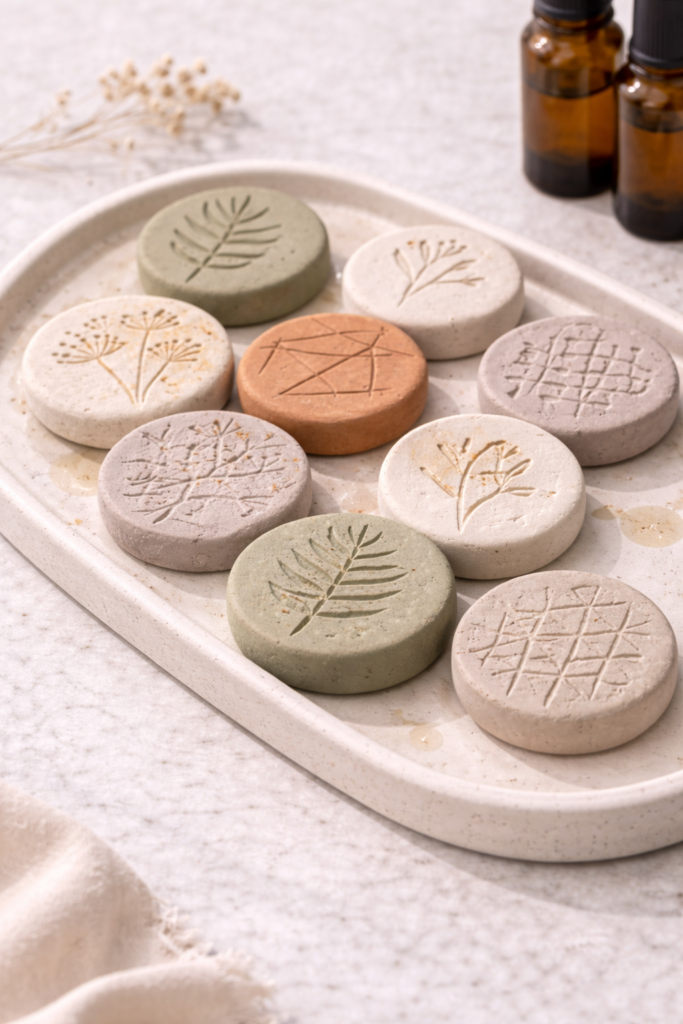
Next is texture. This is where stamped details take your diffuser stones from basic to styled. You don’t need anything complicated. A simple pressed pattern, light botanical imprint, or subtle line texture instantly makes them feel curated instead of random. The key is to keep it consistent across your set so everything looks cohesive.
Now let’s talk shape. Skip anything overly intricate. Clean shapes always look more high-end:
- Circles
- Arches
- Soft squares
- Organic, imperfect blobs (but controlled, not messy)
Smaller sizes work best because they sit easily on trays, tuck into drawers, and don’t overpower your space. You’re not making decor statements. You’re creating quiet, layered details.
One more thing that makes a big difference: thickness. Aim for about 1/4 inch. Too thin and they’ll crack. Too thick and they won’t absorb and release scent as well.
If you treat this like styling instead of crafting, your final result will look like something you bought from a boutique, not something you made in your kitchen.
How to Make DIY Clay Diffuser Stones (Step-by-Step)
This is where it all comes together. Take your time here, because the way you shape, dry, and finish your clay directly affects how well your diffuser stones absorb and release scent.
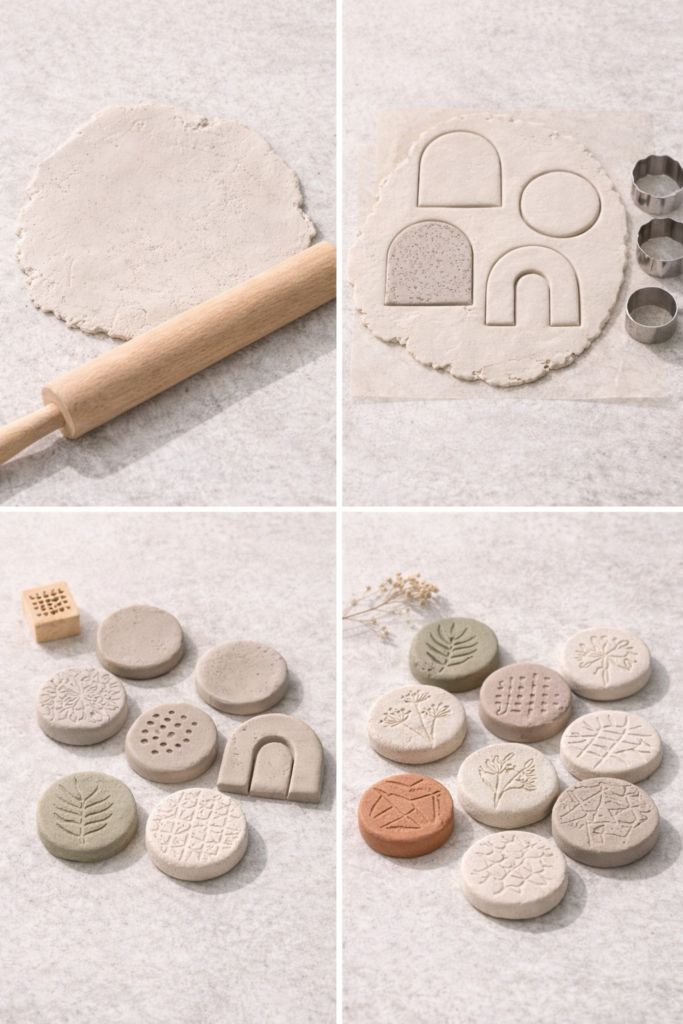
Step 1: Prep Your Surface and Clay
Start with a clean, flat surface. You can lightly dust it with a tiny bit of cornstarch if your clay tends to stick, but most air dry clay is workable on its own.
Take a small portion of clay and knead it for 1–2 minutes until it feels soft and pliable. This helps remove air bubbles, which can cause cracks later. If the clay feels stiff, warm it slightly in your hands.
Step 2: Roll the Clay to the Right Thickness
Use your rolling pin to roll the clay out evenly to about 1/4 inch thick.
This part matters more than you think:
- Too thin = fragile and prone to cracking
- Too thick = won’t absorb and diffuse scent properly
Check the thickness across the entire piece. Uneven areas will dry at different rates and can warp.
Step 3: Create Your Shapes
Use cookie cutters, a glass rim, or freehand shapes to cut your diffuser stones.
If you’re going for that elevated look:
- Stick to simple shapes like circles, arches, or soft squares
- Smooth the edges immediately using your fingers
After cutting, gently lift each piece and place it on a flat, non-stick surface like parchment paper.
Step 4: Add Stamped Texture (This Is the Upgrade Step)
Now press your stamps or texture tools into the clay before it dries.
Important tips here:
- Press firmly, but not so hard that you distort the shape
- Keep the pattern centered and intentional
- Wipe your stamp between uses to keep impressions clean
If you’re using botanicals or fabric textures, press evenly so the imprint shows clearly without tearing the surface.
Step 5: Refine the Edges and Surface
Before drying, take a few extra seconds to clean everything up:
- Smooth rough edges with a slightly damp fingertip
- Remove any cracks or dents while the clay is still soft
- Make sure each piece lays flat
This is what separates a polished finish from something that looks rushed.
Step 6: Let the Clay Dry Completely
Leave your pieces to air dry on a flat surface for 24–48 hours.
Halfway through drying, flip them gently so both sides dry evenly. This helps prevent warping.
Make sure:
- They are fully hardened before moving on
- There is no cool or damp feeling left in the clay
If you rush this step, the oils won’t absorb properly later.
Step 7: Optional Light Sanding for a Luxe Finish
Once dry, you can lightly sand the edges or surface using fine-grit sandpaper.
This step is optional, but it:
- Smooths imperfections
- Enhances that soft, matte, high-end look
Wipe away any dust before adding oils.
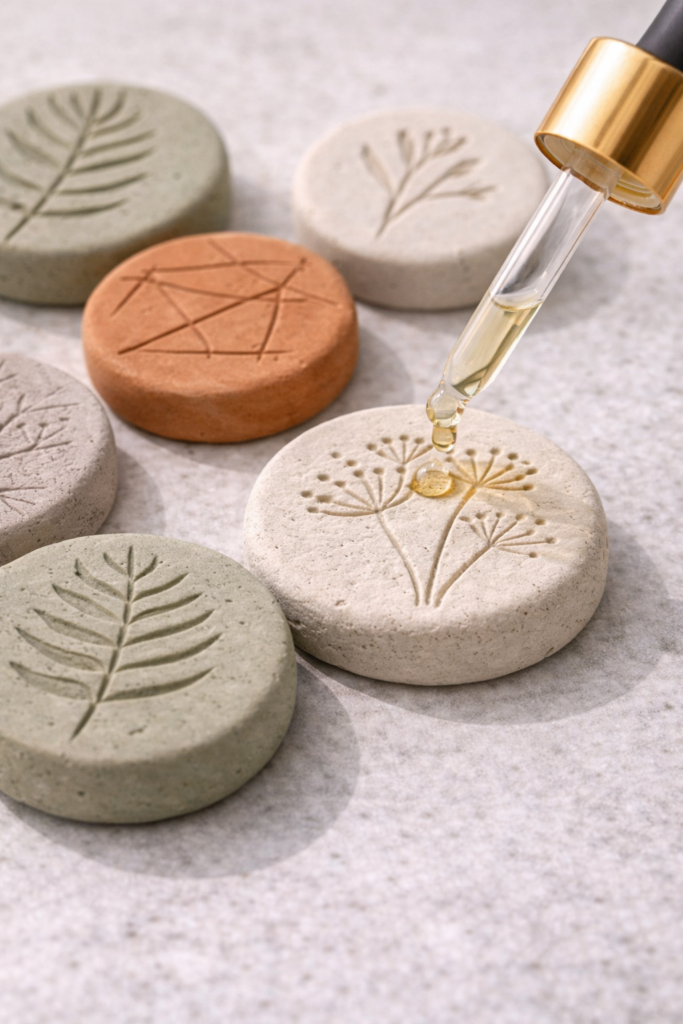
Step 8: Add Your Essential Oils
Now for the part that makes them functional.
Add 3–5 drops of essential oil directly onto the surface of each clay stone. Focus on the back or less visible side if you want to protect the front design.
Let the oil absorb fully before placing them in your space.
Pro tip without calling it a “pro tip”: start with less oil. You can always add more, but too much at once can oversaturate the clay.
Step 9: Let Them Cure Before Styling
Give the oils about 1–2 hours to fully soak in before placing your stones on trays, shelves, or inside drawers.
This prevents:
- Oil transfer onto surfaces
- Uneven scent distribution
Once set, they’re ready to go. When you do this right, you end up with diffuser stones that not only smell amazing but actually look like part of your decor.
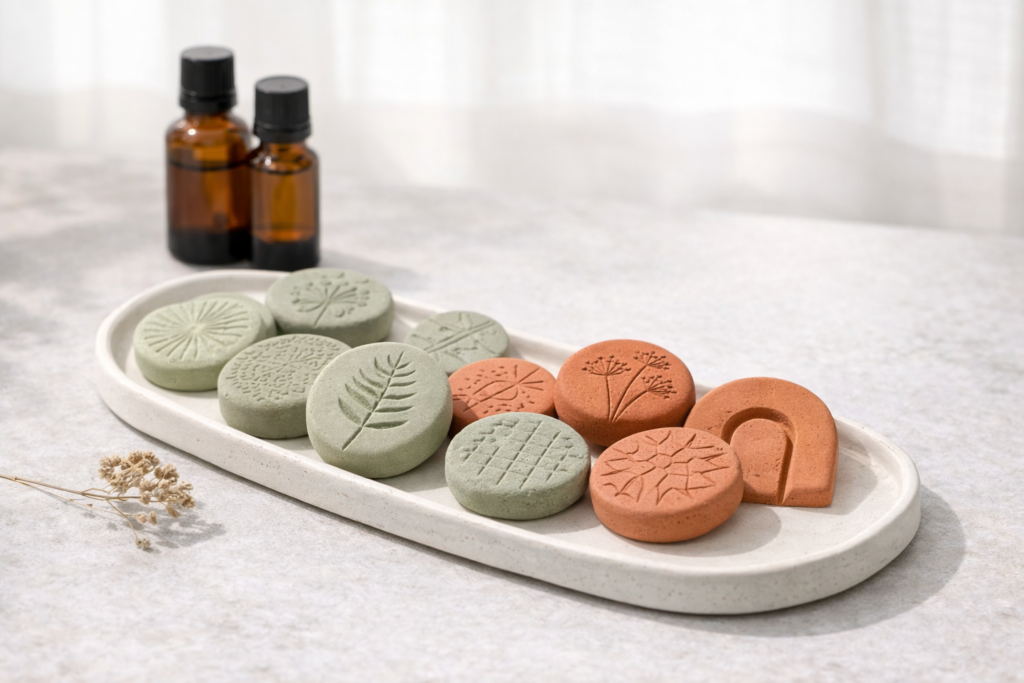
Stamped Clay Designs That Look Expensive
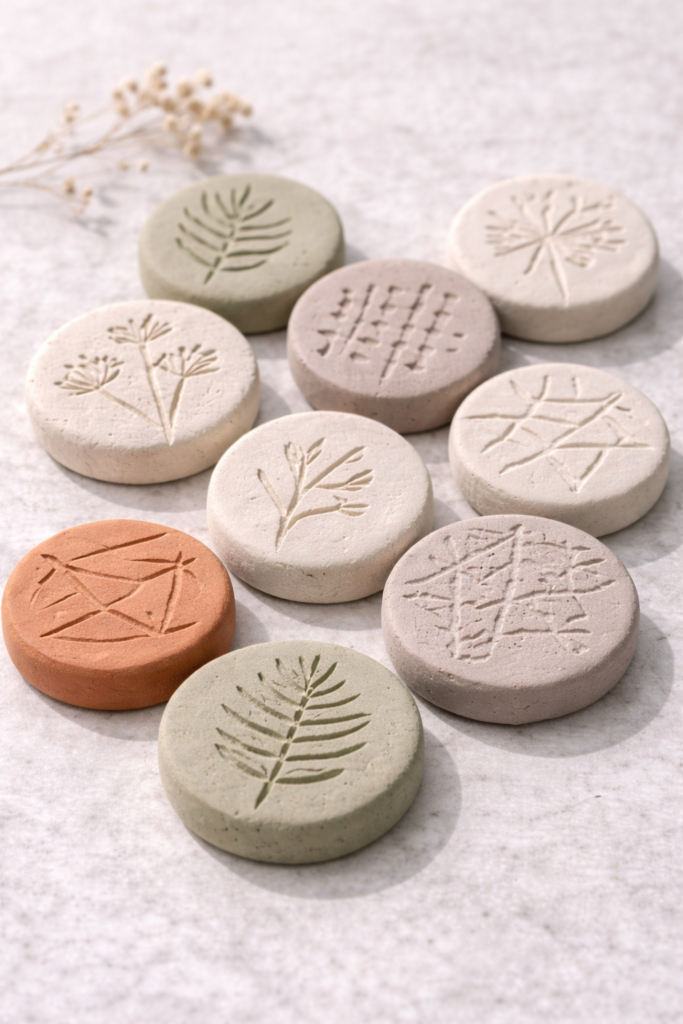
This is the part that takes your DIY clay diffuser stones from basic to something that looks like it came from a boutique. The goal is simple: clean, intentional texture that feels styled, not overdone.
Start with restraint. One good stamp or texture per piece is enough. When you layer too many patterns, it starts to look busy and loses that luxe feel. Think subtle detail over loud design.
Go-To Stamped Looks That Always Work
If you want that elevated, Pinterest-worthy finish, these are the designs that consistently look high-end:
- Botanical Imprints
Press dried leaves, herbs, or small stems into the clay for a soft, organic texture. It gives that natural, spa-like vibe without trying too hard. - Minimal Line Patterns
Simple arches, stripes, or grid lines create structure and feel modern. These work especially well if your decor leans clean and minimal. - Soft Fabric Textures
Lightly pressing linen or lace into the clay adds a subtle pattern that feels rich but understated. It’s texture without being obvious. - Word or Phrase Stamps
Keep this minimal. A single word like “calm,” “breathe,” or “relax” can work, but spacing and font matter. Clean lettering only.
How to Make It Look Polished (Not Messy)
This is where most people get it wrong, so slow down here:
- Keep your stamp centered or intentionally off-center, never random
- Apply even pressure so the imprint is clear and consistent
- Don’t press too deep or you’ll distort the edges
- Wipe your tools between each press to avoid blurred patterns
Color + Finish Pairings That Feel Luxe
Even if you leave your clay natural, the finish matters. For that bright, elevated look:
- Soft white or ivory clay + botanical stamp = clean spa aesthetic
- Warm beige or sand tones + linen texture = cozy but refined
- Pale blush or muted clay + minimal lines = modern feminine vibe
The key is to keep everything cohesive. Your shapes, textures, and tones should feel like they belong together, not like random experiments. When you step back and look at your finished pieces, they should feel like small decor accents, not just something you made for scent.
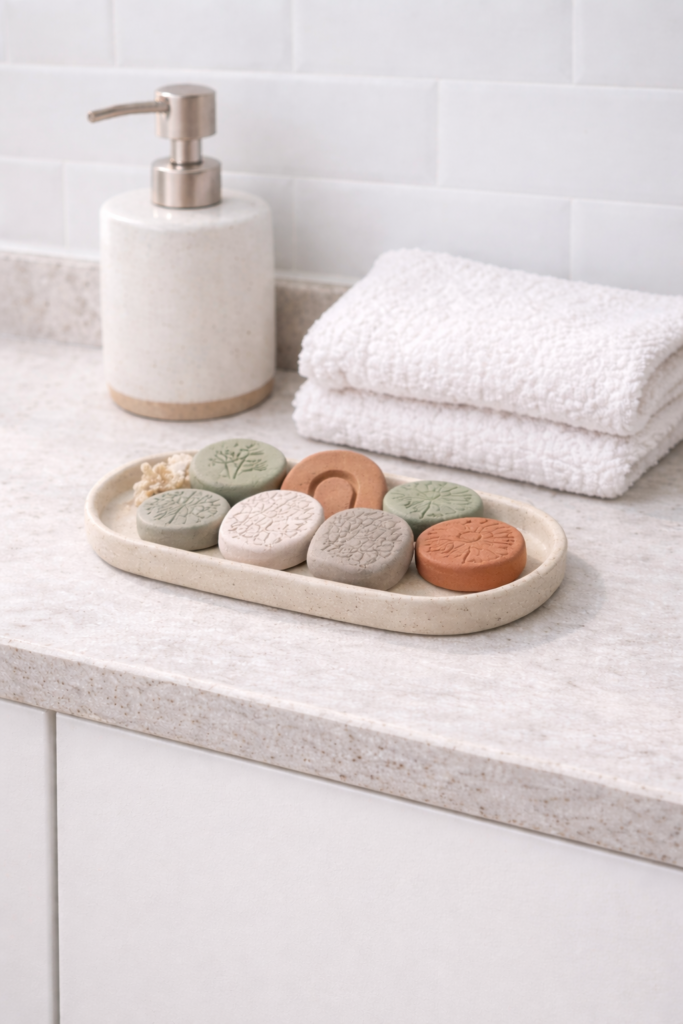
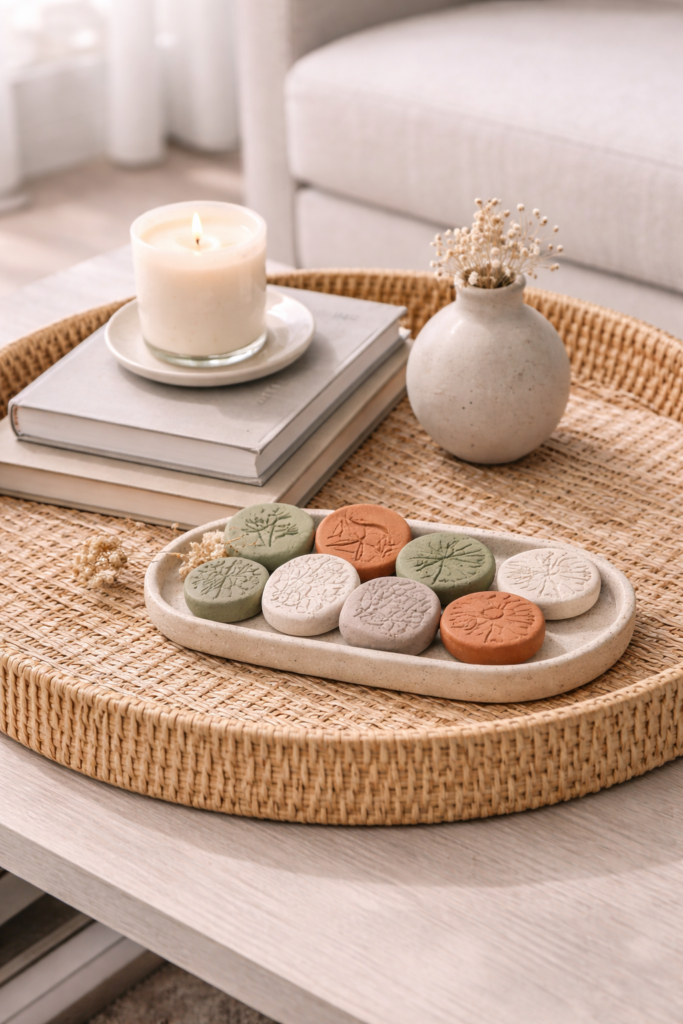
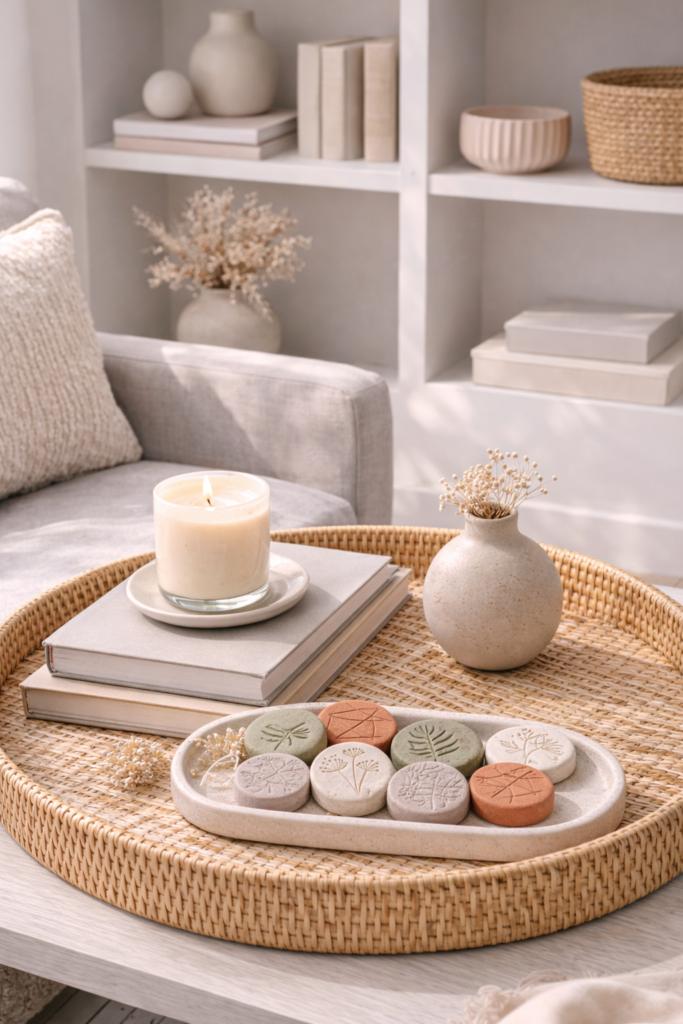
Where to Use Clay Diffuser Stones Around Your Home
Making them is one thing. Placing them correctly is what actually makes your home feel layered, intentional, and put together. These are not meant to sit randomly on a surface. When styled right, they blend into your decor and quietly elevate the entire space.
Bathroom Counter (Clean + Spa-Like)
This is one of the best places to use them. Add a few diffuser stones to a small tray with a soap dispenser and a folded hand towel. It instantly gives that clean, hotel-style vibe without needing candles or sprays. Stick with fresh scents like eucalyptus or citrus here.
Nightstand (Soft + Relaxing)
Place one or two stones on a small dish next to your bed. Lavender or chamomile works perfectly in this spot. It’s subtle, calming, and doesn’t feel overwhelming when you’re trying to wind down.
Closets and Drawers (Hidden but Effective)
Tuck a few diffuser stones into drawers, linen closets, or even your closet shelves. This is where they really shine because the scent stays contained and lingers longer. Think clean, soft scents like cotton or vanilla.
Entryway Table (First Impression Moment)
Set a small bowl or tray with diffuser stones near your entryway. It gives your home that “it smells good the second you walk in” effect. Go for something fresh but noticeable like lemon, bergamot, or a light wood scent.
Styled Coffee Table or Shelf (Decor + Function)
If you’re already styling trays with books, candles, or decorative objects, add a few diffuser stones right into the mix. They blend in effortlessly and add function without adding clutter.
The key is to treat these like decor accents that happen to smell good, not just scent tools. When placed intentionally, they elevate your space without calling attention to themselves.
Best Essential Oil Blends for a Clean, Luxe Home Scent
The difference between “this smells nice” and “your home smells amazing” comes down to how you blend your oils. Single scents can work, but layered blends feel richer, more intentional, and way more elevated.
Think of this like creating a signature scent for your space. You want something that feels consistent, not random.
Fresh and Clean (Everyday Go-To)
This is that just-cleaned, airy vibe that works in almost any room.
- Lemon + eucalyptus
- Bergamot + tea tree
- Grapefruit + mint
These blends are perfect for bathrooms, kitchens, and entryways where you want that crisp, fresh feel.
Calm and Cozy (Wind-Down Energy)
If your goal is a softer, relaxing atmosphere, go for warmer, more comforting notes.
- Lavender + vanilla
- Chamomile + sandalwood
- Cedarwood + tonka
These are ideal for bedrooms and quiet corners where you want the space to feel calm, not stimulating.
Warm and Elevated (Luxury Hotel Vibe)
This is where things start to feel expensive and layered.
- Amber + sandalwood
- Vanilla + patchouli
- Bergamot + cedarwood
These blends work beautifully in living rooms and entryways where you want a slightly deeper, more noticeable scent.
Light Floral (Soft but Not Overpowering)
Florals can go wrong fast, so keep them balanced.
- Rose + vanilla
- Jasmine + sandalwood
- Neroli + bergamot
The key is pairing florals with something grounding so they feel modern, not overly sweet.
How to Blend Without Overdoing It
Keep it simple:
- Use 2–3 oils max per blend
- Start with equal drops, then adjust
- Test on one stone before committing to all
You’re aiming for a scent that people notice when they walk in, not something that hits them immediately. Once you find a blend you love, use it consistently throughout your home. That’s how you create that signature scent feel instead of a mix of random fragrances.
How to Refresh and Maintain the Scent
One of the best things about DIY clay diffuser stones is that they’re not one-and-done. You can keep them going for weeks just by refreshing them the right way. The key is consistency and not overloading the clay.
How Often to Reapply Oils
Most stones will hold scent for 2–5 days, depending on the oil and where you place them. Smaller spaces like drawers and closets will hold scent longer, while open areas may need more frequent refreshes.
When the scent starts to fade:
- Add 2–3 drops of your essential oil
- Let it absorb fully before placing it back
You don’t need to soak it again like the first time. Light refreshes work better.
Where You Place Them Matters
Scent performance isn’t just about the oil. It’s about placement.
- Enclosed spaces (drawers, closets): scent lasts longer
- Open areas (tables, shelves): scent fades faster
- Near airflow (fans, vents): scent disperses more quickly
If you feel like your stones “aren’t working,” it’s usually placement, not the clay.
Keep Them Looking Clean and Luxe
Over time, oils can leave slight marks, especially if you keep reapplying in the same spot. To keep everything looking polished:
- Rotate where you apply the oil (back or edges)
- Avoid over-saturating one area
- Wipe off any excess oil before placing them down
This helps maintain that clean, matte finish instead of a blotchy look.
When to Replace or Reset
If your stones start to feel overly saturated or look uneven:
- Let them sit without adding oil for a few days
- Lightly sand the surface if needed to refresh the finish
But realistically, these last a long time. You’re not constantly remaking them. You’re just maintaining them. When you get into a rhythm with refreshing, these become one of the easiest ways to keep your home smelling good without thinking about it.
Creative Ways to Gift Clay Diffuser Stones
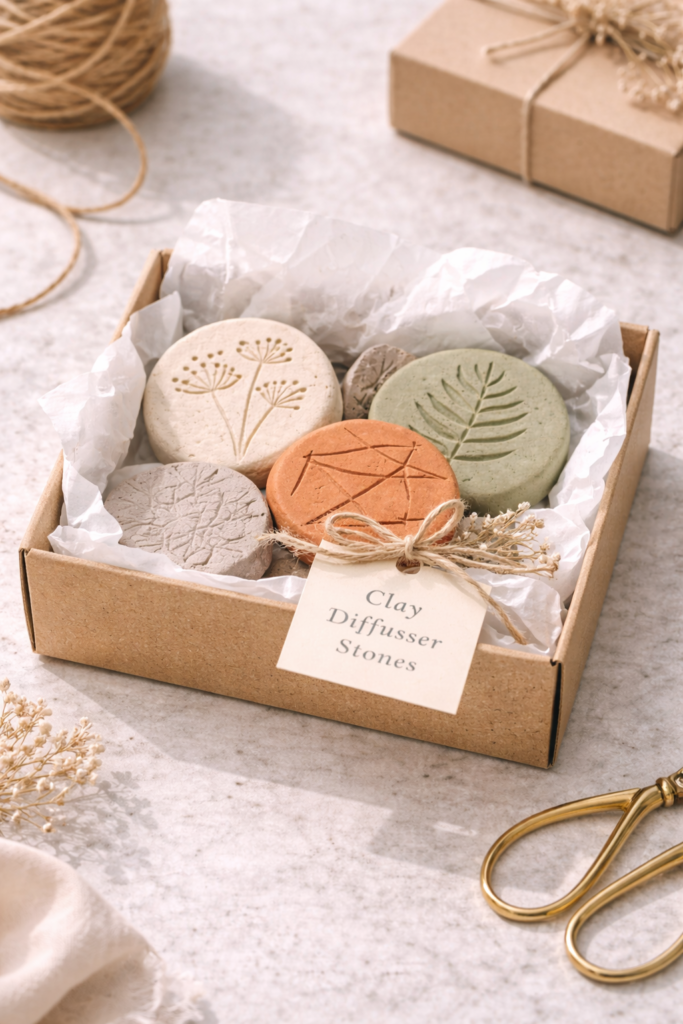
This is where your DIY scented clay diffuser stones go from a simple project to something that actually feels thoughtful and elevated. With the right packaging and presentation, these make the kind of gift people remember and actually use.
Mini Luxe Gift Sets
Bundle 3–5 diffuser stones together and place them in a small box or drawstring bag. Keep everything cohesive:
- Same shape family
- Same stamped texture style
- One signature scent blend
Add a small label with the scent name to make it feel intentional, not random.
Self-Care or Spa Bundles
Pair your diffuser stones with a few complementary items:
- A small essential oil bottle
- A soft hand towel or washcloth
- A minimalist tray or dish
This instantly turns your DIY into a curated gift set that feels like something you’d buy in a boutique.
Closet or Drawer Freshener Kits
This is a practical gift people don’t expect but love once they use it.
Package a few smaller stones in a breathable pouch with a light, clean scent like cotton or lavender. It’s perfect for:
- Linen closets
- Dresser drawers
- Suitcases
Simple, useful, and still aesthetic.
Party Favors or Event Gifts
These work beautifully for:
- Baby showers
- Bridal showers
- Girls’ nights
Keep them small, stamped with a subtle pattern or word, and wrap them in neutral packaging. Add a tag with a short phrase or scent name to finish it off.
Seasonal Gift Add-Ons
Use these as an extra detail instead of a full gift:
- Add to holiday gift boxes
- Pair with candles or home items
- Include in housewarming gifts
It’s that small, thoughtful touch that makes everything feel more put together.
The difference is in how you present them. When you keep the colors, textures, and scents cohesive, your DIY instantly feels elevated instead of homemade.
FAQ: Common Questions About DIY Clay Diffuser Stones
How do you stop essential oils from staining the finish?
This is the biggest concern, and it comes down to how you apply the oil.
If you drop oil directly onto the front surface every time, you’ll eventually see dark spots or uneven patches. To avoid that:
- Apply oils to the back or edges of the stone
- Use smaller amounts (2–3 drops) instead of saturating
- Let the oil fully absorb before placing it on any surface
If you want extra protection, you can lightly seal the front with a very thin, breathable sealant like a matte spray. Just don’t fully seal the entire stone, or it won’t absorb scent properly.
How long do clay diffuser stones hold scent?
Typically, scent lasts 2–5 days depending on:
- The type of essential oil
- The size of the stone
- Where it’s placed
Smaller, enclosed spaces like drawers will hold scent longer, while open areas may need more frequent refreshing.
Can you reuse clay diffuser stones?
Yes, and that’s one of the best parts.
You can:
- Reapply the same scent
- Switch to a new scent after it fades
If you’re changing scents, let the stone sit for a day or two without adding oil so the previous scent fades first.
Why isn’t my scent strong enough?
This usually comes down to one of three things:
- Not enough oil applied
- Placement in a large or open space
- Clay being too thick
Try adding a few more drops or moving the stone to a smaller, more enclosed area.
Can I paint or color my diffuser stones?
You can, but be careful.
Heavy paint or sealants can block absorption. If you want to add color:
- Use light washes or tinted clay instead of thick paint
- Keep at least part of the surface unsealed for oil absorption
Do they work better than candles or plug-ins?
They’re different.
Clay diffuser stones are:
- More subtle
- Safer (no flame or heat)
- Better for small, layered scent moments
They won’t fill a large room like a candle, but they create a more consistent, clean scent throughout your space.
DIY scented clay diffuser stones are one of those small upgrades that completely change how your home feels. They’re simple to make, easy to customize, and they double as decor that actually serves a purpose. Once you start using them, it’s hard to go back to anything else.
If you’re already in a clay-making mood, don’t stop here. Check out 18 Mini Clay Ideas That Are Cute and Easy to Make for even more simple projects you can create in one sitting.

