
Affiliate Disclosure – This post may contain affiliate links, which means I may earn a small commission if you shop through my links at no extra cost to you.
If you’ve been seeing bloom bars all over Pinterest and events lately, you’re not imagining it. This trend is everywhere right now and for good reason. It’s interactive, it’s beautiful, and it instantly makes any party feel elevated.
I’ve noticed the difference between a bloom bar that looks thrown together and one that actually feels luxe comes down to intention. The colors, the setup, the flow, all of it matters.
If you want a DIY bloom bar that people don’t just use but actually talk about, this is exactly how to do it.
Start With a Bloom Bar Concept That Feels Intentional

Before you buy a single flower, you need a clear direction. This is the part most people skip, and it’s exactly why some bloom bars end up looking random instead of styled.
A good DIY bloom bar always starts with a defined vibe. Think soft romantic pastels for a baby shower, bold saturated tones for a birthday, or a clean monochrome palette for something more modern. When everything visually connects, your flower bar instantly looks more expensive.
You also want to decide how you want it to feel. Is this a relaxed, boho-style DIY bouquet bar with loose greenery and texture, or a polished flower booth display with structured arrangements and clean lines? That decision shapes everything from the flowers you choose to the wrapping paper you use.
Once your direction is locked in, every single element should follow it. The flowers, ribbons, signage, even the table setup should feel like they belong together. That’s what turns a simple flower bar set up into something that actually stands out.
Shop the Look
Choose the Right Table, Cart, or Display Setup
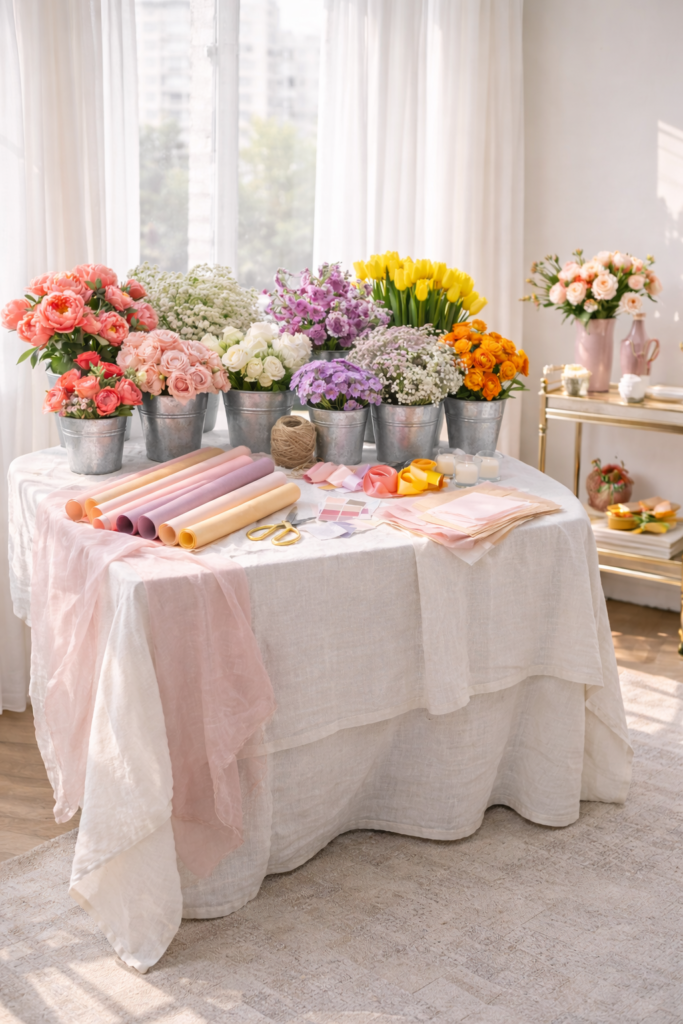
Your setup is what people notice first. Before they even touch a flower, they’re reading the layout, the height, and how everything is presented. This is where your DIY bloom bar either looks elevated or instantly falls flat.
If you’re working with a table, don’t just drop flowers on top and call it done. Layer it. Use a linen tablecloth, add a runner, and vary the height with buckets or risers so everything doesn’t sit on one flat level. That small shift makes your flower bar feel styled instead of basic.
If you want something more eye-catching, a flower bar cart or rolling cart setup instantly gives you that “event-ready” look. It feels intentional, almost like a mini flower booth display, and it’s perfect if you want guests to gather around it naturally.
Think about flow, too. Guests should be able to walk up, see everything clearly, and move through the space without confusion. The easier it feels to use, the more people will actually engage with it.
Shop the Look
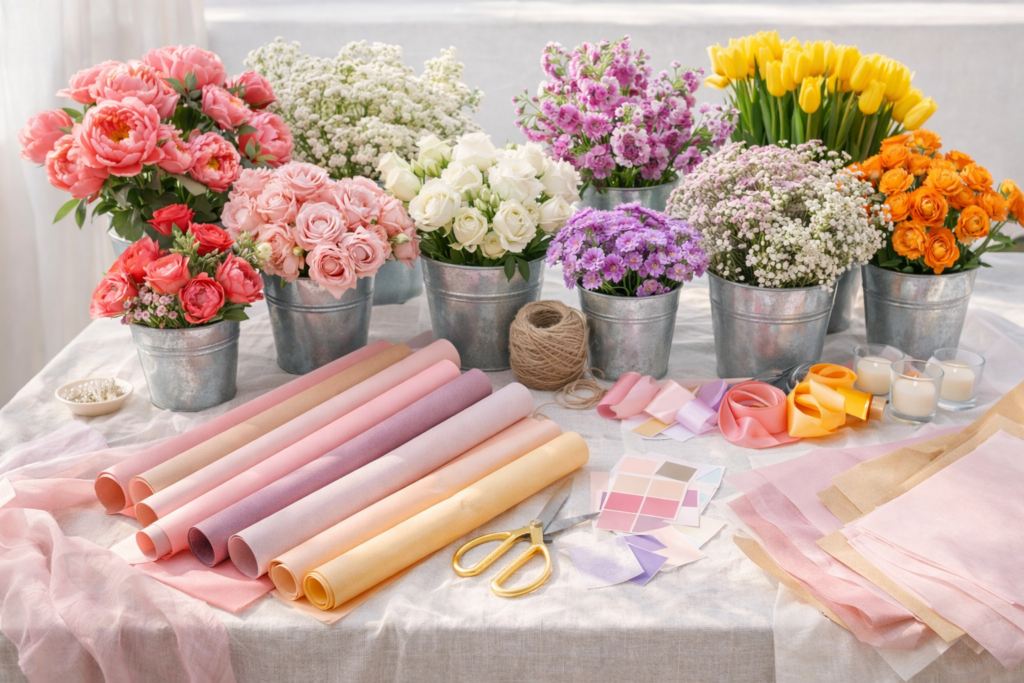
Pick Flowers That Actually Look Good Together
This is where your bloom bar either looks high-end or completely off. It’s not about grabbing a bunch of random flowers. It’s about choosing a mix that feels cohesive, layered, and visually balanced.
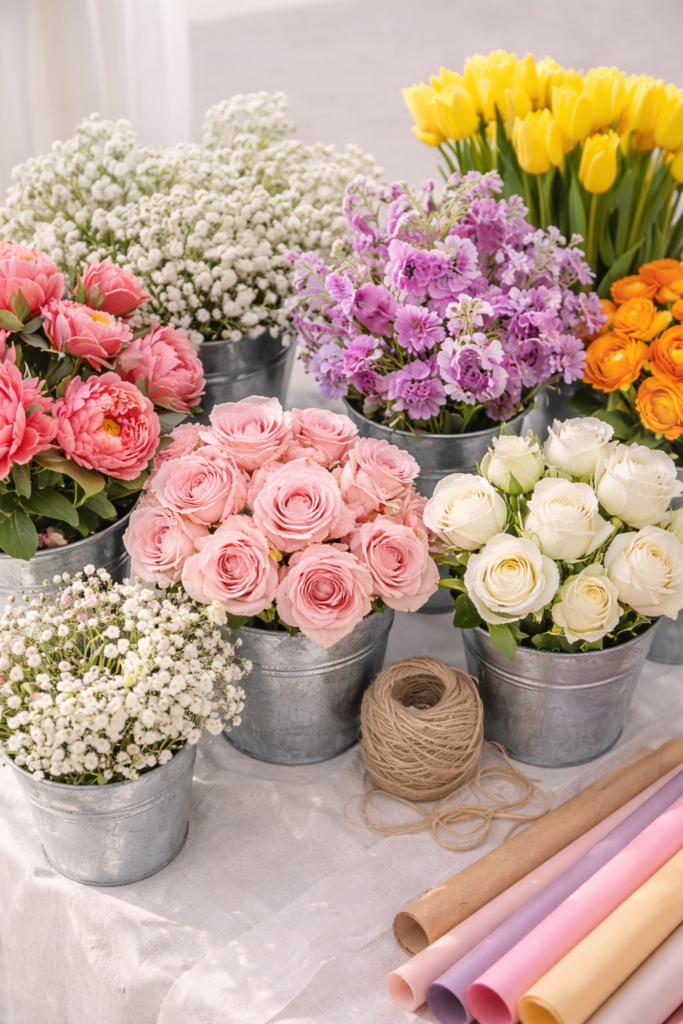
Start with 3 to 5 focal flowers that set the tone. Think roses, peonies, ranunculus, or tulips depending on your season and vibe. Then build around them with filler flowers like baby’s breath or spray roses, and finish with greenery to soften everything and add movement.
You also want contrast, but controlled contrast. Mix larger blooms with smaller ones, soft petals with structured stems, and light tones with a few deeper accents. That’s what makes a DIY flower bar feel styled instead of flat.
Keep everything within your chosen palette so nothing feels out of place. When the colors, textures, and sizes all work together, even simple bouquets end up looking like they came from a boutique.
Shop the Look
Set Up a “Make Your Own Bouquet” Station
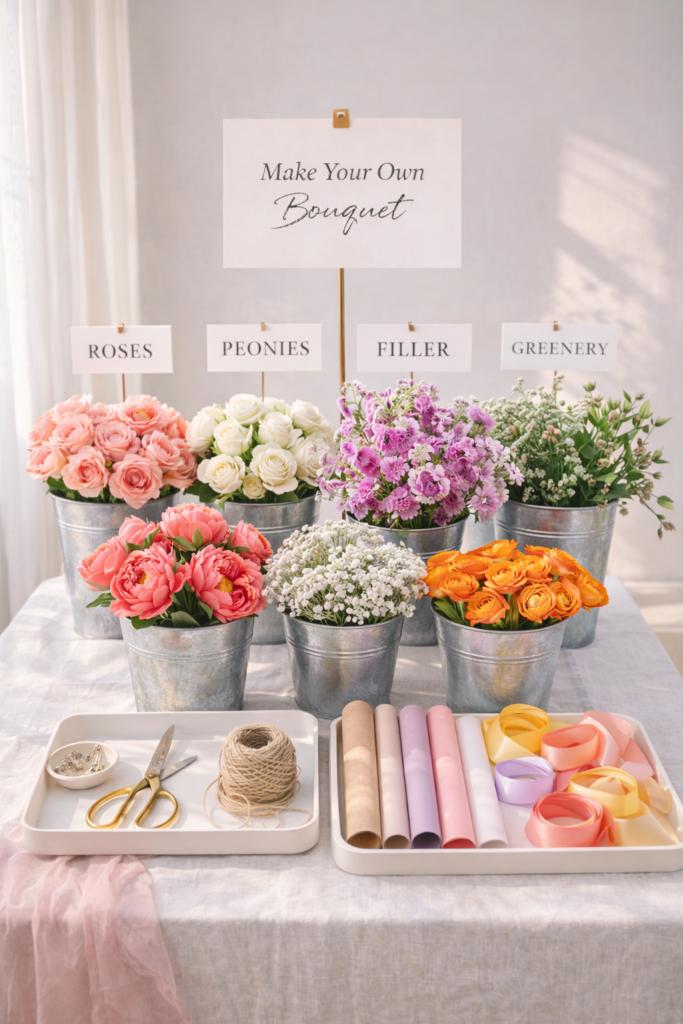
This is where your DIY bloom bar turns into an actual experience. If this part isn’t clear and easy to use, guests will hesitate or skip it altogether. The goal is to make the process feel effortless the moment they walk up.
Start by grouping your flowers by type and color so everything is easy to see. Keep focal flowers in one area, fillers in another, and greenery in its own section. When everything is visually organized, guests naturally understand how to build their bouquet without needing instructions.
Next, create a simple flow. Think of it like a mini assembly line: pick your flowers, arrange your bouquet, then move to wrapping. You can subtly guide this with placement or small signs so no one feels confused or stuck.
Finally, give them space to work. A small open area on the table or cart where guests can gather, adjust stems, and wrap their bouquet makes a big difference. It keeps everything feeling smooth instead of crowded.
Shop the Look
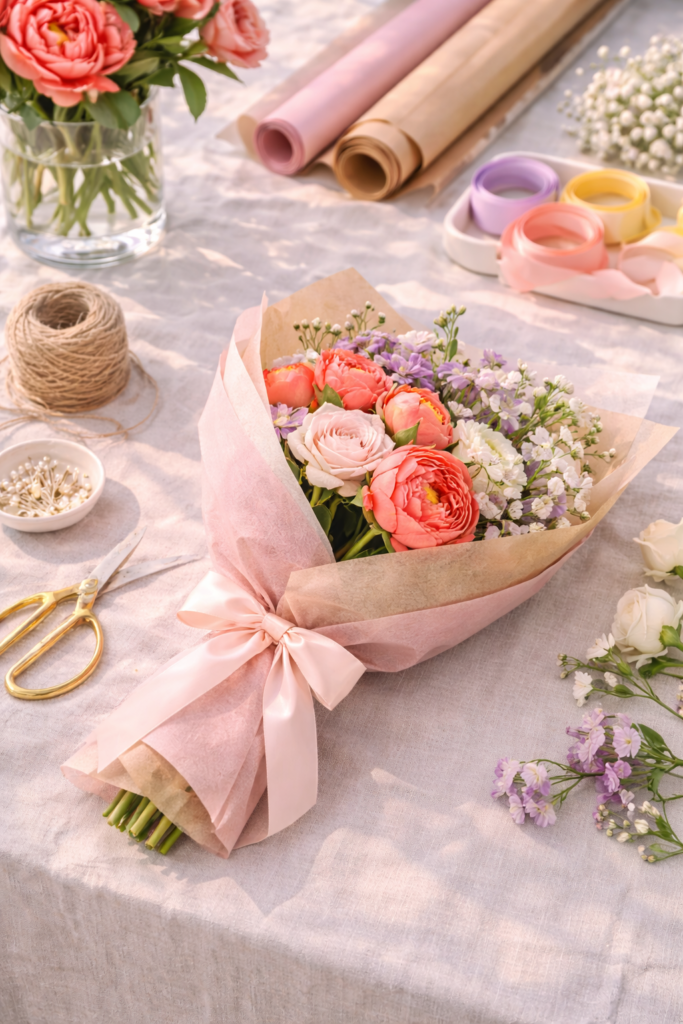
Wrap It Like a Pro (Paper + Ribbon Styling)
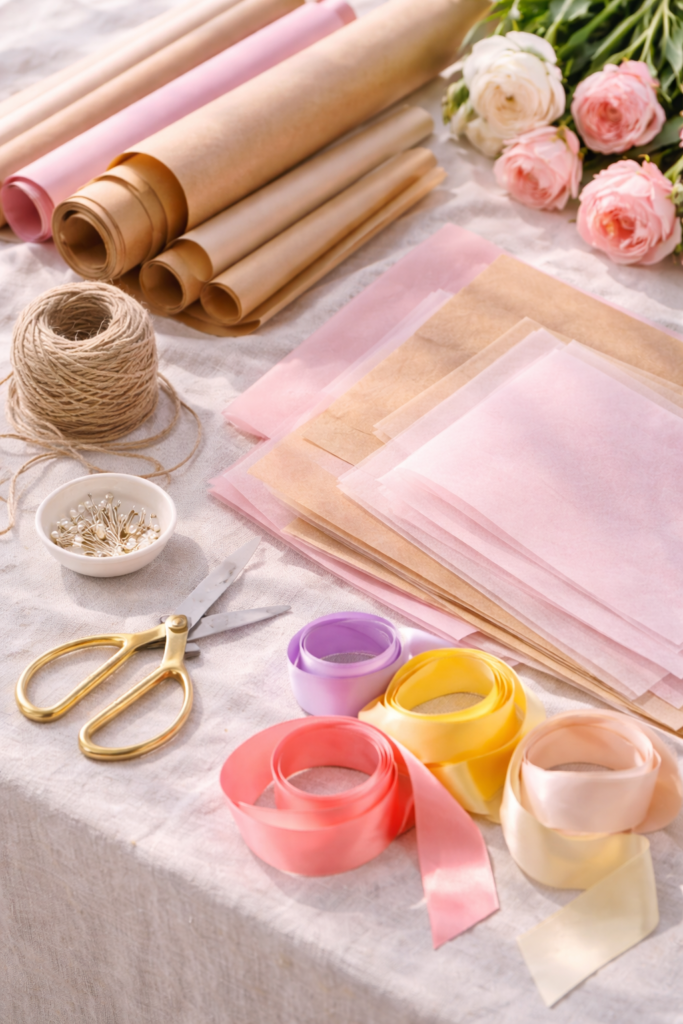
Wrapping is what takes your DIY bloom bar from “cute activity” to something that actually feels luxe. This is the detail people notice when they’re walking away with their bouquet, and it makes everything feel more finished and intentional.
Start with your base layer. Kraft paper gives you that clean, modern look, while tissue paper adds softness and color. Layering both creates dimension so the bouquet doesn’t feel flat or basic. Even a simple two-layer wrap instantly elevates the whole setup.
Then bring in ribbon or twine to pull everything together. Satin ribbon leans more polished and elevated, while twine gives a relaxed, slightly rustic feel. Stick to colors that match your overall palette so nothing clashes with the flowers.
The easiest way to keep things smooth is to have everything pre-cut and ready to go. When guests can grab, wrap, and finish without struggling, the entire flower bar set up feels effortless and well thought out.
Shop the Look
Add a Statement Sign That Pulls Everything Together
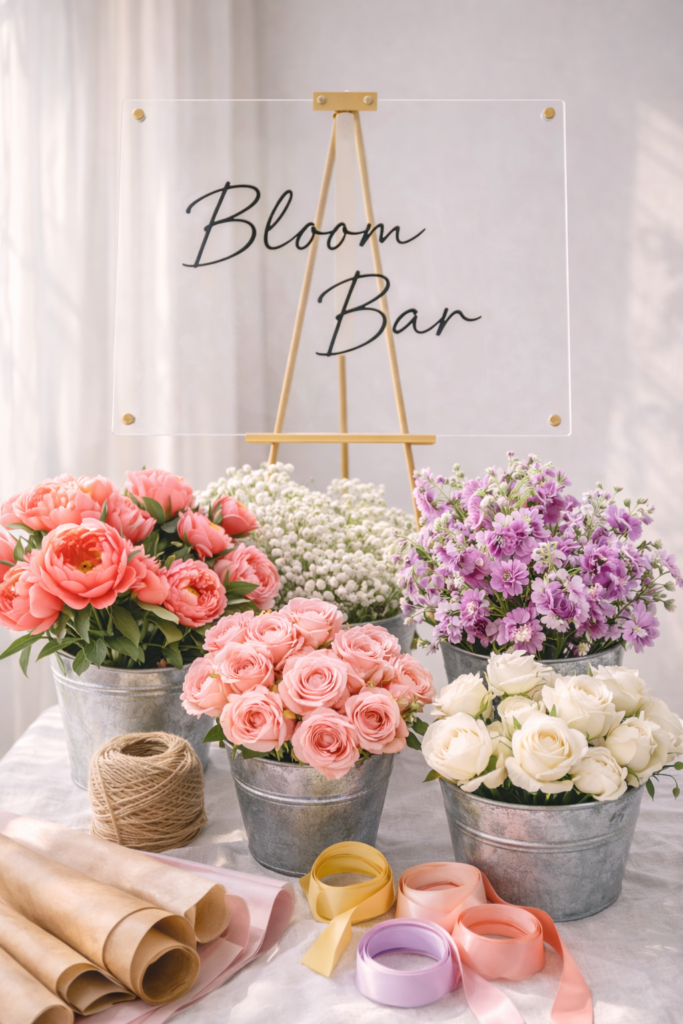
A bloom bar without a sign feels unfinished. This is the piece that anchors your entire setup and instantly tells guests what they’re looking at. It also makes your flower bar feel styled, intentional, and event-ready instead of just a table with flowers.
Keep the wording simple and clear. Phrases like “Bloom Bar,” “Build Your Bouquet,” or “Make Your Own Bouquet” work because they’re easy to understand and visually clean. You don’t need anything complicated here. The impact comes from how it looks, not how much it says.
Material matters more than people think. Acrylic signs give you that sleek, modern feel. Wood adds warmth and softness. Foam board works if you style it right and keep the design minimal. Pairing script fonts with clean lettering always reads more elevated and polished.
Placement is everything. Your sign should sit at eye level or slightly above the display so it draws attention right away. When done right, it ties the entire DIY flower bar together and makes the setup feel complete.
Shop the Look
Elevate With Decor That Feels Luxe (Not Cluttered)
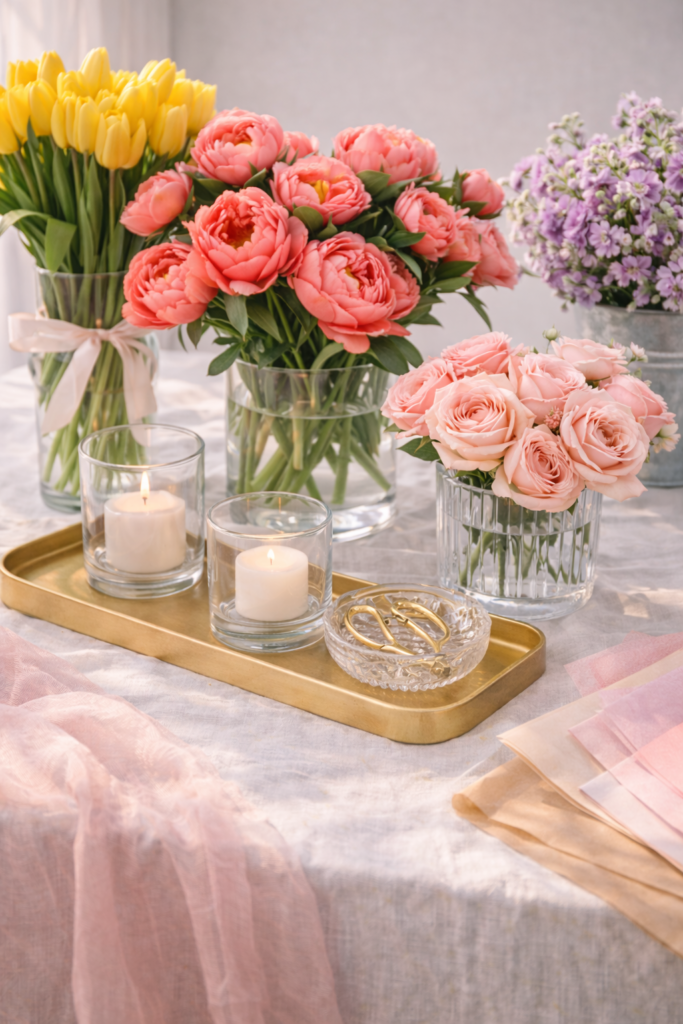
This is where your DIY bloom bar shifts from functional to styled. The right decor makes everything feel elevated, but too much will instantly make it look messy. You want balance, not overload.
Start by layering a few key pieces. Glass vases, trays, and candles add height and reflection, which gives your flower bar that soft, luxe glow. Mixing materials like glass, linen, and a little wood keeps the setup visually interesting without competing with the flowers.
Spacing matters just as much as what you add. Leave room between elements so everything can breathe. When each piece has its own space, the entire bloom bar feels cleaner, more intentional, and way more high-end.
Stick to your color palette here, too. Your decor should support the flowers, not distract from them. When everything works together, your flower booth display ends up looking styled like a boutique instead of a DIY table.
Shop the Look
Create a Flower Cart or Booth Display (Optional Upgrade)

If you want your DIY bloom bar to feel next-level, this is the upgrade that does it. A flower bar cart or full booth display instantly gives your setup that event-professional look without needing a full production.
Start with a rolling cart or compact stand that you can style vertically. This adds height and makes your bloom bar more visible across the space. It also creates that “stop and come over here” moment that draws guests in naturally.
Adding a canopy or umbrella takes it even further. It frames the setup, adds softness, and makes everything feel like a true bloom party moment instead of just another table. This works especially well for outdoor events or garden-style setups.
You can also use hooks, baskets, or side rails to hang tools, ribbons, or small bundles. That layered look makes the flower cart feel curated, functional, and visually interesting from every angle.
Shop the Look
Make It Feel Like an Experience, Not Just a Table
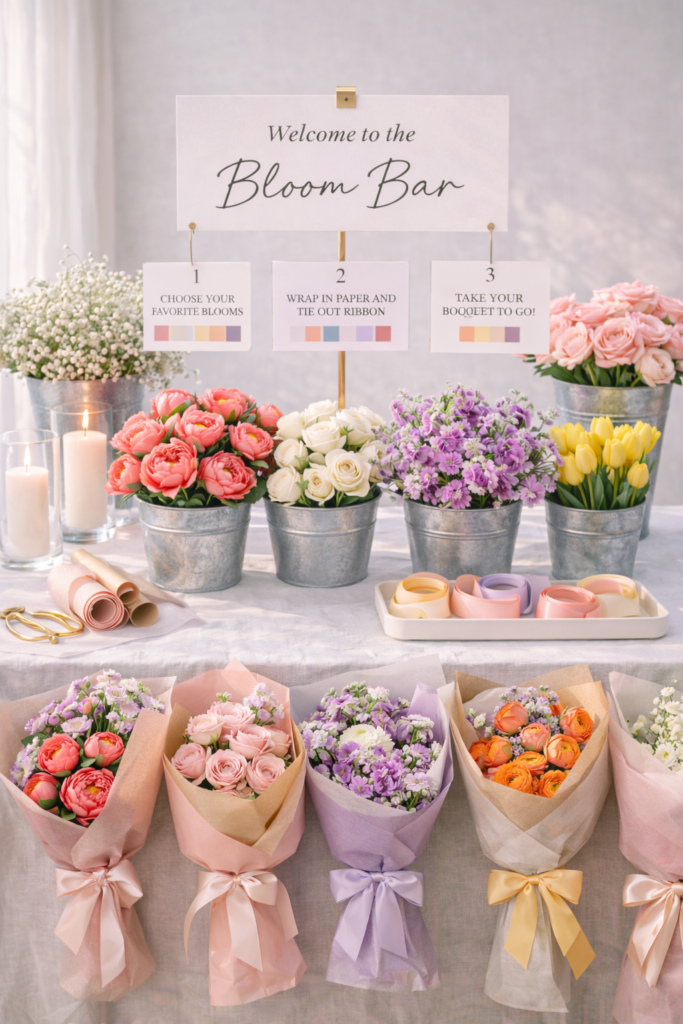
The difference between a basic DIY bloom bar and one people actually remember comes down to the experience. You want guests to feel invited to interact, not confused about what to do.
Start by making everything self-explanatory. A simple sign like “Pick Your Flowers → Build Your Bouquet → Wrap It” instantly removes hesitation. When guests know exactly what to do, they’re more likely to jump in and enjoy it.
Keep everything stocked and easy to grab. Nothing breaks the flow faster than missing supplies or overcrowded sections. When your flower bar stays clean, full, and organized, it feels effortless and polished the entire time.
Finally, think about the overall vibe. Music, lighting, and even how the space is arranged all play a role. When everything feels cohesive, your DIY flower bar turns into a full bloom party moment that guests will talk about long after the event is over.
Shop the Look
A DIY bloom bar isn’t just about flowers. It’s about creating a moment. When the setup is intentional, the colors feel cohesive, and the experience flows naturally, it becomes one of those details people genuinely remember.
The best part is you don’t need a huge budget or a professional setup to make it look high-end. You just need the right mix of styling, structure, and a little attention to detail.
If you’re already thinking about turning your creativity into something bigger, don’t skip this next read. It breaks down exactly what can hold you back when starting out and how to avoid it. Read next: 12 Cricut Business Mistakes Beginners Make

