

Affiliate Disclosure: This post may contain affiliate links. As an Amazon Associate, Room Revival Studio earns from qualifying purchases. This comes at no extra cost to you and helps support the free content you see here.
Winter days can feel long when kids are stuck indoors and boredom hits hard by noon. If you’re juggling home, classroom, or daycare activities, you need crafts that are easy, affordable, and don’t require a trip to the craft store. That’s exactly what this list delivers. These easy winter crafts for kids use paper and cardboard you likely already have, work for mixed age groups, and keep little hands busy without turning your space into a mess. Save this list now because it’s a cold-weather lifesaver.
1. Paper Plate Snowmen
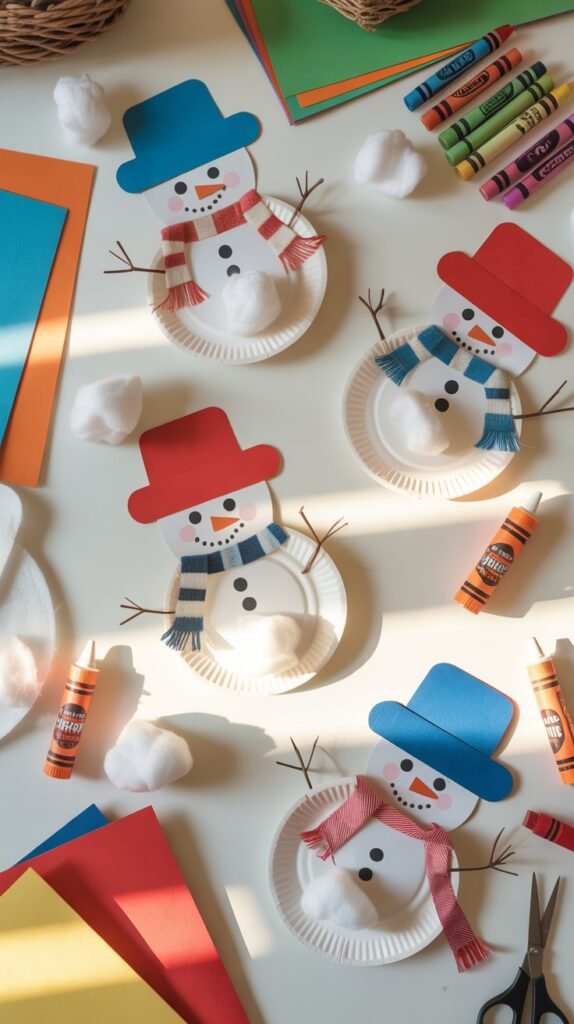
Paper plate snowmen are a winter classic for a reason. They’re simple, adaptable, and perfect for mixed ages, from toddlers to elementary kids. Younger kids can glue on pre-cut eyes and noses, while older kids can add personality with scarves, hats, and expressive faces. This is one of those paper crafts for kids that works just as well at the kitchen table as it does in a classroom. It’s quick, cute, and the finished snowmen make easy wall or window decor.
Step-by-Step Instructions
- Color the base (optional): If your plates aren’t bright white, let kids color the plate with white crayon or paint it lightly and let it dry.
- Create the face: Cut (or draw) eyes, a carrot nose, and a mouth using construction paper or markers.
- Add the details: Glue on buttons, rosy cheeks, eyebrows, or freckles. Older kids can draw these instead.
- Make accessories: Cut a paper hat, earmuffs, or a scarf from colored paper or cardstock.
- Attach accessories: Glue the scarf and hat onto the plate, then press gently to help pieces stick.
- Finish with texture (optional): Add cotton balls for “snow,” a pom-pom for the hat, or glitter-free sparkle using metallic crayons.
- Display: Tape to a wall, hang with string, or turn it into a puppet by taping a craft stick to the back.
Shop the Look
2. Cardboard Roll Winter Animals
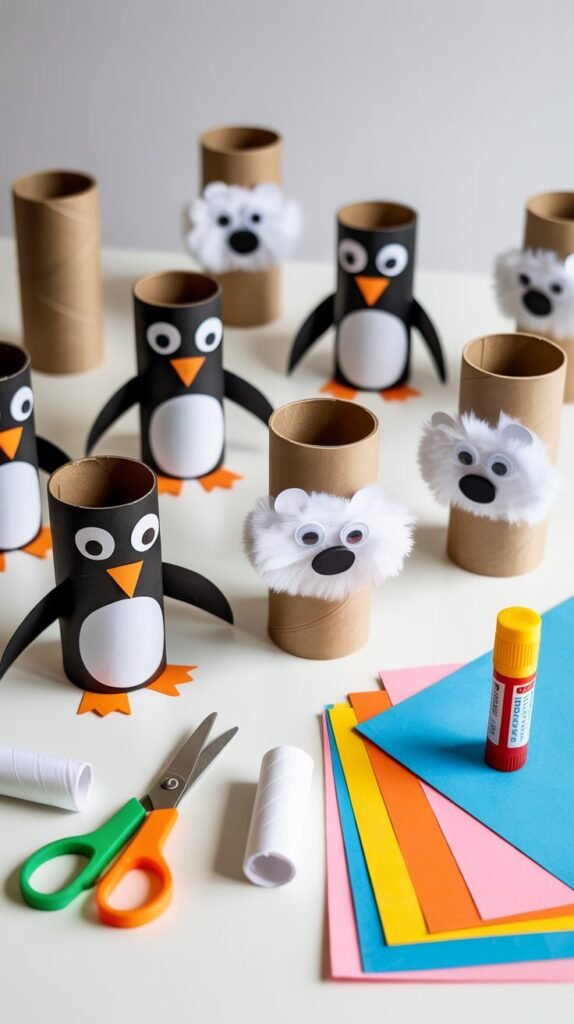
Cardboard roll winter animals are a fun way to turn recyclables into something playful and educational. Toilet paper rolls easily transform into penguins, polar bears, owls, or foxes with just paper and glue. This craft works well for mixed ages because younger kids can decorate pre-cut shapes, while older kids can design their own animals from scratch. It’s a great option for quick crafts for kids that still feel creative and intentional.
Step-by-Step Instructions
- Prep the roll: Gently flatten the cardboard roll slightly so it’s easier for small hands to hold.
- Choose an animal: Decide whether you’re making a penguin, polar bear, owl, or another winter animal.
- Cover the base: Wrap or glue construction paper around the roll to match the animal’s body color.
- Create facial features: Cut out eyes, beaks, noses, and ears from paper, or draw them directly on.
- Assemble the face: Glue facial pieces onto the roll, starting with larger shapes and ending with small details.
- Add finishing touches: Attach googly eyes, paper wings, or patterned bellies for extra personality.
- Let dry and play: Allow the glue to set, then use the animals for pretend play or winter displays.
Shop the Look
3. Snowflake Paper Cutouts
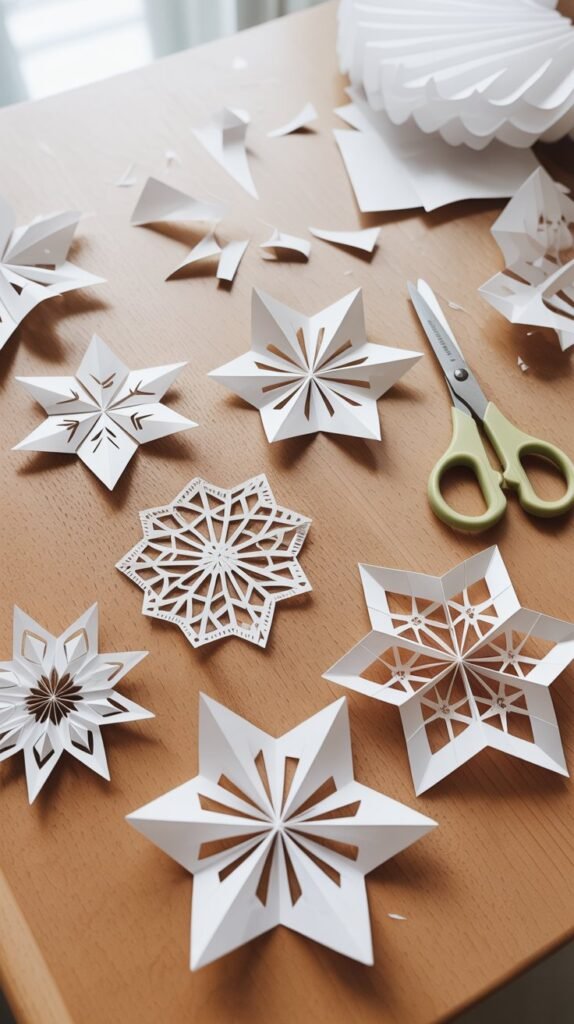
Snowflake paper cutouts are one of the easiest winter crafts for kids and a guaranteed hit every year. This activity lets kids explore symmetry, patterns, and creativity while keeping supplies simple. Younger kids can decorate pre-cut snowflakes, while older kids enjoy folding and cutting their own designs. It’s perfect for classrooms, quiet afternoons at home, or filling windows with winter charm.
Step-by-Step Instructions
- Choose the paper: Use plain white paper or coffee filters for easy folding and cutting.
- Fold the paper: Fold into halves or triangles depending on skill level. The more folds, the more detailed the snowflake.
- Cut the design: Cut small shapes along the edges. Triangles, curves, and tiny notches work best.
- Unfold carefully: Slowly open the paper to reveal the snowflake pattern.
- Decorate (optional): Add glitter-free sparkle using crayons, markers, or metallic pencils.
- Display: Tape snowflakes to windows, walls, or string them together into a garland.
Shop the Look
4. Cardboard Mitten Garland
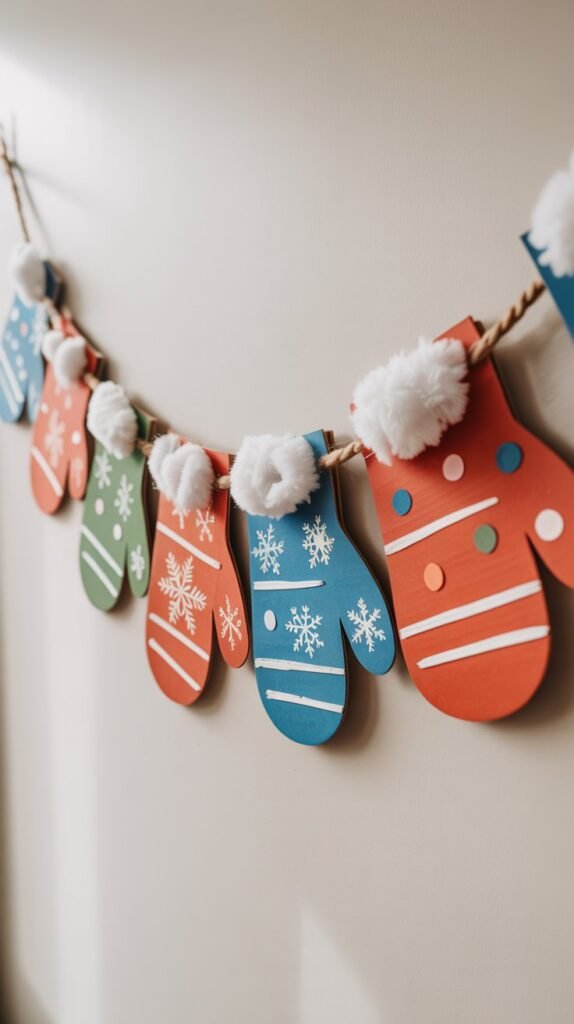
A cardboard mitten garland is a cozy winter craft that doubles as seasonal decor. Kids can decorate each mitten differently, making this project ideal for mixed ages and group settings like classrooms or playgroups. Younger kids can color and sticker their mittens, while older kids experiment with patterns and textures. Once finished, the garland instantly adds winter charm to walls, windows, or bulletin boards.
Step-by-Step Instructions
- Create the mitten shape: Draw mitten outlines on cardboard and cut them out ahead of time if needed.
- Decorate the mittens: Let kids color, paint, or collage each mitten using paper scraps.
- Add texture (optional): Glue on cotton balls, yarn, or paper “knit” patterns.
- Punch holes: Use a hole punch at the top of each mitten.
- String the garland: Thread yarn or twine through the holes, spacing mittens evenly.
- Secure the ends: Tie knots on each side to keep mittens in place.
- Hang and display: Tape or pin the garland where kids can admire their work.
Shop the Look
5. Paper Hat and Scarf Collages

Paper hat and scarf collages let kids mix patterns, colors, and textures while keeping the mess to a minimum. This craft is especially great for creative crafts for kids because there’s no single “right” way to do it. Younger kids can glue down larger shapes, while older kids enjoy layering smaller pieces and creating detailed designs. It’s a simple winter-themed activity that builds creativity and fine motor skills at the same time.
Step-by-Step Instructions
- Prepare the base: Give each child a sheet of white cardstock as the background.
- Cut hat shapes: Cut simple hat shapes or let older kids design their own.
- Cut scarf strips: Create long strips or patterned pieces for scarves.
- Arrange the pieces: Lay out the hats and scarves on the paper before gluing.
- Glue in place: Use glue sticks to attach all pieces securely.
- Add details: Draw patterns, fringe, or buttons with markers or crayons.
- Let dry: Allow collages to dry flat before displaying.
Shop the Look
6. Cardboard Igloo Art
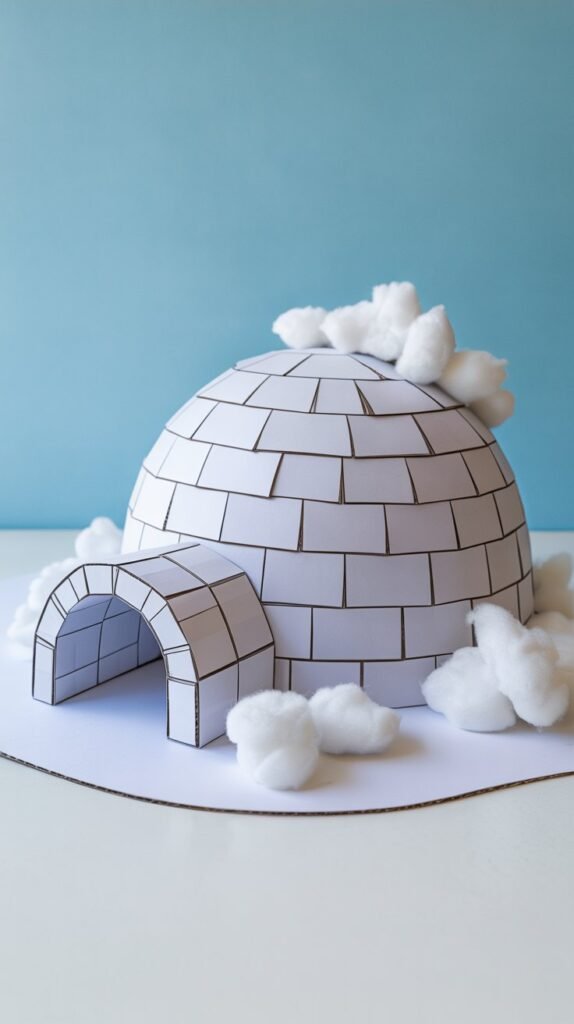
Cardboard igloo art is a simple way to introduce shape, repetition, and texture into winter crafting. Kids create an igloo using basic paper or cardboard pieces, making this project easy to adapt for different ages. Younger children can glue pre-cut shapes, while older kids focus on arranging pieces into neat patterns. The finished artwork looks especially cute displayed as a winter wall or bulletin board.
Step-by-Step Instructions
- Create the base: Give each child a piece of blue or light-colored paper for the background.
- Cut igloo shapes: Cut small curved or rectangular pieces from white paper or thin cardboard.
- Plan the layout: Arrange the pieces in rows to form a dome shape before gluing.
- Glue the igloo: Start from the bottom row and work upward, overlapping slightly.
- Add details: Cut a small doorway and glue it near the bottom of the igloo.
- Add snow texture: Use cotton balls or torn white paper around the base.
- Let dry: Allow the artwork to dry flat before moving or displaying.
Shop the Look
7. Paper Penguin Puppets
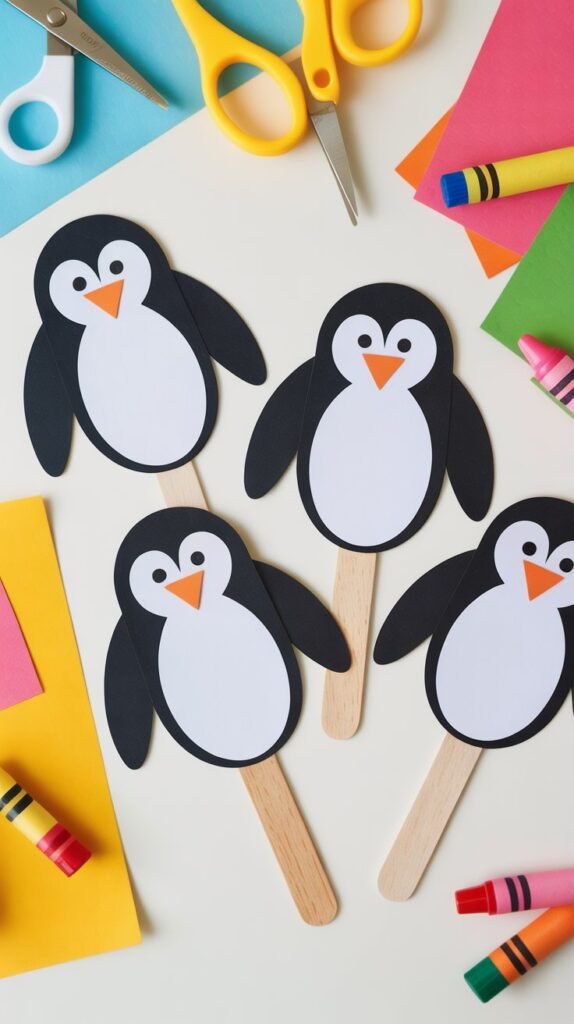
Paper penguin puppets combine crafting with imaginative play, which makes them a favorite for mixed-age groups. Kids get the satisfaction of creating something cute, then immediately use it for storytelling or pretend play. Younger kids can assemble simple shapes, while older kids enjoy adding wings, expressions, and personality. This is a great option when you want quick crafts for kids that last longer than the crafting time itself.
Step-by-Step Instructions
- Create the penguin body: Cut an oval shape from black paper and a smaller oval from white paper for the belly.
- Assemble the body: Glue the white belly onto the black oval.
- Add the face: Cut small circles for eyes and a triangle for the beak, then glue them in place.
- Make the wings: Cut two curved wing shapes from black paper and attach them to the sides.
- Attach the handle: Tape or glue a craft stick to the back of the penguin.
- Personalize: Add scarves, hats, or rosy cheeks using markers or scrap paper.
- Play time: Once dry, use the puppets for stories, songs, or winter-themed games.
Shop the Look
8. Cardboard Snow Globes
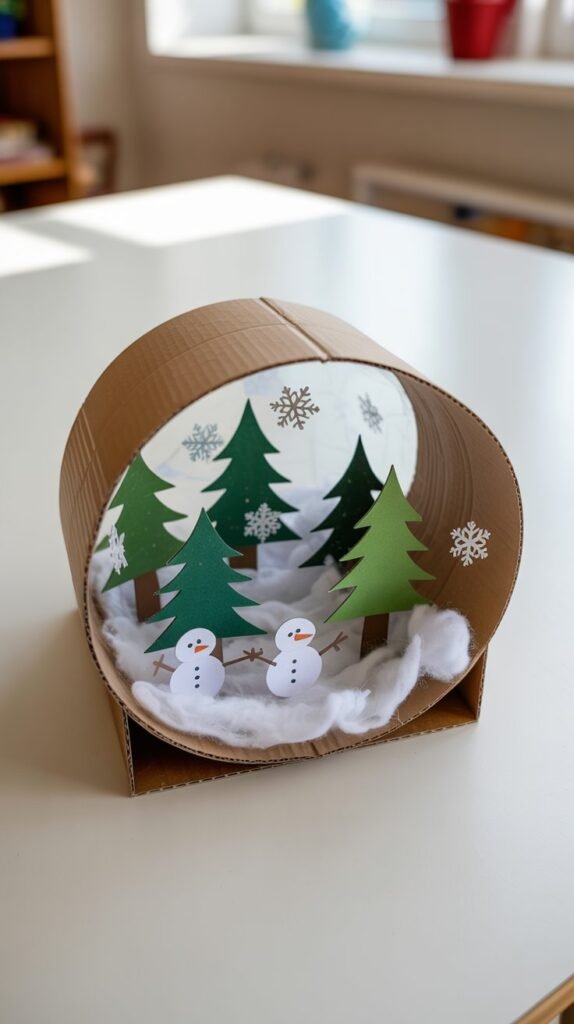
Cardboard snow globes are a fun way to let kids build a winter scene without the mess of real glitter or liquid. Each child creates their own snowy world using paper, stickers, and imagination. This craft works especially well for classrooms because every snow globe looks different, even when everyone starts with the same base. It’s creative, calming, and easy to display once finished.
Step-by-Step Instructions
- Create the globe shape: Trace a large circle onto cardboard and cut it out to form the snow globe frame.
- Prepare the background: Cut a circle from blue or light-colored paper slightly smaller than the cardboard frame.
- Build the scene: Cut trees, houses, snowmen, or animals from paper and arrange them on the background.
- Glue the pieces: Attach all scene elements securely to the background.
- Add snow details: Glue small white paper dots or cotton pieces around the scene.
- Attach the frame: Glue the cardboard frame over the background once everything is in place.
- Let dry and display: Allow to dry flat, then hang or prop up for winter decor.
Shop the Look
9. Paper Forest Winter Scene
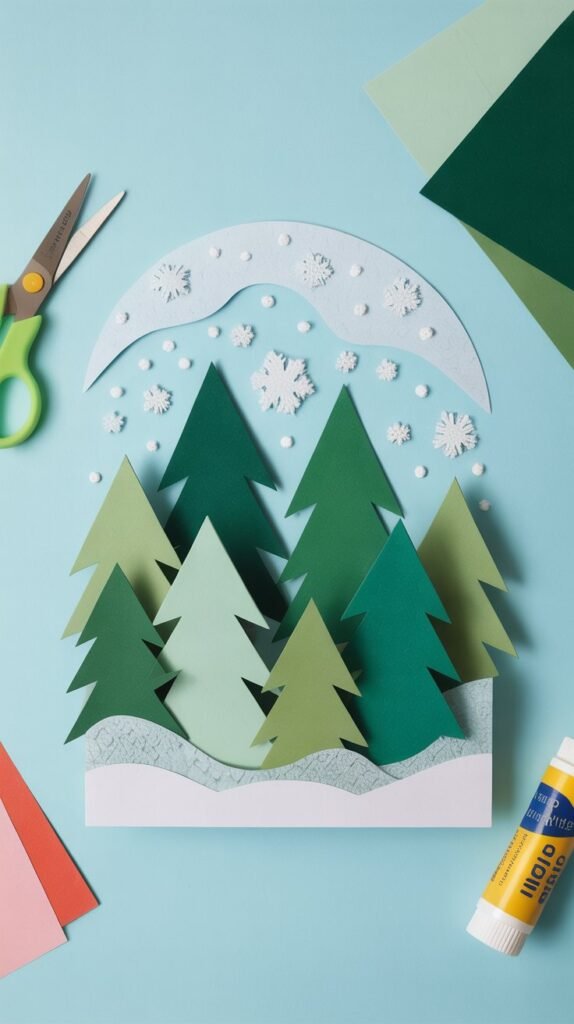
Paper forest winter scenes let kids create a peaceful snowy landscape using simple shapes and layering. This craft encourages imagination while staying calm and structured, which makes it great for classrooms or quiet afternoons at home. Younger kids can focus on gluing larger pieces, while older kids enjoy adding depth with layered trees and details. It’s one of those easy winter crafts for kids that feels creative without being chaotic.
Step-by-Step Instructions
- Choose the background: Use light blue, gray, or white paper as the winter sky.
- Create tree shapes: Cut triangles or tall rectangles from green, white, or brown paper.
- Layer the forest: Arrange trees from back to front to create depth before gluing.
- Add snow: Tear small pieces of white paper or use cotton to add snowy accents.
- Include animals (optional): Cut simple animal shapes or draw them into the scene.
- Glue everything down: Secure all pieces once the layout looks right.
- Finish details: Add falling snow, shadows, or outlines with crayons or markers.
Shop the Look
10. Cardboard Sled Art
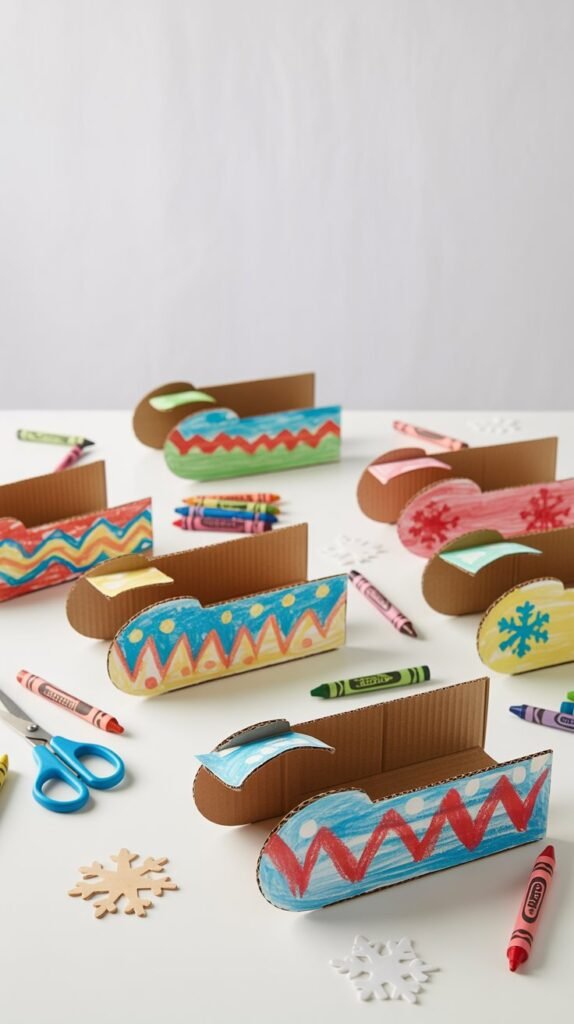
Cardboard sled art is a simple winter craft that focuses on shapes, color, and pattern. Kids can design their own sleds using markers, crayons, or paper pieces, making each one unique. This activity works well for mixed ages because the base shape stays the same, while the decorating level can vary. It’s a great option for quick crafts for kids that don’t require a lot of setup.
Step-by-Step Instructions
- Create sled shapes: Draw sled outlines on cardboard and cut them out ahead of time if needed.
- Color the sled: Use crayons or markers to fill in the sled with winter colors.
- Add patterns: Draw stripes, dots, or zigzags to decorate the sled.
- Attach runners: Cut thin strips of cardboard or paper and glue them to the bottom.
- Add details: Draw rope, seats, or snow splashes for extra character.
- Let dry: Allow glued pieces to set before moving.
- Display: Tape the sleds to a wall or use them as bulletin board decor.
Shop the Look
11. Paper Snowman Faces
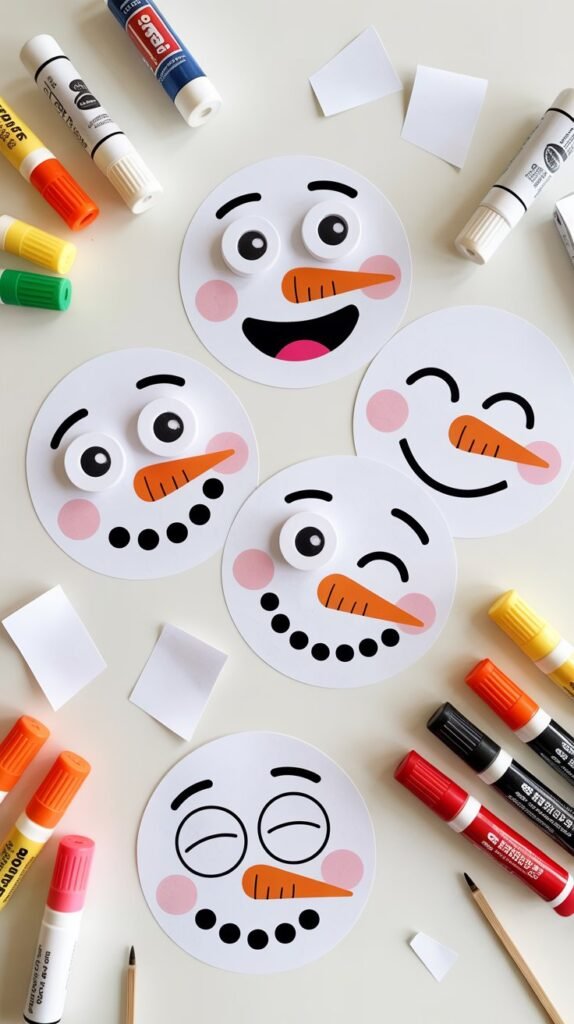
Paper snowman faces are a simple, expressive craft that lets kids play with emotions and personality. Each snowman can look happy, silly, sleepy, or surprised, which makes this activity especially fun for younger kids. Older kids can experiment with different facial expressions and accessories, while toddlers enjoy placing big, simple shapes. It’s an easy winter craft for kids that feels creative without being complicated.
Step-by-Step Instructions
- Prepare the base: Cut large white circles from paper or cardstock for the snowman faces.
- Create facial features: Cut small circles for eyes, triangles for carrot noses, and curved shapes for mouths.
- Arrange before gluing: Lay out all facial pieces to decide on the expression.
- Glue the face: Attach eyes, nose, and mouth using glue sticks.
- Add extras: Draw rosy cheeks, eyebrows, or freckles with crayons or markers.
- Customize: Add paper hats, scarves, or earmuffs if desired.
- Display: Tape faces to windows, walls, or a bulletin board.
Shop the Look
12. Cardboard Winter Houses
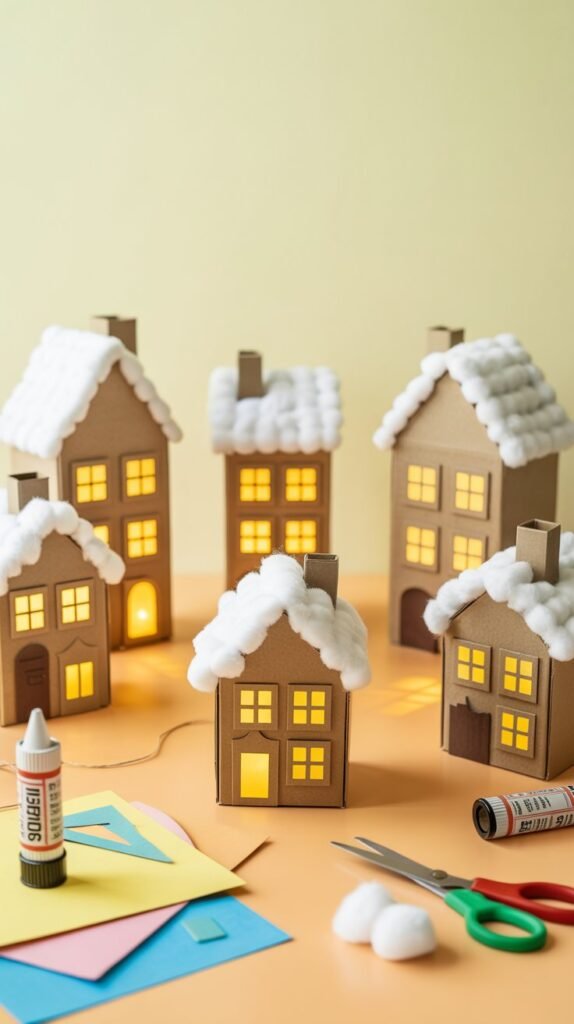
Cardboard winter houses let kids build cozy little homes using simple shapes and imagination. This craft is great for mixed ages because the structure can stay basic or become more detailed depending on skill level. Younger kids enjoy decorating flat house shapes, while older kids can add windows, doors, and snowy rooftops. It’s a creative winter activity that encourages storytelling and design at the same time.
Step-by-Step Instructions
- Create house shapes: Cut simple house outlines from cardboard or use small cardboard boxes.
- Prepare the base: Lay houses flat on the table or open boxes to decorate before assembling.
- Decorate the exterior: Use construction paper, markers, or crayons to add windows, doors, and trim.
- Add winter details: Glue white paper or cotton to rooftops for snow.
- Assemble (optional): Fold or tape pieces together if creating a 3D house.
- Let dry: Allow all glued elements to set completely.
- Play or display: Use houses for pretend play or line them up as winter decor.
Shop the Look
13. Paper Polar Bear Masks
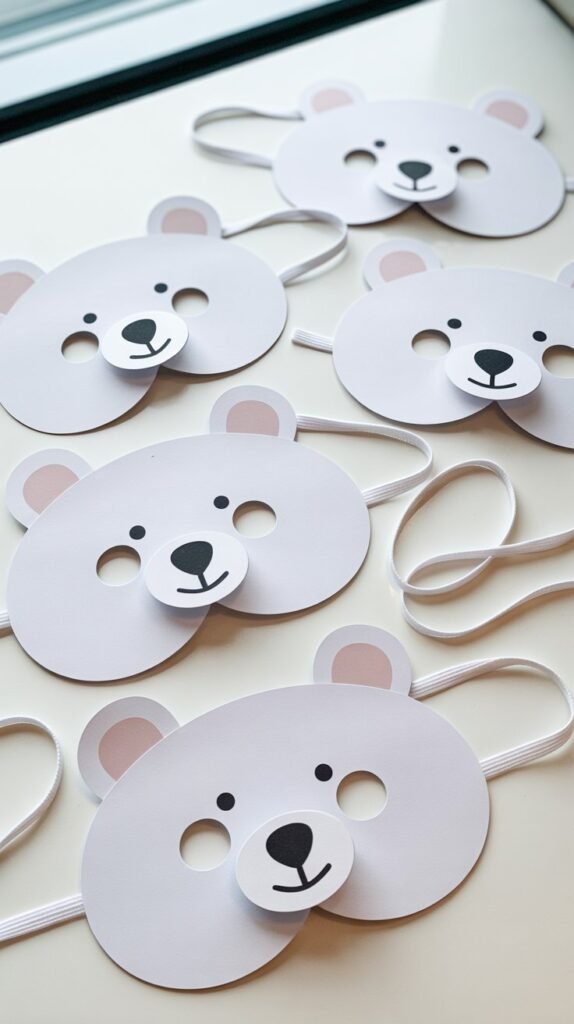
Paper polar bear masks are a fun winter craft that instantly turns into imaginative play. Kids love wearing their creations, which makes this activity especially engaging for mixed ages. Younger kids can decorate simple pre-cut shapes, while older kids enjoy adding details like ears, snouts, and expressions. This is a great option for crafts for toddlers and older kids alike when you want something playful but easy to manage.
Step-by-Step Instructions
- Create the mask base: Cut a large oval or circle from white cardstock.
- Cut eye holes: Carefully cut two eye holes, or pre-cut them for younger kids.
- Add facial features: Cut ears, noses, and snouts from paper and glue them onto the mask.
- Draw details: Use markers or crayons to add eyes, mouths, and texture.
- Attach the strap: Tape or staple elastic or string to each side of the mask.
- Fit and adjust: Gently adjust the strap so the mask fits comfortably.
- Play time: Let kids wear their masks for pretend play or winter-themed games.
Shop the Look
14. Cardboard Skiers
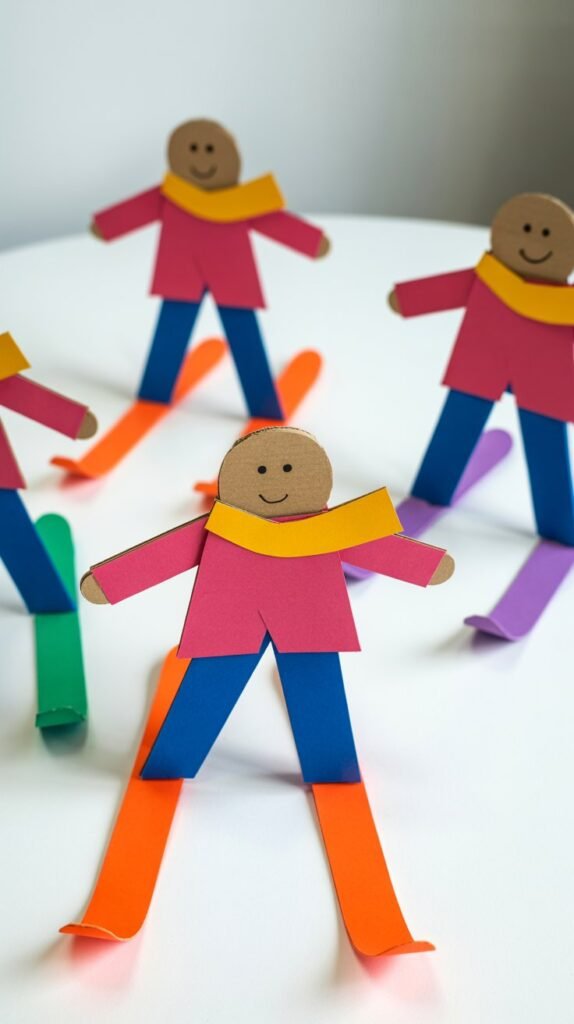
Cardboard skiers are a movement-inspired winter craft that lets kids create playful figures in action. This activity works well for mixed ages because the base shape is simple, but the details can get more advanced. Younger kids can color pre-cut shapes, while older kids enjoy designing outfits and ski poses. It’s a fun way to mix creativity with winter sports themes.
Step-by-Step Instructions
- Create the skier base: Draw a simple person shape on cardboard and cut it out.
- Design the outfit: Color or glue paper pieces onto the skier for winter clothing.
- Make the skis: Cut two long, thin strips from cardboard or paper.
- Attach the skis: Glue or tape skis to the bottom of the skier.
- Add poles: Cut thin paper strips for ski poles and attach to the hands.
- Add movement details: Draw motion lines or snow splashes with markers.
- Display or play: Stand skiers upright or tape them to a winter scene backdrop.
Shop the Look
15. Paper Hot Cocoa Mugs
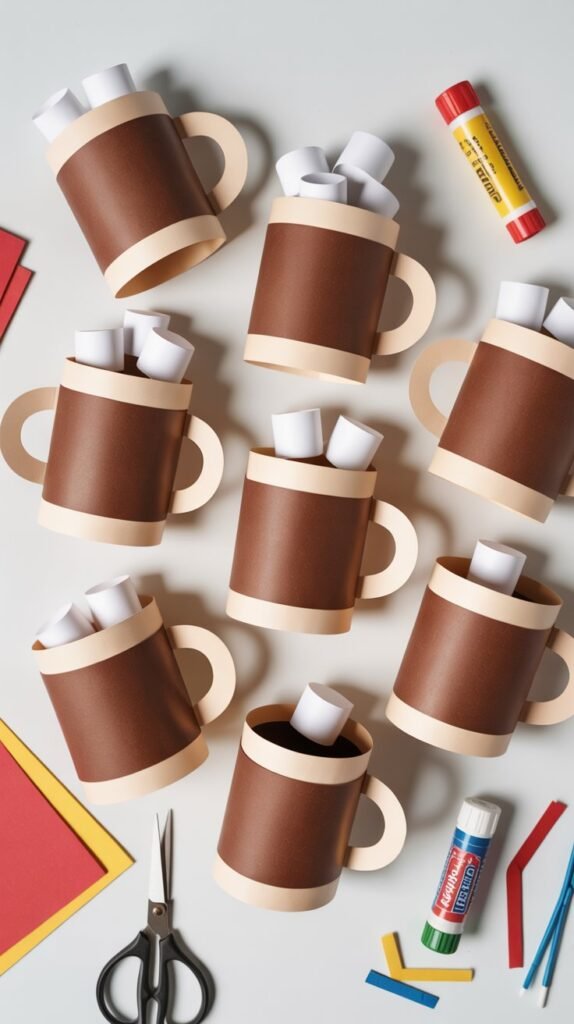
Paper hot cocoa mugs are a cozy, low-mess winter craft that kids instantly recognize and love. This project is especially great for mixed ages because it uses simple shapes and leaves plenty of room for creativity. Younger kids can glue large pieces together, while older kids enjoy layering details like marshmallows, whipped cream, or patterned mugs. It’s a perfect winter-themed craft for classrooms, playdates, or a quiet afternoon indoors.
Step-by-Step Instructions
- Create the mug shape: Cut a mug shape from colored cardstock or construction paper.
- Add the cocoa: Cut a brown paper rectangle or oval and glue it inside the mug.
- Make marshmallows: Cut small white squares or circles from paper.
- Layer the toppings: Glue marshmallows slightly overlapping at the top of the cocoa.
- Add a handle: Cut a curved strip of paper and attach it to the side of the mug.
- Decorate the mug: Draw patterns, names, or winter designs on the mug.
- Display: Line mugs up on a bulletin board or tape them to a wall for instant winter decor.
Shop the Look
When winter keeps kids indoors, having a go-to list of easy crafts makes all the difference. These paper and cardboard winter crafts are simple, affordable, and flexible enough to work for toddlers, older kids, and classroom groups alike. Whether you’re filling a snowy afternoon at home or planning themed activities for school, these projects keep creativity flowing without overwhelming prep or cleanup. Bookmark this list now so you’re ready the next time winter boredom strikes.
If you’re looking for more kid-friendly craft ideas that are just as simple and low-mess, check out Beginner-Friendly Air-Dry Clay Crafts on Room Revival Studio for another easy way to keep little hands busy and creative indoors.

