
Every December, Pinterest and home décor catalogs explode with Christmas inspiration—gorgeous garlands, custom wreaths, and tablescapes that look straight out of a designer showroom. But here’s the thing: most of those setups cost more than your actual tree. The good news? You don’t need to spend a fortune to make your home look luxurious. With a little creativity, you can turn Dollar Store Christmas Crafts into décor that looks high-end, modern, and totally original.
Think DIY Christmas decorations made from simple materials—glass, velvet, greenery, and gold—that rival the ones you’d find at Pottery Barn. Whether you’re crafting for your dining table, mantel, or front door, these ideas are stylish enough for adults but easy enough for anyone to pull off. The best part? Every project starts with a trip to your local dollar store and ends with your space looking like a holiday feature in a design magazine.
1. Frosted Candle Centerpieces
This craft nails that “effortlessly elegant” look because it blends texture, light, and height—three elements professional stylists use in their Christmas tablescapes. Frosted glass diffuses candlelight to create a soft, warm glow that instantly feels upscale. The finish blurs harsh lines, giving every candle an ethereal, designer-like shimmer. Pair that glow with luxe ribbon or twine and you’ve got a centerpiece that feels curated, not crafty. It’s one of those DIY Christmas decorations that people won’t believe came from the dollar store.
How to Make It:
- Clean your glass: Start with basic glass vases, jars, or candleholders from the dollar store. Wipe them down with rubbing alcohol to remove any fingerprints or residue.
- Apply the frost: On a covered surface, spray the outside of each vase with frosted glass spray paint using light, even strokes from 8–10 inches away. Let it dry completely between coats.
- No spray paint? No problem: Mix equal parts Mod Podge and water in a small bowl. Brush a thin layer onto the glass and roll it in Epsom salt for a beautiful, crystalline frost effect. Let dry.
- Add your finishing touch: Wrap the top of each vase with velvet ribbon for a sophisticated look or jute twine for a rustic finish. Tie in a bow or secure with hot glue.
- Assemble your centerpiece: Place a white pillar candle or LED flameless candle inside each vase. Group three or more of varying heights on your table or mantel to create visual interest.
Pro Tips:
Stick to a cohesive color palette for a high-end feel—try ivory, champagne, or sage green. For natural warmth, surround your centerpiece with pinecones, sprigs of faux greenery, or gold ornaments. If you’re going for a minimalist aesthetic, line them down the center of your table on a neutral linen runner for that clean, Scandinavian-inspired glow.
Shop the Look:
2. Velvet Ribbon Wreath
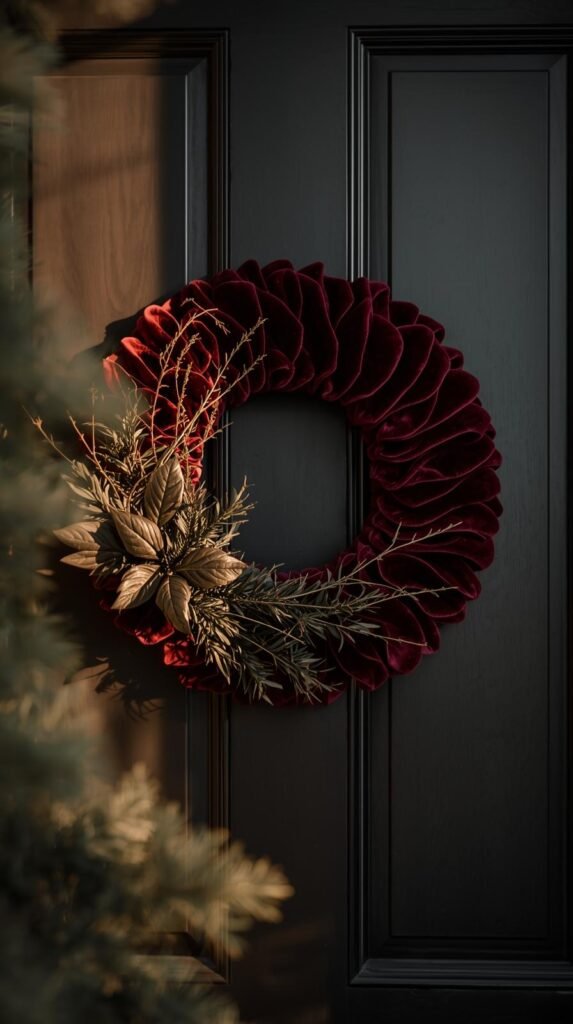
Velvet instantly elevates anything it touches—it’s rich, soft, and catches light in a way that feels luxurious. When wrapped around a simple dollar store wreath form, it creates a piece that looks like it came from an upscale boutique, not the bargain aisle. This DIY Christmas craft works because it’s all about contrast: the plush texture of the ribbon against evergreen tones or metallic accents gives your door a designer finish. It’s proof that a few dollars’ worth of ribbon can make a big visual impact when used strategically.
How to Make It:
- Gather your base: Start with a plain foam or wire wreath form from the dollar store. Choose your shape—round for traditional, or square for something more modern.
- Prep the ribbon: Use 2–3 rolls of velvet ribbon in your color of choice. Burgundy, forest green, and navy all give that rich holiday depth. Cut ribbon lengths around 2–3 feet each so they’re easy to wrap.
- Wrap and secure: Apply a small dab of hot glue to anchor the first piece of ribbon to the back of your wreath form. Begin wrapping the ribbon tightly around, slightly overlapping each layer so no base shows through. When you reach the end of one strip, glue it down, then start the next piece. Continue until the entire form is covered.
- Add dimension: For a more layered look, weave in thin gold cord or metallic trim between sections of velvet. It adds that subtle shimmer you see in designer décor.
- Finish the look: Tie a large bow from the same velvet ribbon and attach it at the bottom or top of your wreath with hot glue. You can also tuck in faux evergreen sprigs, pinecones, or small gold ornaments for a custom touch.
Pro Tips:
For a minimalist vibe, stick to one tone of velvet ribbon and skip the add-ons—it looks modern and clean. If your door is dark, choose lighter tones like blush or champagne velvet to make it pop. To hang, loop a matching piece of ribbon over the top and secure it with a small command hook so the focus stays on the wreath itself. This project pairs beautifully with Dollar Tree holiday crafts like candleholders or garlands using similar ribbon colors for a cohesive entryway.
Shop the Look:
3. Mini Ornament Garland
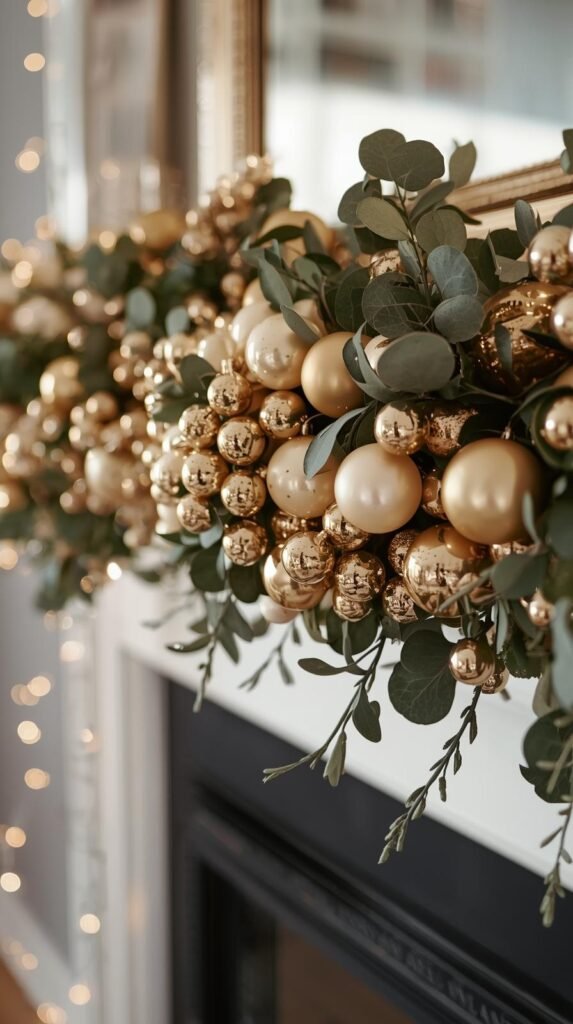
Small ornaments might seem like filler pieces, but when you cluster them together, they suddenly look intentional and high-end. This craft transforms simple Dollar Tree Christmas ornaments into a designer garland that looks custom-made. It’s all about repetition and shine—mixing matte, metallic, and glossy finishes creates the kind of layered texture you’d see in a luxury holiday display. Whether you hang it across a mantel, mirror, or entryway table, it instantly adds depth and sparkle without overwhelming the space.
How to Make It:
- Gather your supplies: You’ll need mini ornaments (in a consistent color palette), thin floral wire or jute string, and a few command hooks or clear thumbtacks for hanging. Stick to three tones max for cohesion—like gold, copper, and champagne, or blush, white, and silver.
- Prep your ornaments: Remove any bulky hangers and thread each one onto your wire or string. If you’re using jute, a large needle helps thread them easily.
- Cluster strategically: Slide ornaments close together in sections of 5–7, then twist the wire once or tie a small knot between clusters to hold them in place. This creates the “full” garland look you see in high-end holiday décor.
- Add greenery or accents: Tuck in snippets of faux pine or eucalyptus between clusters, securing them with a dab of hot glue or floral tape. This softens the metallic shine and gives that designer “layered” effect.
- Hang and shape: Attach your garland along a mantel, mirror, or banister. Let it drape slightly for a natural curve, or hang it straight for a clean, modern look.
Pro Tips:
If you want a fuller look, double up your strand and twist them together—it creates instant volume. For smaller spaces like apartment entryways, use shorter garlands around mirrors or picture frames for a polished touch. To avoid looking overly busy, balance shine with matte ornaments and mix in a few textures like glitter or brushed metal. This DIY Christmas decoration looks stunning when paired with frosted candles or wreaths from earlier projects, tying your décor together effortlessly.
Shop the Look:
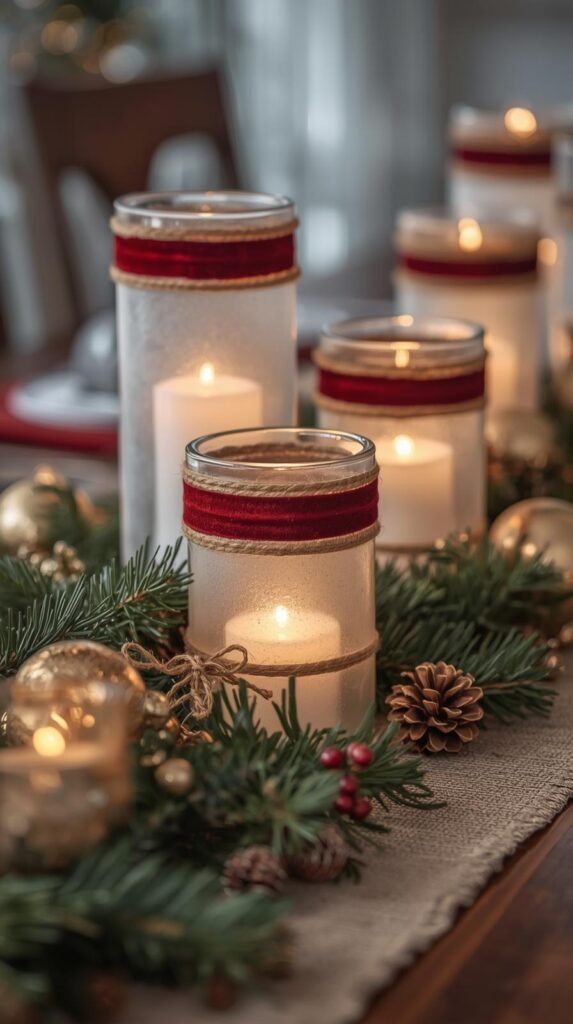
4. Snowy Mason Jar Lanterns
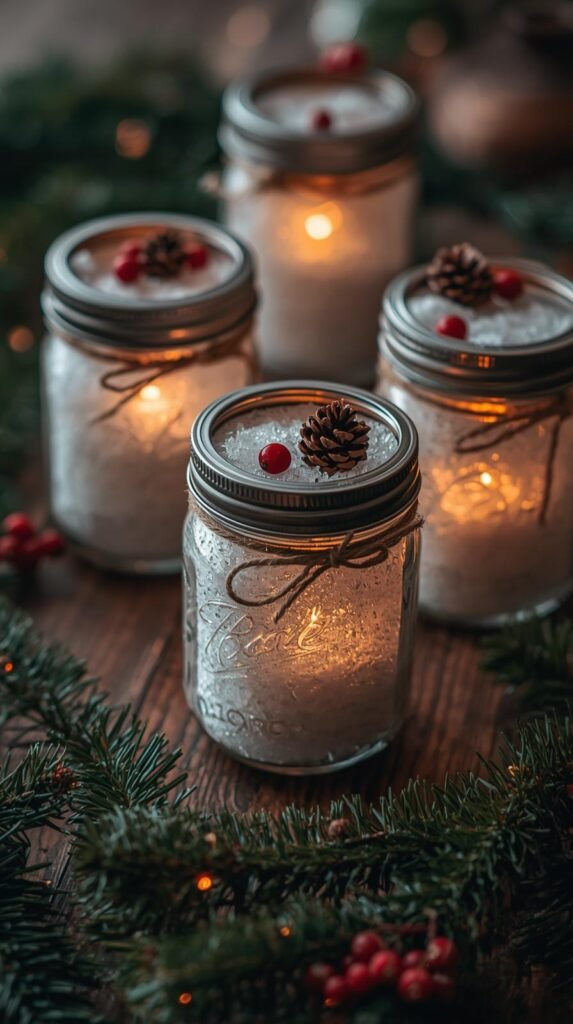
There’s something nostalgic about a glowing mason jar in winter—it feels homemade but charmingly elevated. This project transforms a simple glass jar into a snowy lantern that captures that soft winter glow found in boutique holiday shops. The texture of faux snow against the smooth glass plays beautifully with candlelight, while small details—like twine, ribbon, or pine accents—turn an everyday item into a cozy, high-end DIY Christmas decoration. It’s a versatile craft you can use on tabletops, mantels, or even outdoor steps for a warm, welcoming glow.
How to Make It:
- Start with clean jars: Pick up a few mason jars or glass containers from your local dollar store. Remove labels and wash thoroughly with warm, soapy water. Dry completely before starting.
- Add the “snow” effect: Brush the outside of each jar with a thin, even layer of Mod Podge. Then roll the jar in Epsom salt or faux snow flakes until it’s fully coated. Shake off the excess and let it dry for about 30 minutes.
- Create a soft frosted look: For more subtle shimmer, sprinkle a small amount of fine glitter into the faux snow before coating. It gives a candlelit sparkle when the light hits.
- Dress the rim: Once dry, wrap jute twine, burlap ribbon, or a thin velvet bow around the top of the jar. Add a small pinecone, cinnamon stick, or faux berry sprig for texture and color. Secure everything with a hot glue gun.
- Light it up: Drop a battery-operated LED tealight or flameless candle inside each jar. Avoid real flames—the faux snow is flammable. Arrange 3–5 jars in varying heights for a layered, designer-inspired glow.
Pro Tips:
For a more curated display, use jars of different sizes and tie them together visually with a matching ribbon color or metallic accent. Soft neutrals like ivory, gold, and sage green create a cozy, Scandinavian-inspired palette, while deep red or emerald tones feel traditional and warm. These Dollar Tree holiday crafts work beautifully as centerpieces for dinner tables, windowsills, or entryways—just add a few pine sprigs around the base to finish the look.
Shop the Look:
5. Dollar Tree Village Glow-Up
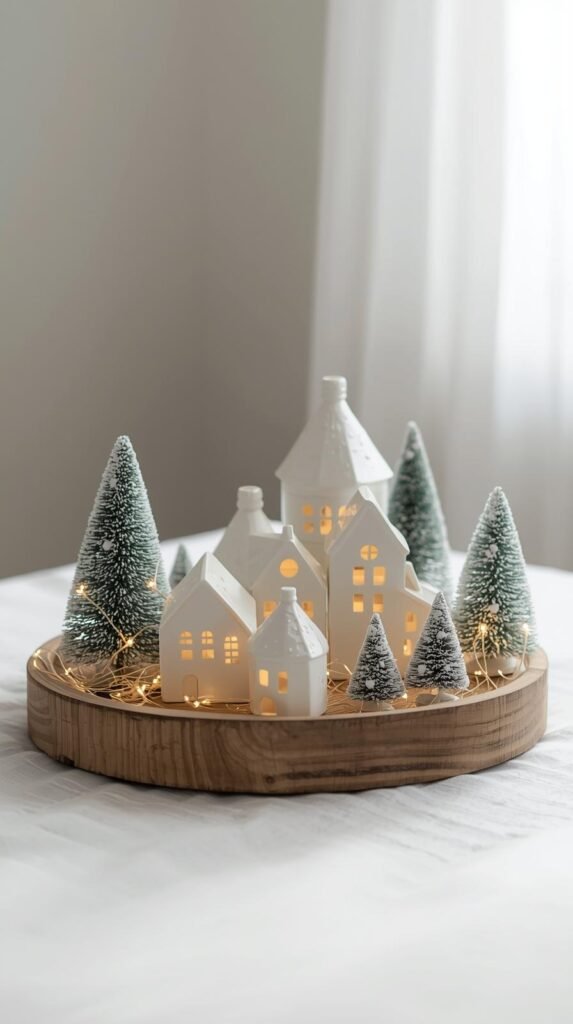
This is one of those Dollar Store Christmas crafts that turns an overlooked classic into something effortlessly chic. The tiny ceramic Christmas villages you find at Dollar Tree are cute but often painted in overly bright colors that can cheapen your display. With a few coats of matte spray paint and smart styling, you can turn them into a minimalist winter scene that looks straight out of a design catalog. It’s a small project with big payoff—perfect for mantels, bookshelves, or entryway tables where subtle, neutral décor always wins.
How to Make It:
- Choose your pieces: Pick out a mix of small ceramic houses, churches, or figurines from the dollar store. Variety in height and shape keeps your display interesting.
- Prep the surface: Wipe each piece clean with a damp cloth to remove dust or residue. For glossy finishes, lightly sand with fine-grit sandpaper so the paint adheres better.
- Prime and paint: Set your pieces on a drop cloth outdoors or in a well-ventilated area. Spray with a coat of matte white, stone gray, or champagne gold paint, holding the can about 8–10 inches away. Two thin coats usually do the trick. Let them dry completely.
- Optional shimmer: For a more festive touch, lightly mist the rooftops with pearl finish spray or brush on subtle glitter paint. The goal is sheen, not sparkle overload.
- Assemble your village: Arrange the painted houses on a wooden tray, cake stand, or faux snow base. Layer in small bottle-brush trees, LED string lights, or tiny deer figurines for dimension.
Pro Tips:
Stick to a cohesive palette—white and gold for a glam vibe, or white and gray for modern minimalism. If you want to elevate the setup even further, place your entire village under a clear glass cloche or inside a shallow shadow box frame for that museum-style presentation. This DIY Christmas craft also makes a great conversation piece—guests won’t believe it came from the dollar store once they see the transformation.
Shop the Look:
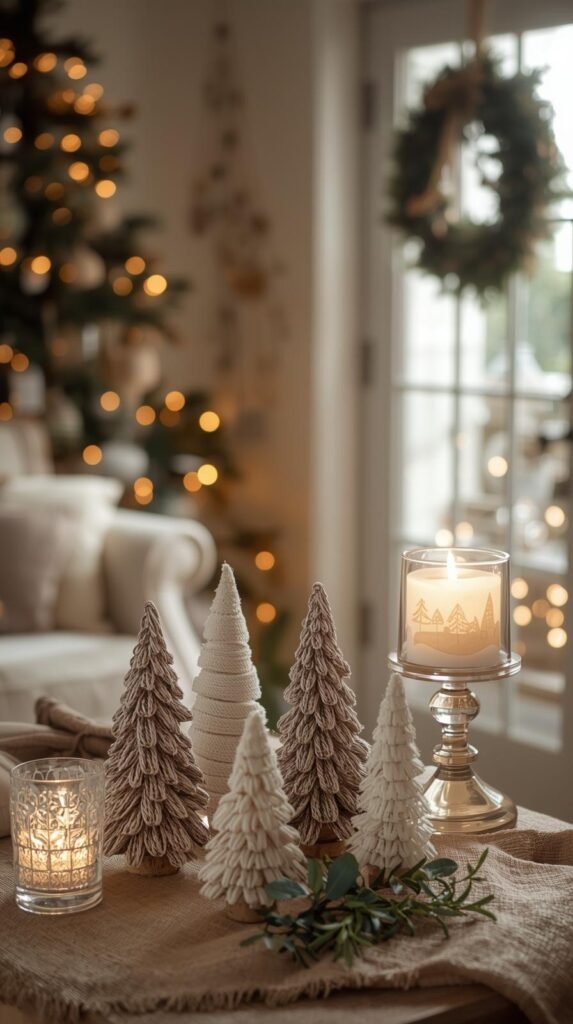
6. Twine-Wrapped Christmas Trees
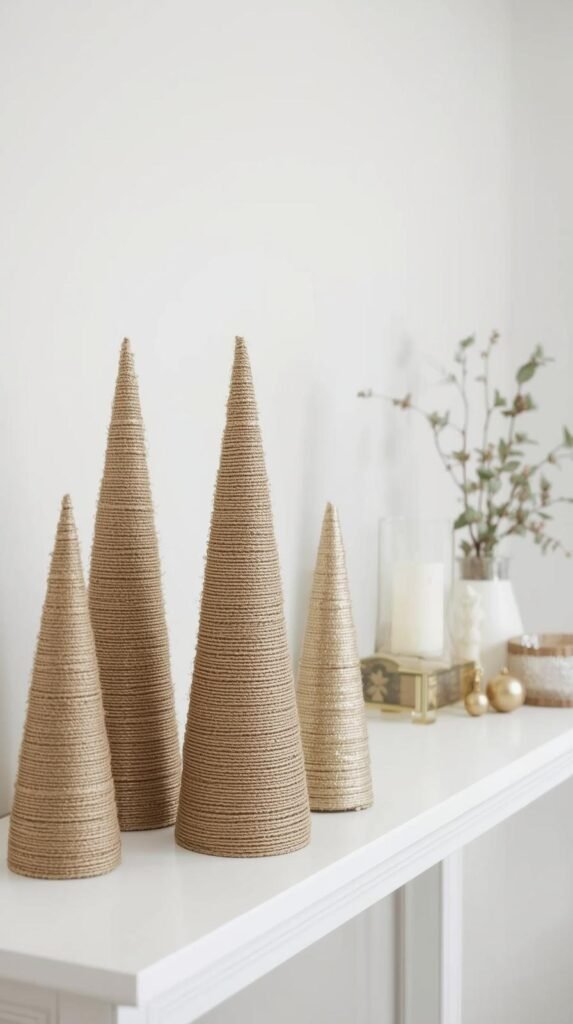
Texture is what separates store-bought from designer—and this craft is a masterclass in texture. Twine adds warmth, depth, and a handmade sophistication that works in nearly every décor style, from rustic farmhouse to modern organic. When wrapped around cone forms, it creates sculptural mini trees that look like something from a high-end boutique display. It’s one of the easiest Dollar Store Christmas crafts you can make, but it delivers serious style payoff. Group them on a mantel, console, or dining table to add height and balance to your holiday setup.
How to Make It:
- Create your tree base: Use foam or cardboard cones from the dollar store. If you can’t find any, roll cardstock into a cone shape, trim the bottom flat, and secure it with hot glue or tape.
- Prep your materials: Grab a roll of jute twine, hemp rope, or cotton cord—each gives a slightly different texture. Thicker rope feels coastal and bold, while thin jute looks refined and classic.
- Start wrapping: Add a small dab of hot glue at the tip of the cone and attach the end of your twine. Begin wrapping tightly around the cone, adding a small bead of glue every few inches to keep it secure. Continue until the entire surface is covered.
- Add dimension: Once wrapped, dry-brush the twine with a small amount of metallic gold or silver craft paint to highlight the texture. Alternatively, lightly mist the trees with gold spray paint for a subtle, expensive-looking sheen.
- Finish the look: Glue a small wooden star, jingle bell, or metallic bead to the top of each tree. Arrange three or five in varying heights for a layered, professional-looking vignette.
Pro Tips:
Stick to neutral tones—beige, taupe, cream—for a modern minimalist look, or mix in gold and green for a more festive, traditional palette. These twine trees pair beautifully with DIY holiday decorations like frosted candles and mini garlands. To give them even more presence, place them on small wooden coasters or white ceramic trays to create contrast against darker surfaces.
Shop the Look:
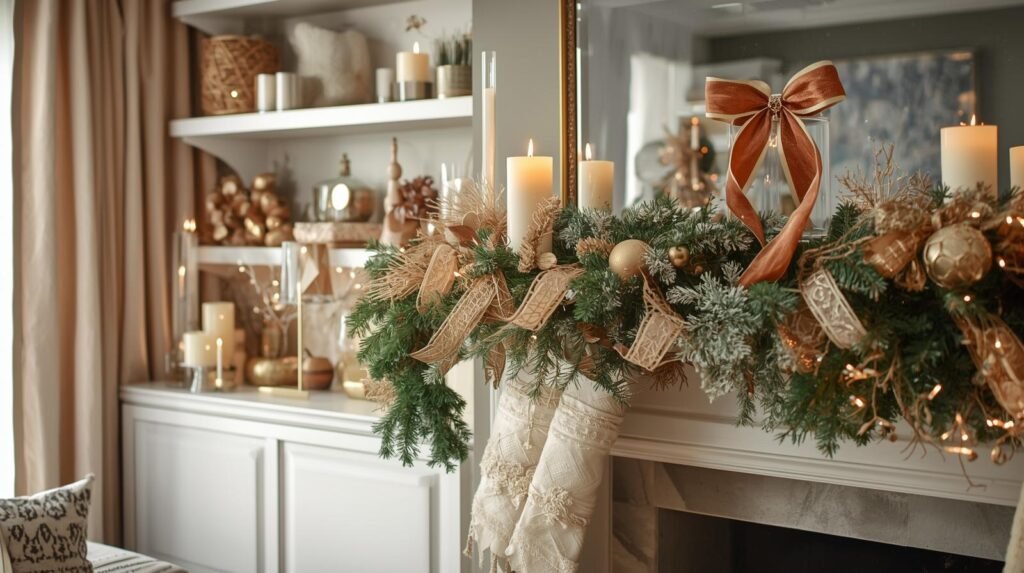
7. Burlap Bow Stockings
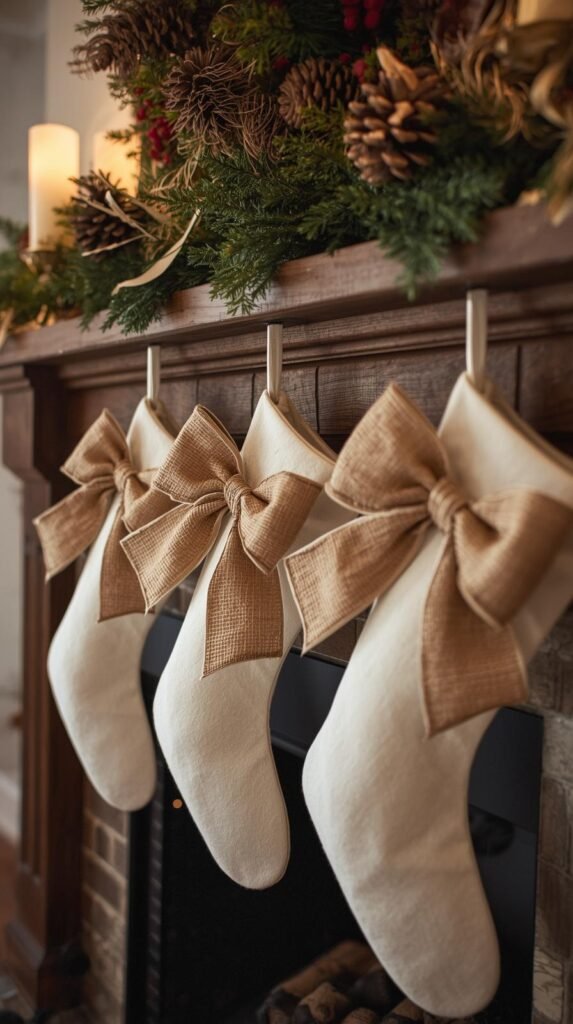
Every great Christmas setup has a focal point, and stockings are one of the easiest ways to create that designer moment without overspending. The secret? Texture and scale. Adding large burlap bows to simple dollar store stockings instantly makes them look custom-made. The contrast between soft fabric and rough burlap feels rich and layered—very “Anthropologie without the price tag.” This DIY Christmas craft gives you high-end, cozy farmhouse vibes with materials that cost next to nothing.
How to Make It:
- Start with basic stockings: Pick up plain felt or fabric stockings from the dollar store. White, cream, or red all work depending on your color scheme.
- Cut your burlap: Using a roll of burlap ribbon, cut two 2-foot sections per stocking. One will form the main bow, the other will create the tails. If the edges fray, lightly run a thin bead of hot glue along the cut to seal them.
- Form the bow: Fold one section of ribbon into loops and pinch the center tightly. Wrap a small piece of twine around the middle to hold it in place, creating a full, puffy bow shape.
- Attach the tails: Fold the second section in half and glue it behind your bow to form the trailing pieces. Snip the ends diagonally for a finished look.
- Add accents: Layer in velvet ribbon, mini pinecones, or tiny faux berries on top of the bow center for a touch of color and dimension. Secure everything with hot glue.
- Mount the bow: Glue or pin the finished bow onto the cuff of your stocking—right in the center or off to one side for a casual, styled look.
Pro Tips:
If your space leans modern, swap burlap for linen or velvet in muted tones like taupe or hunter green. For a more rustic setup, mix textures by adding twine tassels or small wooden name tags. Hang all your stockings in a row on your mantel, or stagger them along a staircase rail for a more organic, editorial look. This Christmas craft for adults feels designer because it plays with proportion—big bow, minimal base, perfect balance.
Shop the Look:
8. Faux Evergreen Centerpiece Bowl
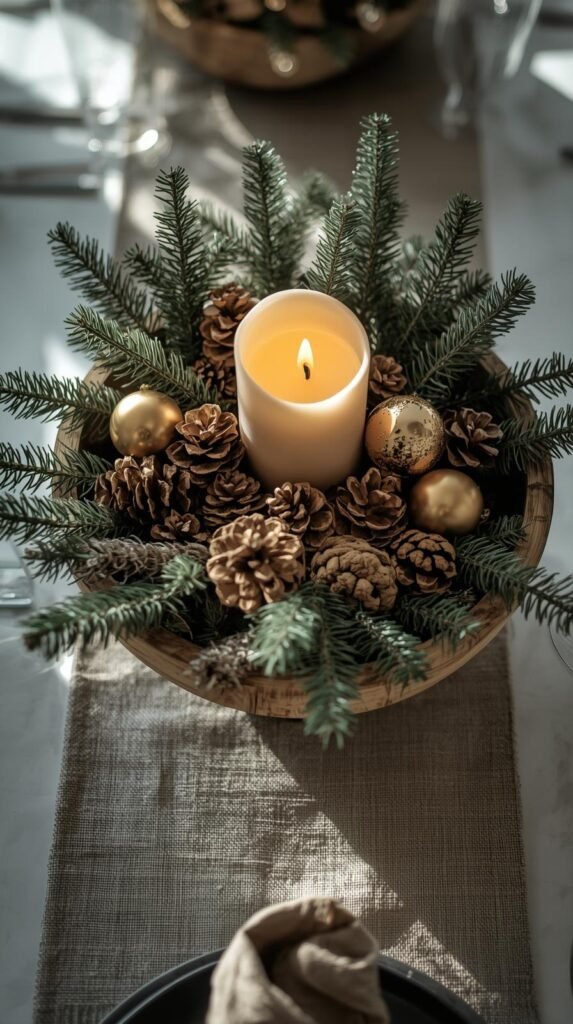
Centerpieces anchor your holiday décor—they pull a space together and add that “designer effort” that looks intentional, not improvised. This one turns a few Dollar Tree holiday crafts—like faux greenery, ornaments, and pinecones—into a lush, layered arrangement that looks far more expensive than it is. The trick is all in the styling: mixing textures, playing with proportions, and choosing the right vessel. Done right, this project looks like a floral arrangement from a high-end boutique instead of something whipped up from dollar store finds.
How to Make It:
- Choose your base: Grab a large decorative bowl, wooden tray, or low glass vase from the dollar store. Matte or stone finishes feel elevated and modern.
- Add structure: Fill the bottom with floral foam or crumpled tissue paper to give the arrangement height and support. You’ll want it slightly domed in the center for a full look.
- Layer your greenery: Start with faux pine branches, cedar sprigs, or eucalyptus stems. Insert them evenly around the base, crisscrossing for a natural, full shape.
- Add texture: Mix in pinecones, small ornaments, or dried orange slices. Stick to a consistent color palette—think champagne, gold, and ivory for modern luxe, or red and green for traditional warmth.
- Add a focal point: Nestle a pillar candle, LED candle, or small cluster of mini ornaments in the center for balance. Make sure it sits slightly elevated so it draws the eye.
- Finish and fluff: Step back and tweak until it feels visually balanced. The goal is a mix of shapes and textures with no empty gaps or overly tight clusters.
Pro Tips:
If your bowl feels too flat, raise the interior with an inverted cup or small container hidden under the greenery—this instantly adds height and dimension. A touch of metallic paint on pinecones or ornament edges helps catch light and adds polish. This DIY Christmas decoration is perfect for dining tables, console setups, or even kitchen islands—anywhere that needs a holiday centerpiece with impact but not clutter.
Shop the Look:
9. Metallic Ornament Wreath
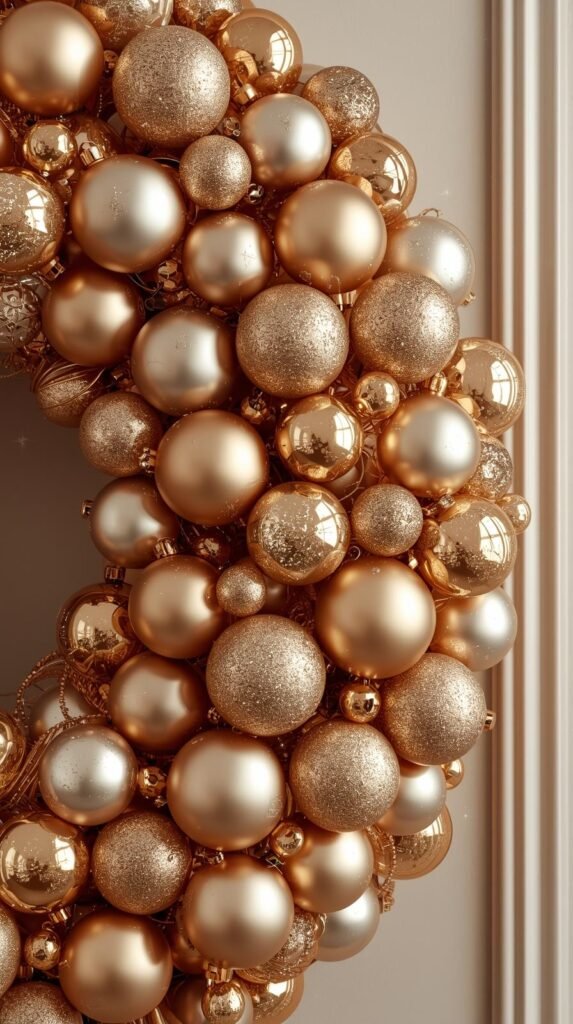
A metallic ornament wreath is one of those timeless DIY Christmas decorations that always looks high-end, but it’s shockingly easy (and inexpensive) to make. The key is balance—mixing matte, shiny, and glitter finishes in a tight, clustered pattern that mimics designer wreaths from places like Crate & Barrel or West Elm. When you keep your palette tight—gold and champagne, silver and white, or even rose gold and blush—the end result feels cohesive, modern, and expensive. This project turns a few boxes of dollar store ornaments into an eye-catching statement piece that looks anything but budget.
How to Make It:
- Start with your base: Grab a foam wreath form from the dollar store. If you want a fuller shape, wrap it in tinsel garland or ribbon first to camouflage the base.
- Sort your ornaments: Separate your ornaments by finish—matte, glossy, and glitter. This will help you distribute them evenly as you build the wreath. Remove the metal hanging tops to make gluing easier.
- Attach the first layer: Using a hot glue gun, attach larger ornaments around the outer and inner edges of the wreath form. This forms the base structure and sets your spacing.
- Build dimension: Glue medium-sized ornaments in between the larger ones, staggering placement for a rounded, organic shape. Fill any visible gaps with smaller ornaments or mini filler balls.
- Fill and polish: Step back and look for uneven sections or visible gaps. Add smaller ornaments until the wreath feels full and balanced.
- Add your finish: Tie a wide satin or velvet ribbon at the top for hanging. If you’re feeling extra creative, tuck in a few sprigs of eucalyptus or faux gold leaves for texture.
Pro Tips:
Keep your color palette simple—no more than three tones. This makes the wreath look sophisticated instead of chaotic. If you want a warm, glam look, stick with metallics like gold, bronze, and champagne. For cooler, winter tones, mix silver, pearl, and icy blue. Hang it on a dark door for contrast or layer it over a mirror for that boutique-hotel holiday vibe. This Dollar Tree Christmas craft DIY project also makes a gorgeous gift—it looks store-bought but costs under $10 to make.
Shop the Look:
10. Winter Window Scene in a Frame
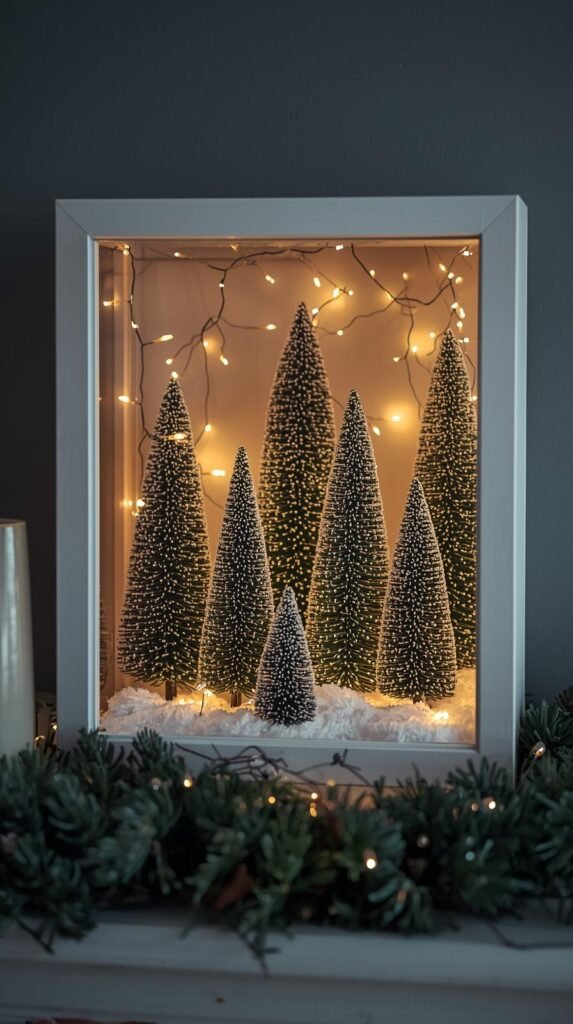
This is one of those Dollar Store Christmas crafts that looks like it came from a boutique holiday market. The layered, shadowbox-style design adds instant depth and charm while using only a handful of inexpensive materials. Framing your décor gives it structure and polish—turning dollar store mini trees, faux snow, and figurines into a cozy winter scene you can hang or display anywhere. It’s classic, whimsical, and versatile enough to fit both modern and traditional spaces.
How to Make It:
- Pick your frame: Start with a deep photo frame or shadowbox from the dollar store. Remove the glass and backing so you can work inside the frame.
- Create your base: Cut a piece of white cardstock or fabric to fit the back of the frame. Glue it in place—it’ll act as your snowy background.
- Add your scene: Using mini bottle brush trees, small ceramic houses, or tiny deer figurines, arrange a little winter vignette. Play with height and spacing for a natural look.
- Add the “snow”: Sprinkle faux snow or Epsom salt across the bottom, securing it with a bit of Mod Podge if you want it to stay fixed.
- Layer it up: For depth, glue some trees or accents closer to the glass and others toward the back. This creates that dimensional “through-the-window” effect.
- Optional lighting: For an extra designer touch, add a mini LED fairy light strand inside before closing the frame. The subtle glow adds instant magic.
- Seal and display: Reattach the glass or leave it open for texture. Set it on a shelf or hang it as part of a holiday gallery wall.
Pro Tips:
Stick with a neutral, wintry palette—white, silver, and forest green with just a hint of gold or red. If your aesthetic leans minimalist, skip the figurines and go for a snowy tree-lined scene instead. For a cozy farmhouse look, use a distressed wood frame and add a twine bow at the top. This DIY Christmas craft also makes a thoughtful handmade gift—it’s simple, elegant, and guaranteed to earn compliments.
Shop the Look:
Mistakes to Avoid When Making Dollar Store Christmas Crafts
Even the best ideas can fall flat if the details aren’t right. Here’s what to watch for when you’re turning Dollar Tree holiday crafts into designer-level décor:
- Mixing too many colors or finishes
When every piece shines differently, the result looks cluttered, not curated. Stick to two or three tones max—like gold, ivory, and greenery—or pick one metallic and build around it. - Skipping prep work
Cheap materials often need a little love before they shine. Always clean, sand, or prime surfaces before painting or gluing. This one step makes your finished pieces look professional instead of patchy. - Overusing glitter or bright red accents
Glitter can cheapen your look fast. If you love sparkle, use it sparingly—think shimmer, not sparkle overload. Deep tones, metallic finishes, and matte textures give a more modern, polished feel. - Ignoring proportion and balance
Scale matters. When grouping décor, vary the height and size of your pieces to create dimension. Too many small items or identical shapes can make your setup feel flat and uninspired. - Using hot glue without support
Heavy items like ornaments or wood pieces need secure adhesion. Reinforce hot glue with floral wire, craft adhesive, or command strips if the piece will hang or move around. - Neglecting presentation
Even the most beautiful craft loses its impact if it’s sitting alone on a shelf. Group items by theme—like metallics, greenery, or neutrals—and layer them with candles, trays, or fabrics for that styled, magazine-worthy look.
If there’s one takeaway from these Dollar Store Christmas crafts, it’s that great design doesn’t have to come with a designer price tag. You can create warmth, texture, and sophistication with just a few smart tweaks—paint, ribbon, twine, and a good eye for balance. The trick isn’t the materials; it’s the styling. Layer tones, mix textures, and think like a decorator.
With a few dollars and a bit of creativity, you can turn ordinary supplies into statement décor that looks custom-made. Whether you love classic red-and-green or a modern metallic palette, every project here proves that affordable can still feel curated and luxe. So grab a cart, head to your local dollar store, and start building your own high-end holiday magic—one DIY at a time.
Read Next: 16 Christmas Front Porch Ideas That’ll Make Your Block Stop and Stare

