
Affiliate Disclosure – This post may contain affiliate links, which means I may earn a small commission if you shop through my links at no extra cost to you.
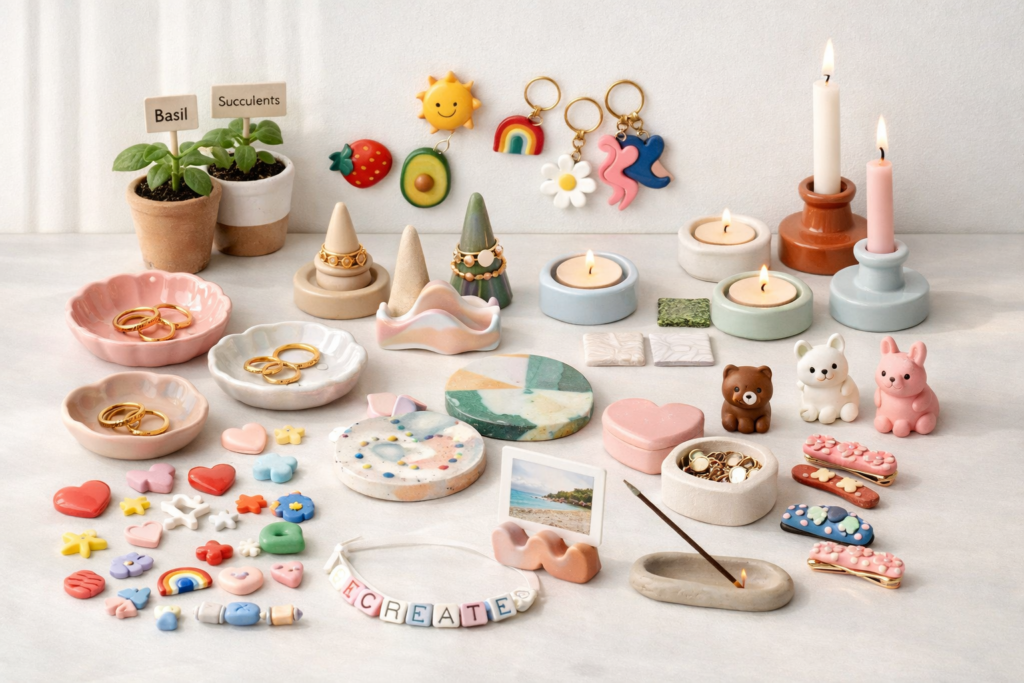
If you’ve been wanting a creative hobby that’s low effort but still gives high-end results, mini clay ideas are it. These tiny projects are quick to make, easy to customize, and honestly kind of addictive once you start. I’ve tested a lot of small clay crafts, and the ones in this list are actually worth your time. Think glossy finishes, aesthetic shapes, and pieces you’ll either use daily or proudly display. If you want cute clay crafts that don’t feel childish or cluttered, this is your list.
Shop Your Clay Supplies (Everything You’ll Need)
Before you start, grab your basics. These are the exact tools and materials that will make your mini clay ideas look polished, glossy, and actually worth keeping.
- Air Dry Clay
- Clay Tools Kit
- Acrylic Paint Set
- Gloss Varnish for Clay
- Fine Grit Sandpaper
- Strong Craft Glue
- Keychain Rings & Hardware
- Small Paint Brushes Set
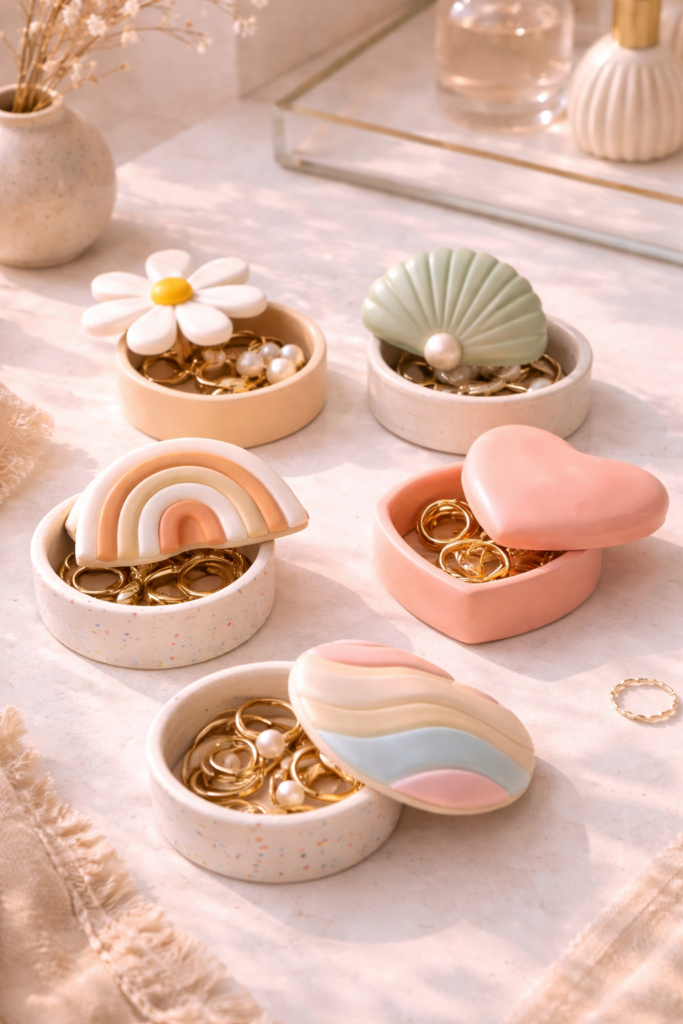
1. Mini Clay Jewelry Dishes
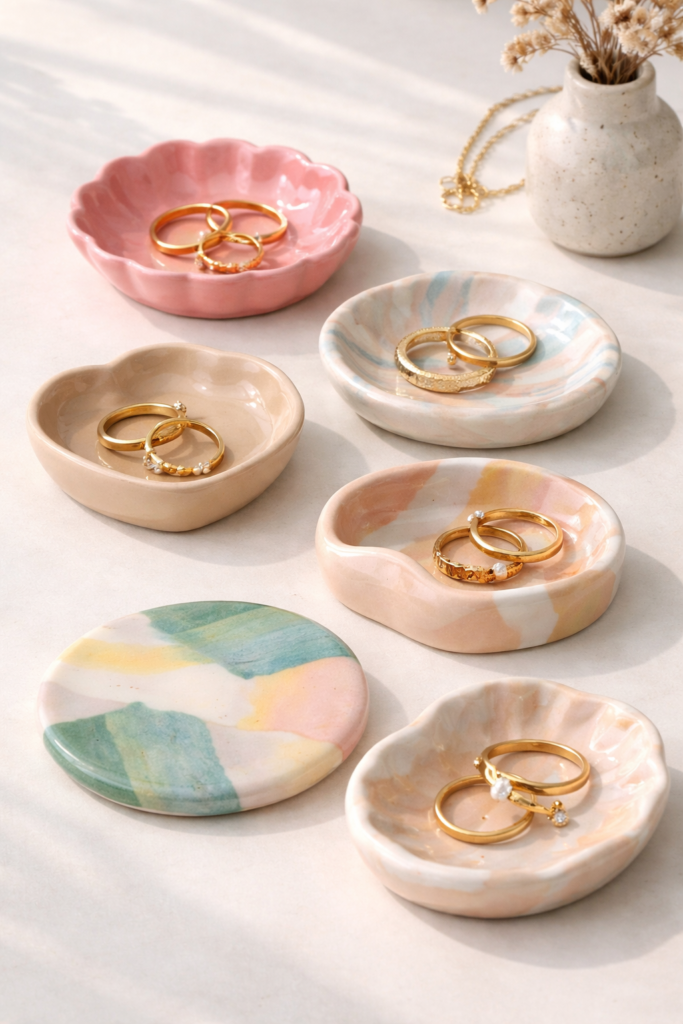
These are the kind of small clay crafts that instantly make your space feel put together. A mini clay jewelry dish with a glossy finish looks clean, elevated, and way more expensive than it is. You can go with soft neutral tones for a minimal vibe or lean into bold marbling for something more eye-catching. The slightly curved edges keep your rings and earrings in place while adding that handmade, organic feel. It’s one of those cute small clay ideas that’s both aesthetic and actually useful.
Step-by-Step Instructions
- Knead a small piece of air dry clay until it feels soft and smooth.
- Roll it out evenly to about 1/4 inch thick.
- Use a small bowl, cookie cutter, or craft knife to cut out a circle, oval, scallop, or abstract shape.
- Gently lift the edges upward with your fingers to create a shallow dish shape.
- Smooth the surface and edges with a little water and your fingertips.
- Let the dish dry completely according to the clay package instructions.
- Lightly sand any rough edges once dry.
- Paint it if desired, then finish with a glossy glaze or varnish for that polished look.
2. Mini Clay Keychains
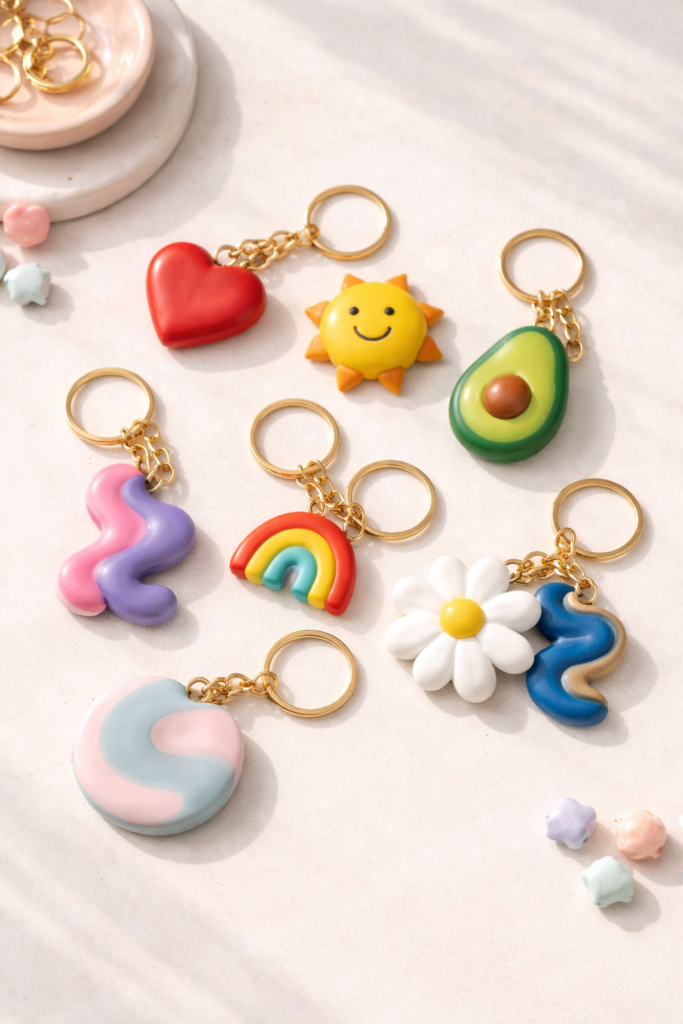
If you want something small that feels custom and giftable, mini clay keychains are it. These tiny clay ideas are perfect for initials, abstract shapes, or cute icons like hearts and stars. With a glossy finish, they instantly look more polished and less DIY in the obvious way. You can keep it minimal with solid colors or layer in patterns and color blocking for a more playful vibe. It’s one of the easiest small clay projects that still feels personal and intentional.
Step-by-Step Instructions
- Take a small piece of clay and knead it until smooth and pliable.
- Roll it out evenly or shape it by hand depending on your design.
- Cut or form your desired shape (circle, tag, heart, letter, or abstract form).
- Use a straw, skewer, or tool to create a hole near the top for the keyring.
- Smooth edges and surfaces with your fingers or a damp brush.
- Let the piece dry completely.
- Lightly sand if needed for a clean finish.
- Paint your design or leave it minimal, then apply a glossy sealant.
- Once fully dry, attach a keychain ring through the hole.
3. Mini Clay Magnets
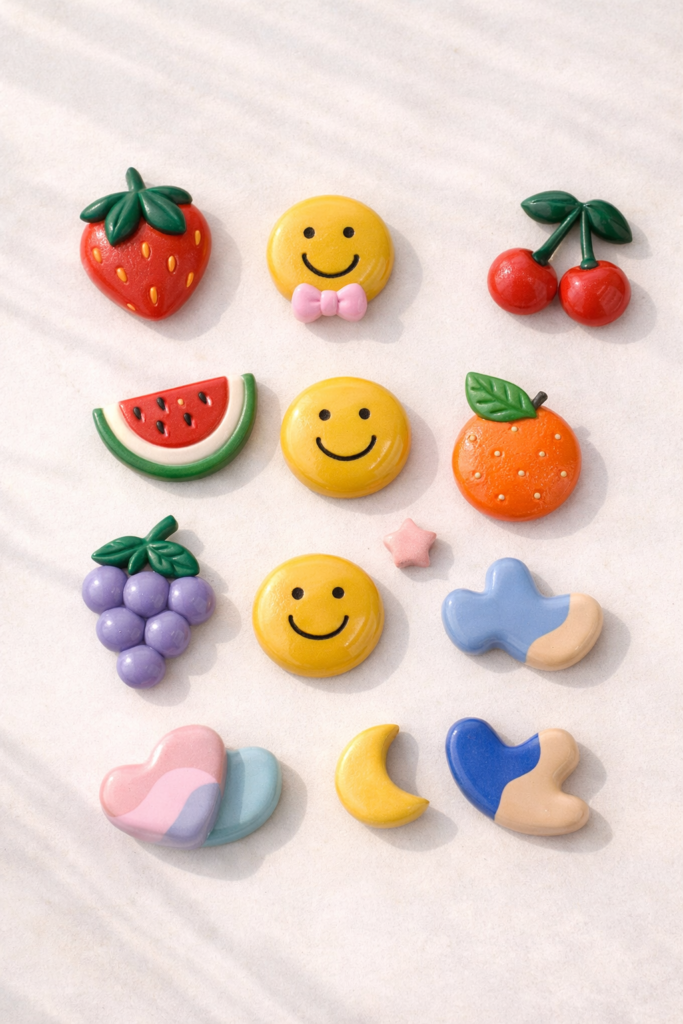
These are the kind of cute clay crafts that make everyday spaces feel more fun without trying too hard. Mini clay magnets are perfect for adding personality to your fridge, office board, or even a locker. Think tiny fruit shapes, smiley faces, abstract blobs, or soft pastel icons with a glossy finish that catches the light. They’re small, quick to make, and easy to customize in batches, which makes them one of the best mini clay ideas if you want instant results.
Step-by-Step Instructions
- Knead a small amount of clay until soft and smooth.
- Roll or shape your design by hand (fruit slices, hearts, flowers, or abstract shapes).
- Keep the thickness even so the magnet sits flat.
- Smooth out any fingerprints or uneven edges with a damp finger.
- Let the pieces dry completely according to instructions.
- Lightly sand the back if needed to create a flat surface.
- Paint your designs or leave them natural for a minimal look.
- Apply a glossy sealant to enhance color and durability.
- Once dry, glue a small magnet to the back using strong craft glue and let it set fully.
4. Mini Clay Plant Markers
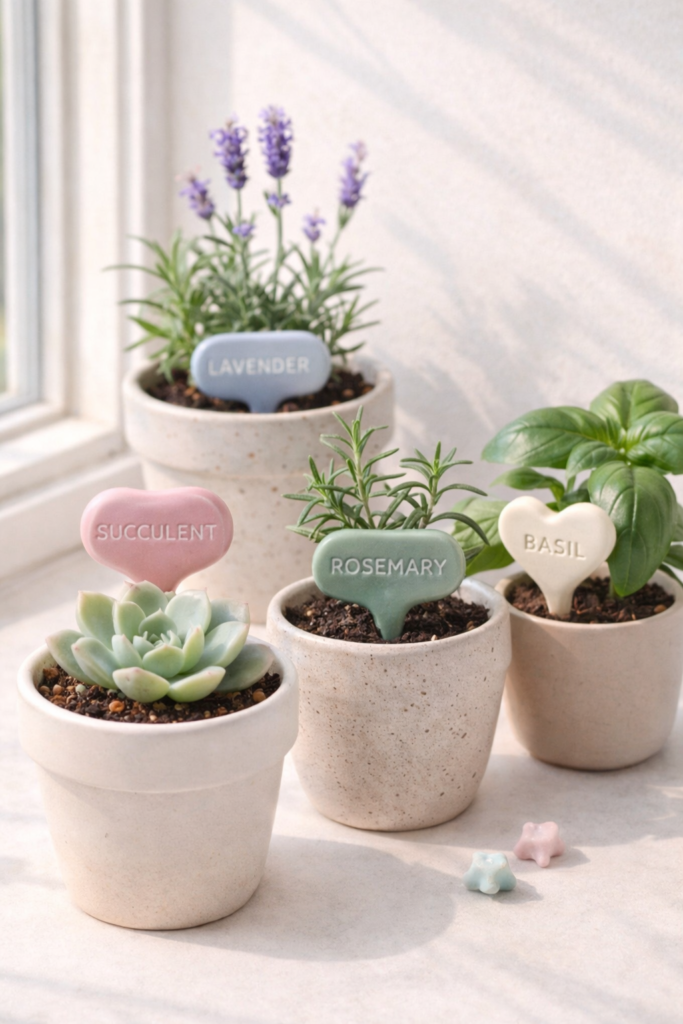
If you have herbs, small plants, or even a tiny indoor garden, these mini clay plant markers are one of those small clay ideas that feel both cute and functional. They add a clean, styled look to your pots while helping you keep everything organized. You can go minimal with neutral tones and engraved lettering or lean playful with soft pastels and hand-painted names. The glossy finish gives them that polished, almost ceramic look without the extra effort.
Step-by-Step Instructions
- Knead your clay until smooth and easy to work with.
- Roll it out to about 1/4 inch thick.
- Cut into small rectangular or oval shapes for the label portion.
- Extend one end into a narrow stem or attach a rolled piece to create a stake.
- Use a needle tool, toothpick, or letter stamps to write or imprint plant names.
- Smooth the surface and edges with a damp finger.
- Let the markers dry completely.
- Lightly sand any rough edges if needed.
- Paint details or leave them minimal, then apply a glossy sealant.
- Once fully dry, place them directly into your plant pots.
5. Mini Clay Ring Holders
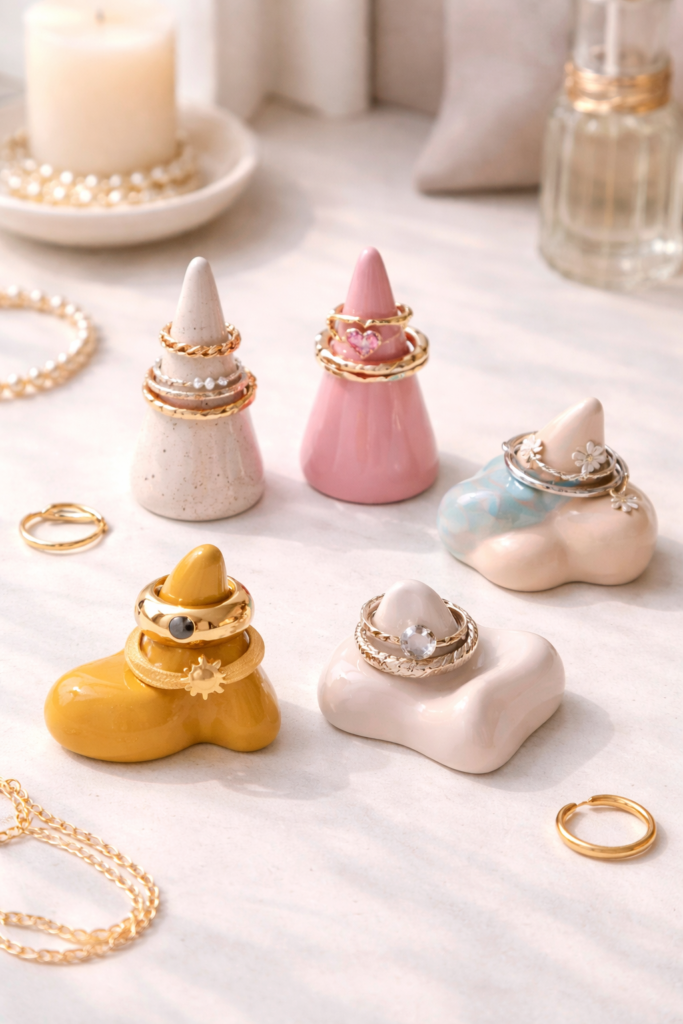
This is one of those mini clay ideas that feels simple but looks designer when it’s done right. A glossy ring holder instantly upgrades your nightstand or bathroom counter, especially when you play with sculptural shapes or clean cone styles. You can keep it minimal in white or beige for that soft neutral aesthetic, or go bold with color-blocked bases. It’s functional, compact, and honestly one of the most satisfying small clay crafts to make.
Step-by-Step Instructions
- Take a small piece of clay and knead it until smooth and pliable.
- Roll one portion into a cone shape to hold the rings.
- Flatten another piece into a small round or organic base.
- Attach the cone to the center of the base, pressing gently to secure.
- Smooth the connection point so it looks seamless.
- Refine the shape and remove any fingerprints with a damp finger.
- Let the piece dry completely.
- Lightly sand for a smooth finish if needed.
- Paint or leave it neutral, then apply a glossy sealant for a polished look.
6. Mini Clay Candle Holders
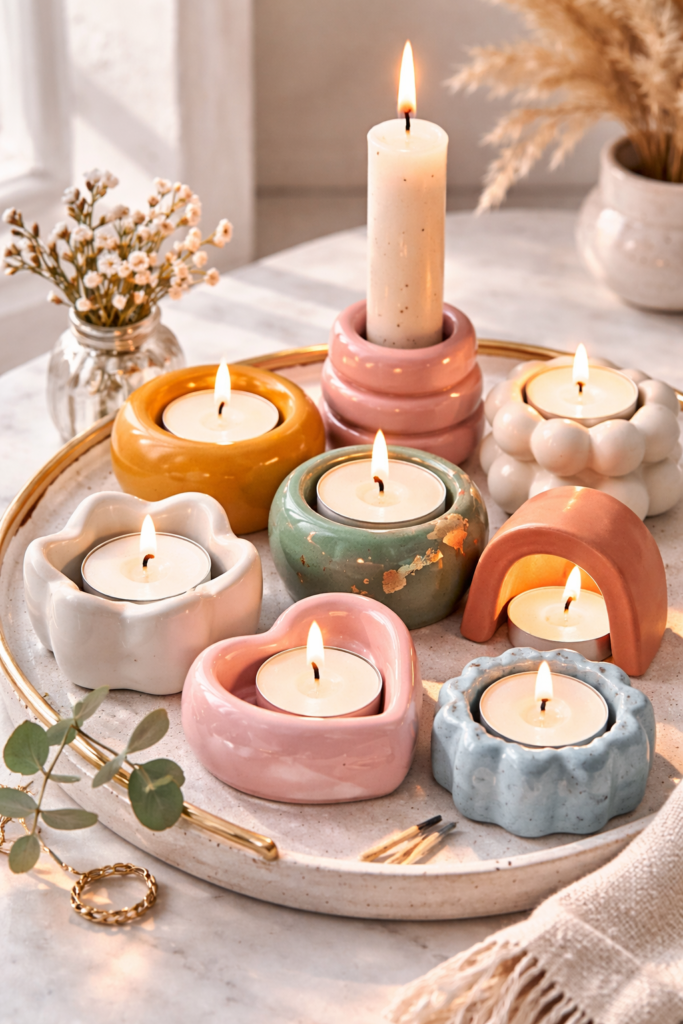
These mini clay candle holders are small but make a big impact, especially when styled on a tray, shelf, or coffee table. With a glossy finish, they give off that clean, modern vibe while still feeling handmade. You can shape them round, square, or slightly organic for a more relaxed look. They’re perfect for tea lights or slim taper candles and work across so many aesthetics, from minimal to bold and colorful.
Step-by-Step Instructions
- Knead your clay until soft and smooth.
- Roll it into a ball, then gently flatten the bottom to create a stable base.
- Use your thumb or a small tool to press a hole into the center for the candle.
- Adjust the opening so it fits your candle snugly without being too tight.
- Smooth the outer surface and edges with your fingers or a damp sponge.
- Let the piece dry completely.
- Lightly sand any uneven areas for a cleaner finish.
- Paint if desired or keep it neutral.
- Apply a glossy sealant to give it that elevated, finished look.
7. Mini Clay Charms
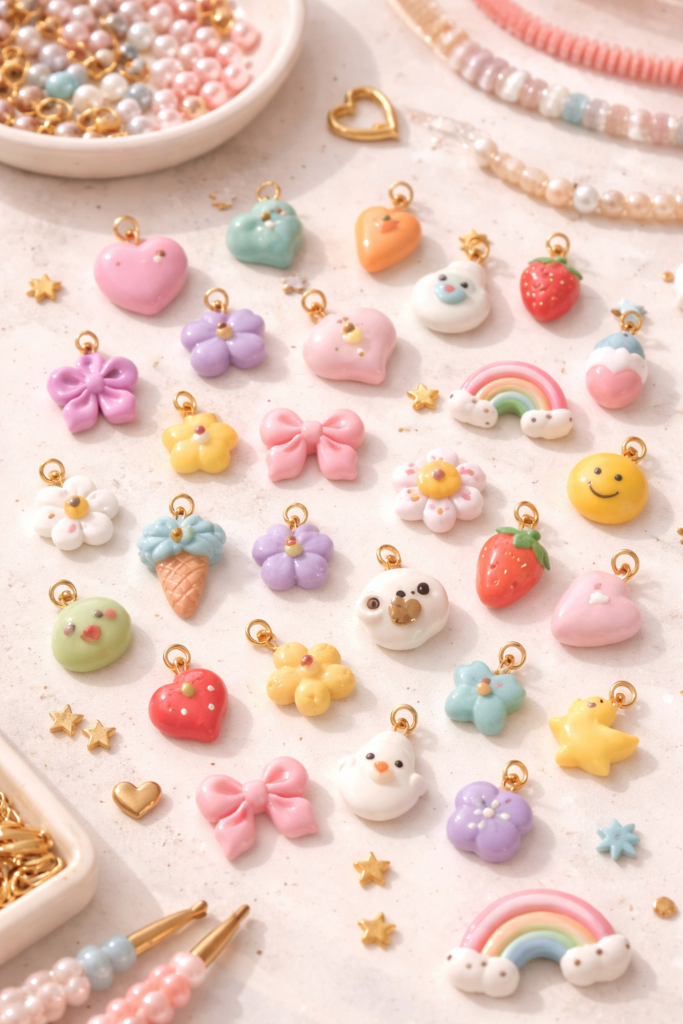
Mini clay charms are one of those tiny clay ideas you’ll keep coming back to because they’re so versatile. You can turn them into bracelet pieces, bag charms, zipper pulls, or even phone accessories. Think tiny hearts, stars, bows, mushrooms, or mini food shapes with a glossy finish that makes them pop. They’re small, detailed, and perfect if you want something cute but still custom.
Step-by-Step Instructions
- Knead a small amount of clay until it’s smooth and workable.
- Roll tiny portions into your desired shapes (hearts, stars, flowers, or mini objects).
- Use a needle tool or toothpick to add small details and textures.
- Carefully create a small hole at the top for attaching hardware.
- Smooth out any rough edges with a damp finger or brush.
- Let the charms dry completely.
- Lightly sand if needed for a cleaner finish.
- Paint details or leave them as is for a minimal look.
- Apply a glossy sealant to enhance color and durability.
- Once dry, attach jump rings, string, or chains to turn them into accessories.
8. Mini Clay Coasters (Small Size)
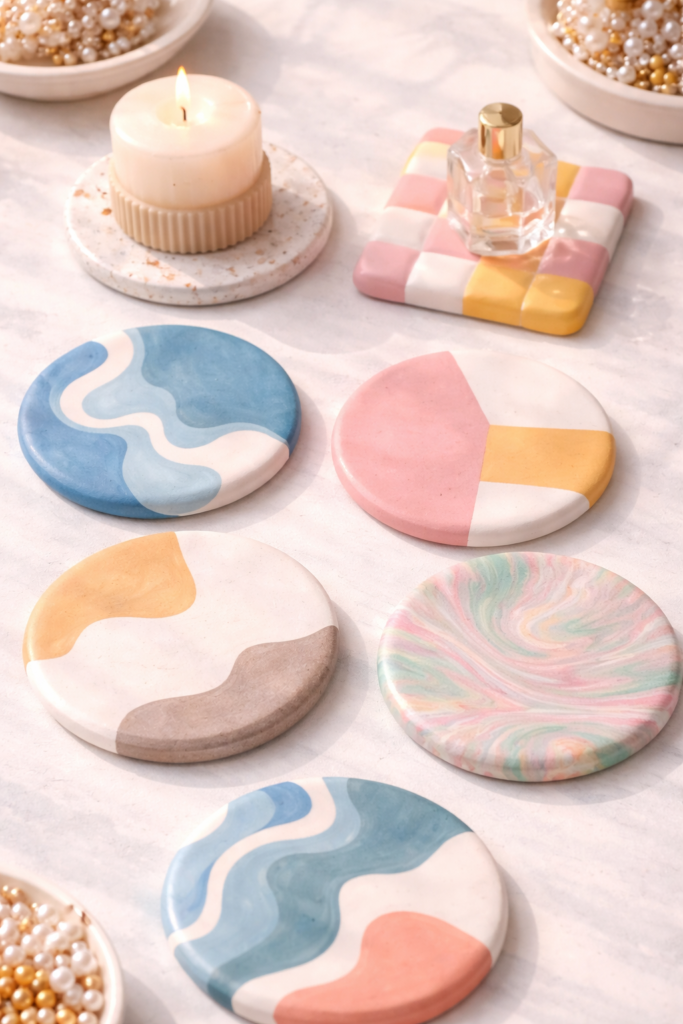
These mini clay coasters are perfect when you want something small but still styled. They’re great for holding candles, jewelry, or even a tiny plant, and the glossy finish gives them that clean, elevated look. You can keep them simple with soft neutral tones or experiment with marbling, terrazzo specks, or bold color blocking. It’s one of those small clay crafts that feels minimal but still makes a statement.
Step-by-Step Instructions
- Knead your clay until smooth and easy to roll.
- Roll it out evenly to about 1/4 inch thickness.
- Use a round cutter, glass, or knife to cut out small circular or abstract shapes.
- Smooth the edges with your fingers or a damp sponge for a clean finish.
- Add texture or patterns if desired (speckles, lines, or marbling).
- Let the pieces dry completely on a flat surface.
- Lightly sand the surface and edges once dry.
- Paint or enhance the design if needed.
- Apply a glossy sealant to give it that polished, finished look.
9. Mini Clay Animal Figurines
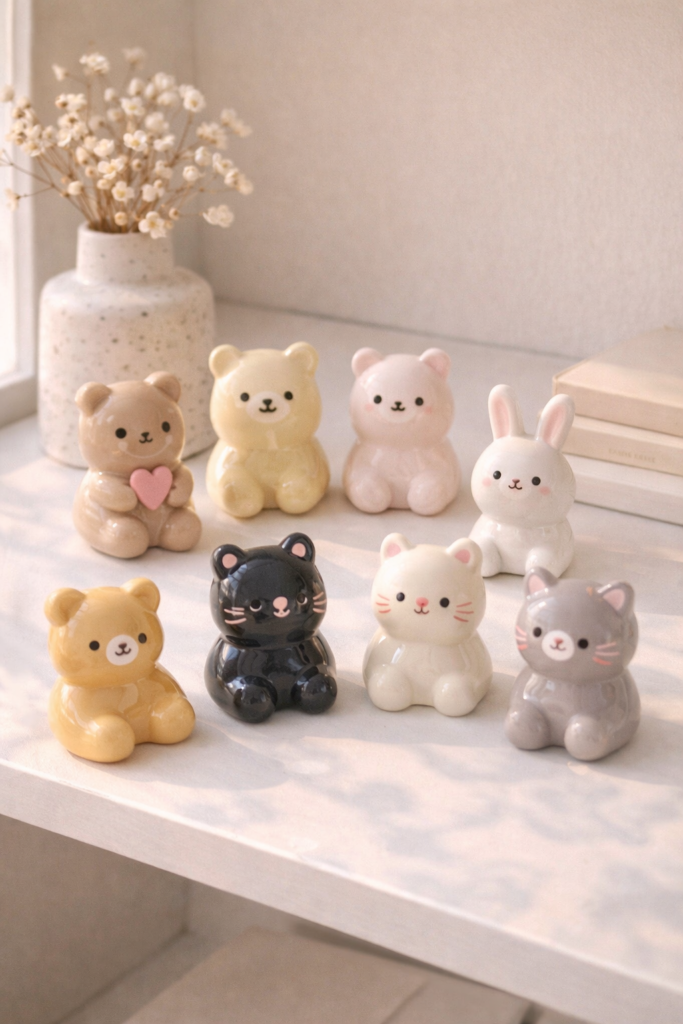
These are the cutest mini clay ideas when you want something playful but still aesthetic. Tiny animal figurines like bears, cats, bunnies, or even abstract creatures can double as desk decor, shelf styling, or little gifts. The key is keeping the shapes simple and smooth, then finishing with a glossy coat so they look clean and polished instead of overly handmade. You can go neutral and minimal or lean into soft pastels and bold accents.
Step-by-Step Instructions
- Knead your clay until soft and smooth.
- Start by shaping a small base for the body (oval or round works best).
- Roll and attach smaller pieces for the head, ears, and limbs.
- Gently press and blend the joints so everything looks seamless.
- Use a needle tool or toothpick to add simple facial features and details.
- Smooth the entire surface with your fingers or a damp brush.
- Let the figurine dry completely.
- Lightly sand any rough areas if needed.
- Paint details or keep it minimal, then apply a glossy sealant.
10. Mini Clay Photo Holders
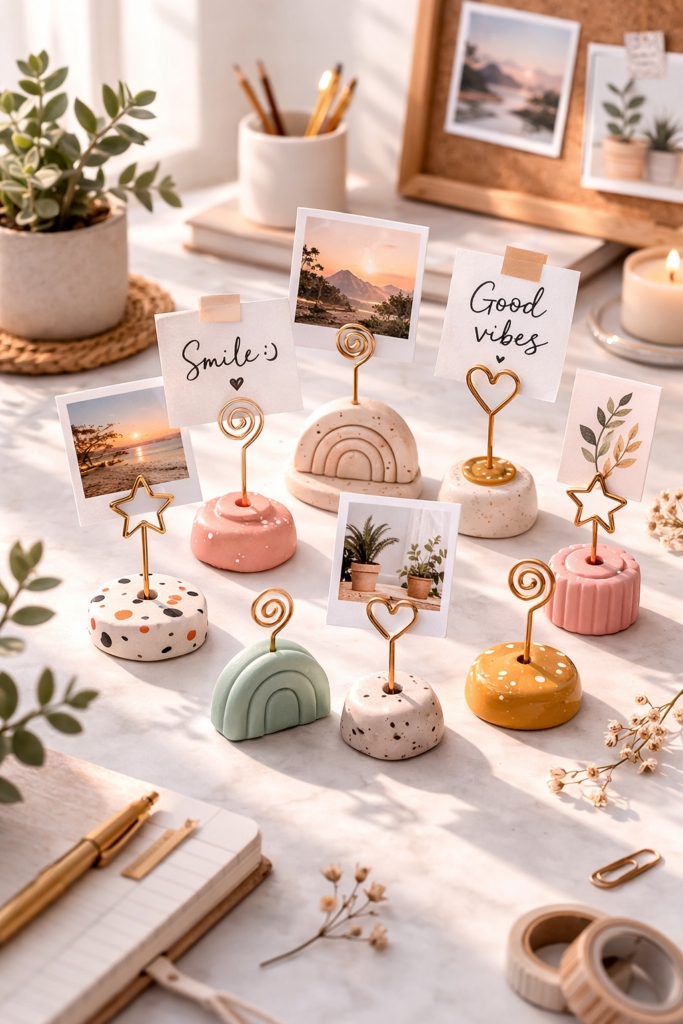
If you want something functional that still feels aesthetic, mini clay photo holders are a go-to. They’re perfect for displaying Polaroids, notes, or little reminders on your desk without adding clutter. The combination of a glossy clay base and a simple wire clip gives it that clean, modern look. You can keep the base minimal or play with color and shape to match your space.
Step-by-Step Instructions
- Knead a small amount of clay until smooth and pliable.
- Shape it into a stable base (round, oval, or abstract works best).
- Cut a small piece of floral wire and twist the top into a loop or clip shape.
- Insert the straight end of the wire into the clay base, making sure it stands upright.
- Smooth the clay around the wire to secure it in place.
- Let the entire piece dry completely.
- Lightly sand the base if needed for a smooth finish.
- Paint or leave it minimal, then apply a glossy sealant.
- Once dry, use the wire clip to hold photos, notes, or cards.
11. Mini Clay Beads
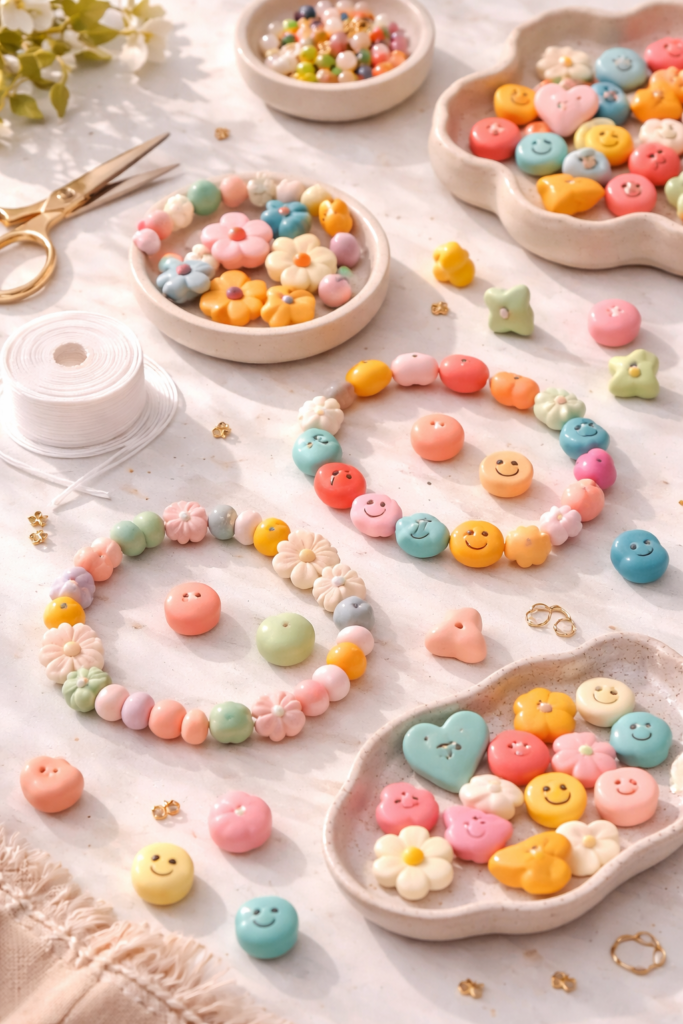
Mini clay beads are one of those small clay ideas that open up a lot of possibilities. You can use them for bracelets, necklaces, bag charms, or even decorative accents on other projects. The glossy finish makes the colors look richer and more polished, especially if you mix tones or create subtle patterns. They’re simple to make but feel custom and intentional once styled together.
Step-by-Step Instructions
- Knead your clay until it’s soft and smooth.
- Roll small, even pieces into balls, ovals, or slightly abstract shapes.
- Use a needle, skewer, or toothpick to carefully poke a hole through the center of each bead.
- Gently rotate the tool to widen the hole without cracking the clay.
- Smooth the surface of each bead with your fingers.
- Let all beads dry completely, making sure they don’t stick to the surface.
- Lightly sand if needed for a smoother finish.
- Paint or add color details if desired.
- Apply a glossy sealant to enhance shine and durability.
- Once fully dry, thread them onto string, elastic, or wire for your project.
12. Mini Clay Incense Holders
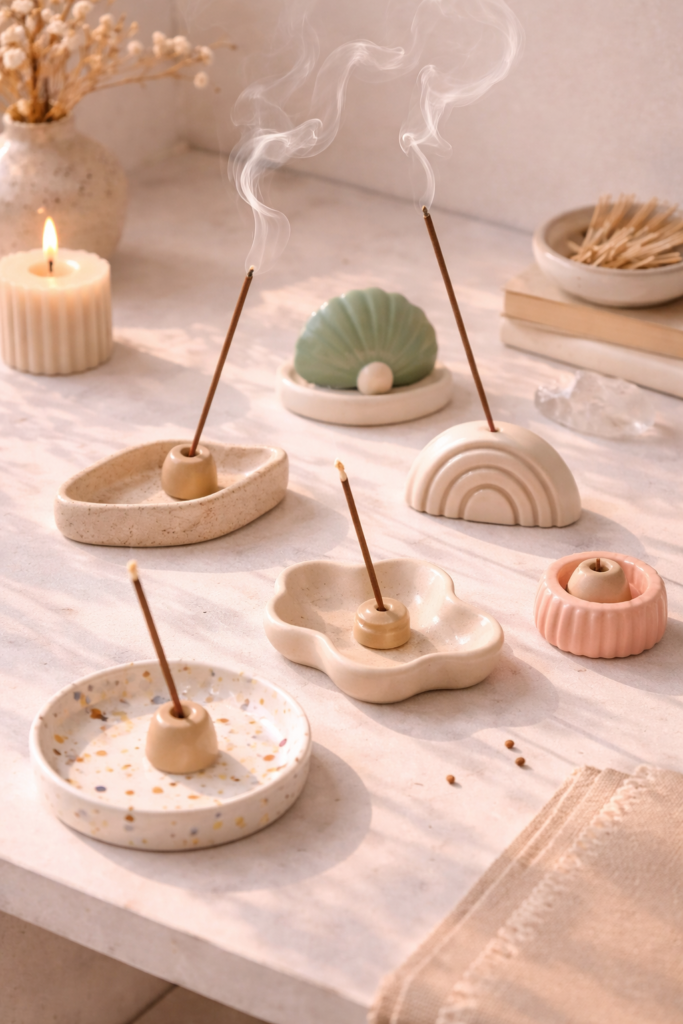
This is one of those mini clay ideas that instantly shifts the vibe of a space. A small, glossy incense holder feels calm, intentional, and just a little bit luxe without doing too much. You can keep the shape minimal with a soft round base or go more sculptural with abstract edges. Either way, it’s a functional piece that doubles as decor, especially when styled on a tray or shelf.
Step-by-Step Instructions
- Knead your clay until smooth and easy to shape.
- Roll it into a small ball, then gently flatten it into a disc or organic shape.
- Use a skewer or needle tool to poke a small angled hole for the incense stick.
- Adjust the angle slightly so ash will fall onto the base instead of off the edge.
- Smooth the surface and edges with your fingers or a damp sponge.
- Let the piece dry completely on a flat surface.
- Lightly sand any uneven areas for a clean finish.
- Paint if desired or keep it minimal for a neutral look.
- Apply a glossy sealant to give it that polished, finished appearance.
13. Mini Clay Hair Clips
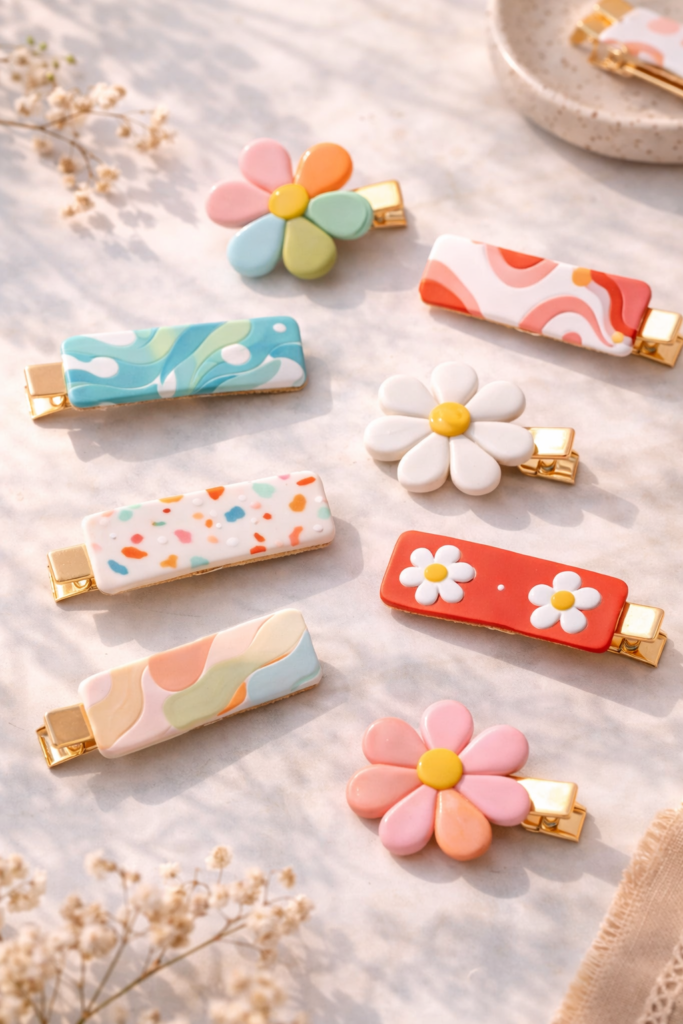
These mini clay hair clips are one of those cute clay crafts that feel trendy without trying too hard. They’re perfect if you want a small accessory that still stands out, especially with glossy finishes and soft color palettes. Think abstract shapes, tiny florals, or simple curved designs that sit right on top of a clip. It’s a fun way to turn small clay ideas into something wearable and stylish.
Step-by-Step Instructions
- Knead your clay until smooth and pliable.
- Roll it out slightly or shape it by hand depending on your design.
- Cut or form small shapes that fit the size of your hair clip base.
- Add any textures or details while the clay is still soft.
- Smooth the edges and surface with your fingers or a damp brush.
- Let the clay piece dry completely.
- Lightly sand if needed for a clean, polished look.
- Paint or leave it minimal, then apply a glossy sealant.
- Once fully dry, use strong craft glue to attach the clay piece to a hair clip base.
- Let the glue set completely before using.
14. Mini Clay Wall Tiles
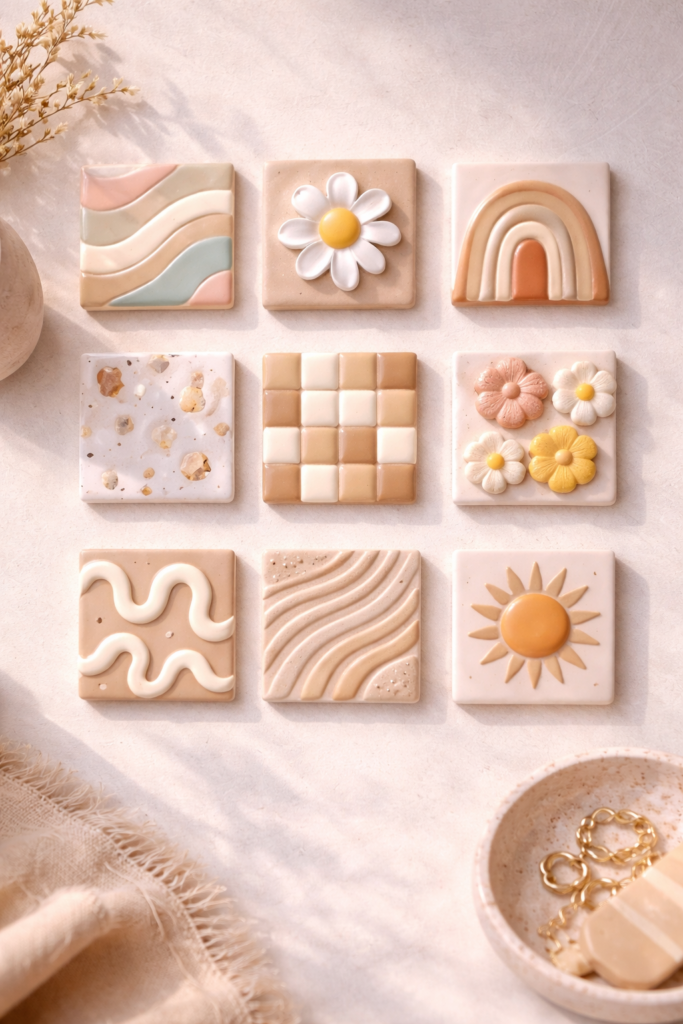
These mini clay wall tiles are perfect if you want to create a small, curated moment on a shelf or wall without committing to a full gallery. They feel artistic and modern, especially when you play with texture, patterns, or subtle color palettes. With a glossy finish, even the simplest designs look elevated and intentional. You can make a few matching pieces or mix styles for a more collected, layered look.
Step-by-Step Instructions
- Knead your clay until smooth and easy to work with.
- Roll it out evenly to about 1/4 inch thick.
- Cut small square, rectangular, or abstract tile shapes.
- Add texture using tools, stamps, or simple pressed patterns.
- Create a small hole at the top if you plan to hang them, or keep them flat for leaning display.
- Smooth the edges and surface with a damp finger.
- Let the tiles dry completely on a flat surface.
- Lightly sand for a smoother finish if needed.
- Paint or leave them minimal, then apply a glossy sealant.
- Hang, prop, or style them on shelves once fully dry.
15. Mini Clay Trinket Boxes
These mini clay trinket boxes are small but feel surprisingly luxe when finished with a glossy seal. They’re perfect for storing rings, earrings, or tiny keepsakes while doubling as decor. You can keep the shape clean and minimal or play with soft curves and subtle textures for a more artistic look. This is one of those small clay projects that looks custom and elevated without being complicated.
Step-by-Step Instructions
- Knead your clay until smooth and pliable.
- Shape a small bowl or cylinder for the base of the box.
- Use your fingers or a tool to hollow out the inside, keeping the walls even.
- Roll out a separate flat piece and cut it slightly larger than the opening to create the lid.
- Gently shape the lid so it sits neatly on top of the base.
- Smooth all surfaces and edges with a damp finger.
- Let both pieces dry completely.
- Lightly sand for a smoother, more refined finish.
- Paint or keep it minimal, then apply a glossy sealant for a polished look.
16. Mini Clay Fridge Clips
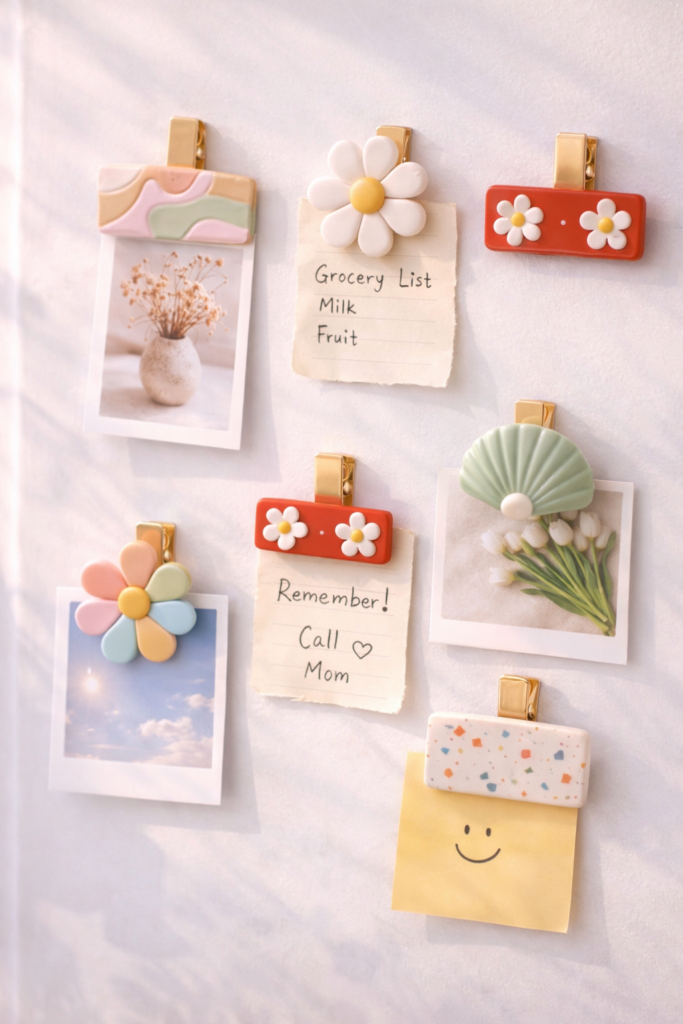
These are one of those small clay ideas that are actually useful day-to-day. Mini clay fridge clips combine a magnet and a clip so you can hold notes, receipts, or photos while still keeping things cute. With a glossy finish and a simple shape, they feel clean and modern instead of cluttered. You can go playful with color or keep it neutral for a more minimal look.
Step-by-Step Instructions
- Knead your clay until smooth and easy to shape.
- Form a small flat or slightly rounded shape that will sit on the front of the clip.
- Smooth the surface and edges with your fingers or a damp brush.
- Let the clay piece dry completely.
- Lightly sand if needed for a clean finish.
- Paint or add simple designs, then apply a glossy sealant.
- Once fully dry, glue the clay piece onto the front of a small clip.
- Attach a magnet to the back of the clip using strong craft glue.
- Let everything set completely before using on your fridge or board.
17. Mini Clay Holiday Ornaments
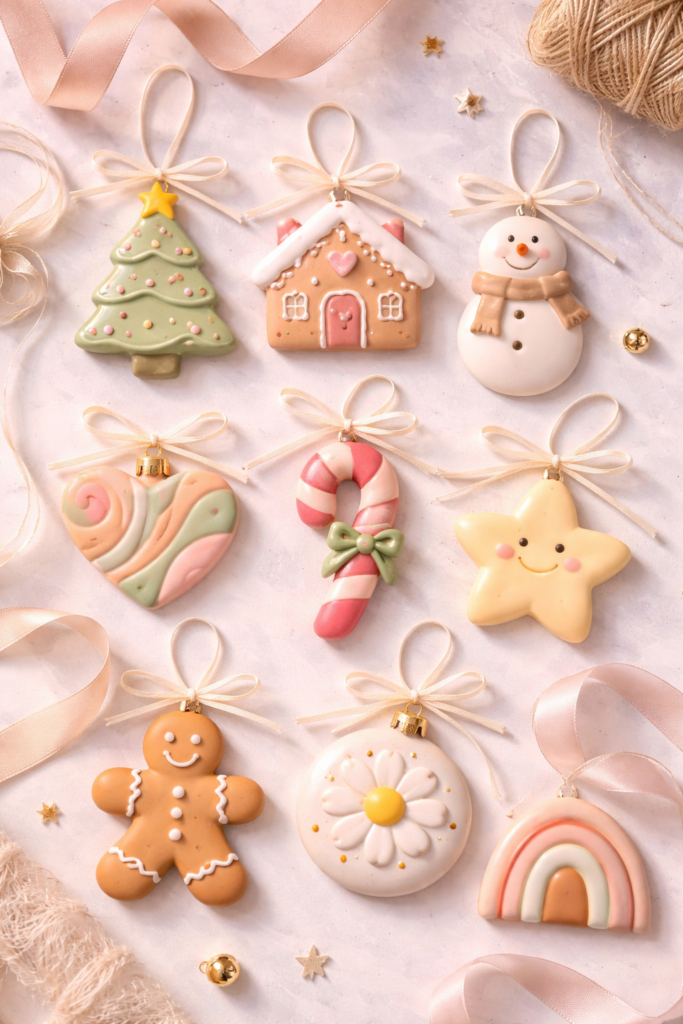
These mini clay ornaments are perfect when you want seasonal decor that feels a little more personal and less store-bought. You can keep them simple with clean shapes or lean into themed designs depending on the holiday. The glossy finish makes them look polished and intentional, whether you’re hanging them on a tree, using them as gift toppers, or styling them on a tray. It’s one of those miniature clay ideas you can come back to year after year.
Step-by-Step Instructions
- Knead your clay until soft and smooth.
- Roll it out evenly to about 1/4 inch thickness.
- Use cutters or a knife to create small seasonal shapes (stars, hearts, leaves, etc.).
- Use a straw or skewer to create a hole at the top for hanging.
- Smooth edges and surfaces with your fingers or a damp brush.
- Let the ornaments dry completely on a flat surface.
- Lightly sand if needed for a smoother finish.
- Paint or decorate based on your theme.
- Apply a glossy sealant for a polished look.
- Thread ribbon or string through the hole once fully dry.
18. Mini Clay Desk Decor Objects
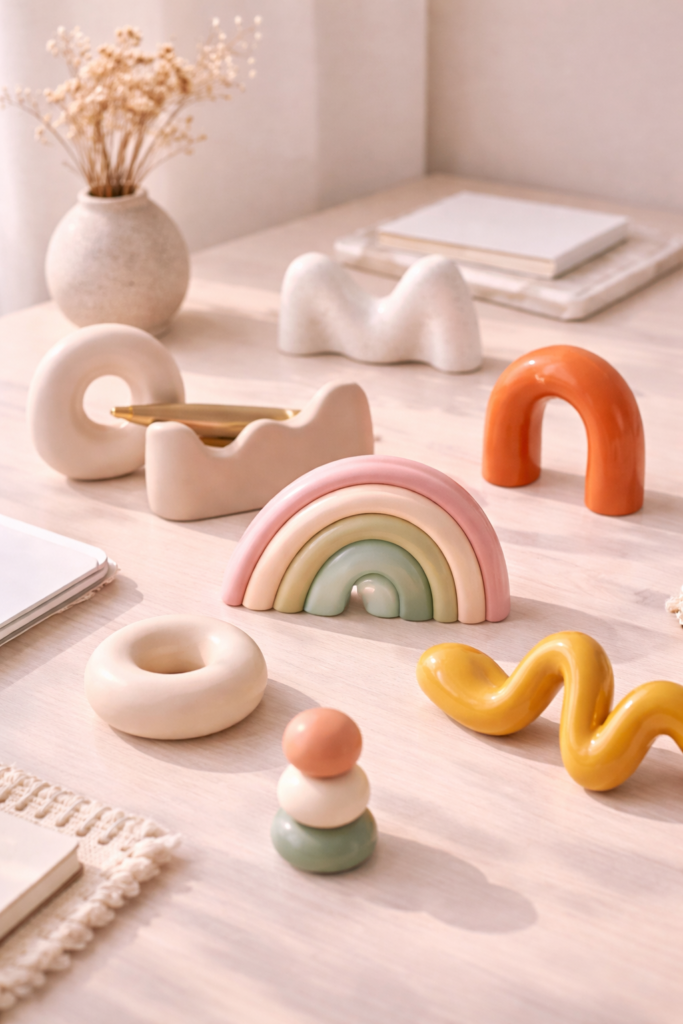
If you want something simple that still makes your space feel styled, mini clay desk decor is the move. These are small sculptural pieces that don’t have to “do” anything but still elevate your setup. Think abstract shapes, soft curves, arches, or stacked forms with a glossy finish that catches the light. They work on desks, shelves, or trays and instantly give that clean, modern, Pinterest-worthy vibe.
Step-by-Step Instructions
- Knead your clay until smooth and easy to shape.
- Decide on a simple form like an arch, loop, knot, or abstract stack.
- Sculpt the shape slowly, keeping proportions balanced.
- Blend and smooth any joins so the piece looks seamless.
- Refine edges and curves using your fingers or a damp tool.
- Let the piece dry completely without moving it.
- Lightly sand any rough areas for a cleaner finish.
- Paint or keep it neutral depending on your style.
- Apply a glossy sealant to give it that polished, high-end look.
Small Projects, Big Style Impact
Mini clay ideas are one of the easiest ways to get creative without committing to a big project. They’re quick, customizable, and actually useful, which makes them perfect for beginners or anyone who just wants something fun and aesthetic to make. The glossy finish is what really takes these from basic to elevated, so don’t skip that final step.
If you want your pieces to look smooth, durable, and professionally finished, make sure you read this next: The Best Way to Seal and Glaze Air Dry Clay.

