
Affiliate Disclosure – This post may contain affiliate links. If you click and make a purchase, Room Revival Studio may earn a small commission at no extra cost to you.
Clay crafts are everywhere right now, and honestly, I get the hype. They’re low-pressure, beginner-friendly, and somehow still manage to look boutique-level when you’re done. Whether you’re stress-crafting on a Sunday afternoon or looking for cute handmade decor that actually feels current, clay is that girl. These ideas are colorful, trendy, and easy enough that you’ll want to make more than one. Fair warning, once you start, it’s very hard to stop. Let’s get started!
Master Shopping List
These are the essentials you can’t really skip for the projects in this post.
- Air-Dry Clay
- Polymer Clay
- Acrylic Roller or Rolling Pin
- Craft Knife or Clay Blade
- Silicone Clay Tools
- Toothpicks or Wooden Skewers
- Parchment Paper or Silicone Mat
- Acrylic Paint Set
- Paint Brushes
- Clear Clay Sealer
- Strong Craft Glue
- Clay Cutters
- Letter or Number Stamps
- Craft Magnets
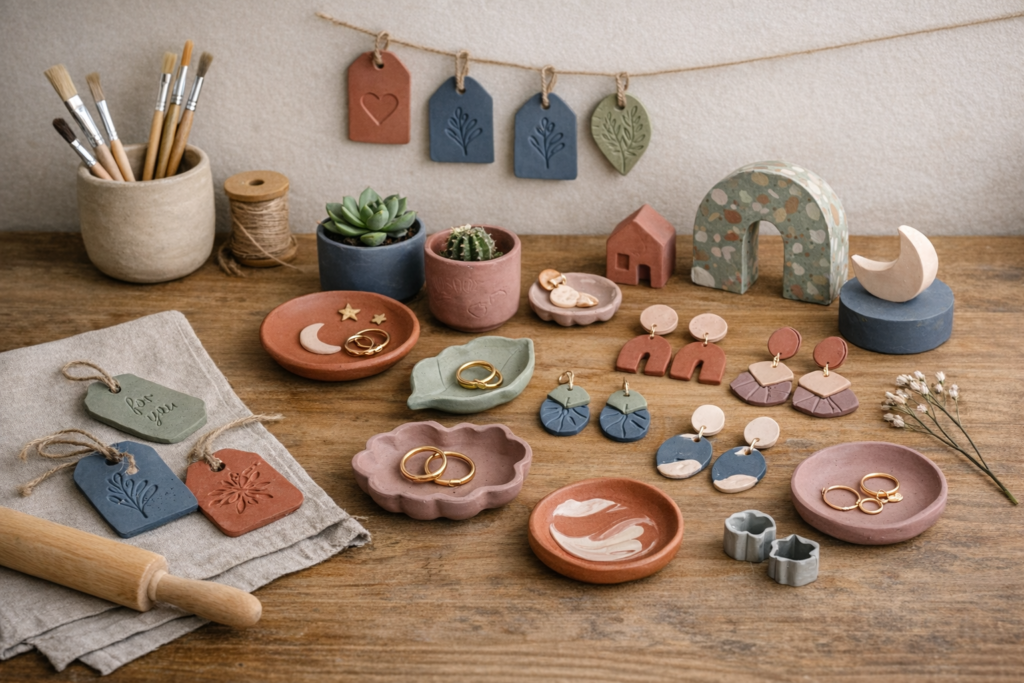
1. Color-Pop Trinket Dishes

This is the gateway clay project. Color-pop trinket dishes are easy, forgiving, and instantly cute, which makes them perfect if you’re new to clay or just want a quick win. The magic is in the bold color choices and soft, imperfect edges. These aren’t meant to look factory-made. They’re playful, a little artsy, and totally display-worthy on a dresser, desk, or coffee table.
How to Make It
- Prep your surface – Lay down parchment paper or a silicone mat so the clay doesn’t stick. Lightly knead your clay to soften it and remove cracks.
- Roll out the clay evenly – Use a rolling pin or acrylic roller to flatten the clay to about ¼ inch thick. Don’t stress about perfection. Slight texture adds character.
- Shape your dish – Cut a circle or organic blob shape using a knife, cutter, or freehand. For a more sculpted look, gently press the clay into a shallow bowl or lift the edges with your fingers to create a curved rim.
- Smooth and refine – Dip your fingertip in water and lightly smooth cracks or rough edges. This step makes a huge difference once the piece dries.
- Dry or bake completely – Let air-dry clay cure fully according to the package directions, flipping once if needed. If using polymer clay, bake on a lined tray following the manufacturer’s instructions and allow it to cool fully.
- Paint with intention – Apply acrylic paint in bold, happy colors. Color blocking, wavy stripes, or a solid high-gloss finish all work beautifully. Let each coat dry before adding another.
- Seal for durability – Once dry, apply a gloss or satin sealer to protect the surface and give it that polished, boutique-style finish.
Why It Works
Trinket dishes give you maximum payoff with minimal effort. You can batch-make them, experiment with color combos, and use them everywhere. Once you finish one, you’ll immediately want to make three more, which is exactly why this project is so addictive.
2. Cute Clay Ring Holders
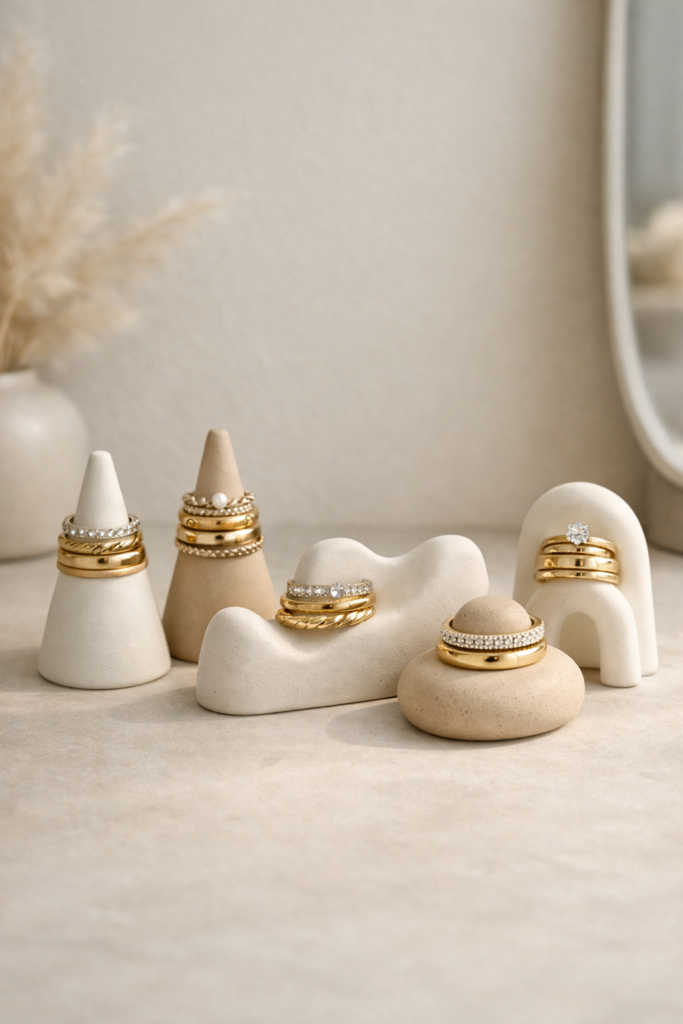
Ring holders are one of those projects that look way harder than they actually are. They’re small, sculptural, and feel intentionally designed, which makes them perfect for nightstands and vanities. You can keep them minimal with a simple cone shape or go playful with hands, hearts, or abstract curves. This is where color really shines. Bright pastels, glossy finishes, or even a single pop color make these feel boutique-level without the price tag.
How to Make It
- Condition the clay – Knead a small amount of clay until it’s soft and pliable. You don’t need much for this project, which makes it great for using scraps.
- Form the base shape – For a classic cone holder, roll the clay between your palms into a thick rope, then gently taper one end. Coil or shape it upright, slightly curving the tip to keep rings from slipping off.
- Stabilize the base – Flatten the bottom gently against your work surface so it stands upright. If it wobbles, adjust the shape before it dries or bakes.
- Refine the details – Smooth cracks or fingerprints with a damp fingertip. If you’re making hands or sculptural shapes, define simple lines without overworking the clay.
- Dry or bake fully – Let air-dry clay cure completely or bake polymer clay according to package directions. Make sure it cools fully before painting.
- Paint and finish – Use acrylic paint in trendy, happy colors. A solid color looks chic, while two-tone or dipped effects feel playful. Seal with a clear finish for durability and shine.
Why It Works
Ring holders are functional decor, which makes them feel extra satisfying. They’re small, fast to make, and perfect for gifting. Once you master one shape, you’ll want to experiment with different silhouettes and color combos.
3. Mini Clay Planters (Fake or Real Plants)
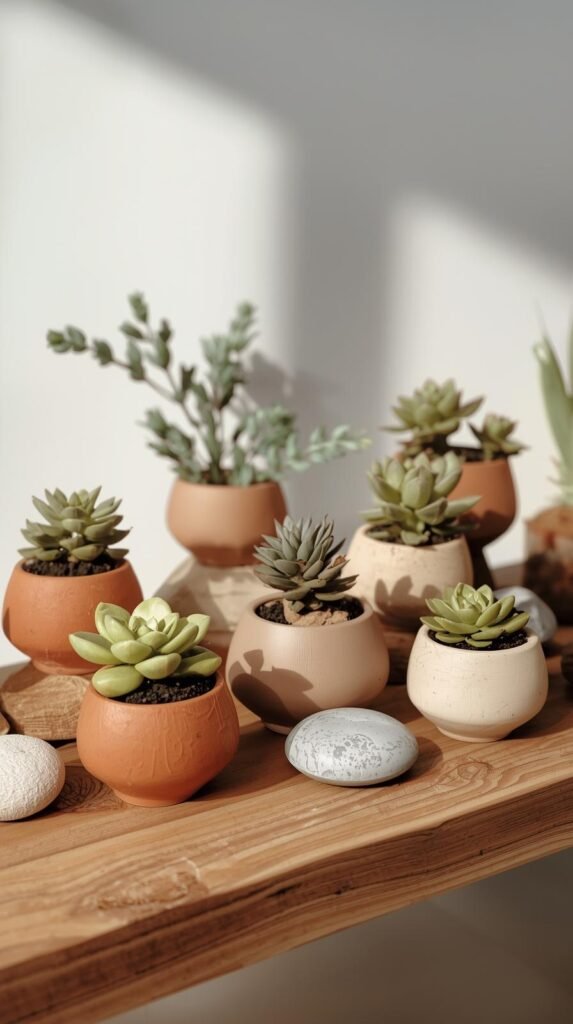
Mini clay planters are proof that small projects can still make a big visual impact. These are perfect for shelves, desks, windowsills, or anywhere that needs a little personality. You can go bold with color, playful with patterns, or lean into fun shapes that feel modern and artsy. Whether you use real plants or faux ones, these planters instantly add charm without taking up much space.
How to Make It
- Choose your planter size – Decide whether your planter will hold a real plant or a faux one. Real plants need drainage, while faux plants give you more freedom with shape and depth.
- Form the base – Roll a thick slab of clay and cut a circle for the base. Roll another slab into a long strip and wrap it around the base to form the walls, gently blending the seam.
- Create drainage if needed – For real plants, poke a small hole in the bottom using a straw or skewer. Smooth the edges so the clay doesn’t crack as it dries.
- Shape and smooth – Refine the rim, straighten the sides, and smooth cracks with a damp fingertip. This step keeps the finished piece looking polished.
- Dry or bake thoroughly – Allow air-dry clay to fully cure, flipping if needed. If using polymer clay, bake according to directions and let cool completely.
- Paint and seal – Paint in bright, trendy colors or add simple patterns like stripes or dots. Seal the inside and outside if you plan to use it with real plants to help protect the surface.
Why It Works
Mini planters are endlessly customizable and easy to batch-make. They’re great for experimenting with color and shape, and they look adorable grouped together. Plus, they make thoughtful handmade gifts that feel personal without being complicated.
4. Aesthetic Clay Wall Hooks
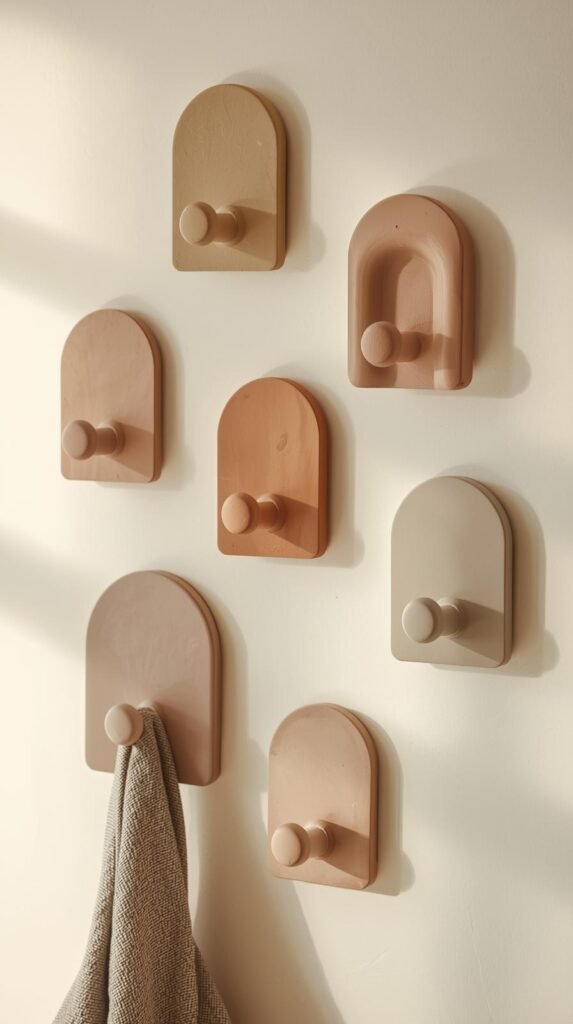
Clay wall hooks are where functional meets fun. These are perfect if you want decor that actually does something while still looking playful and trendy. Think arches, blobs, half-moons, or sculptural pegs in bright colors that turn everyday storage into a design moment. They work great for keys, jewelry, light bags, or even hanging small art pieces.
How to Make It
- Decide on the hook shape – Choose a simple, sturdy shape like an arch, loop, or rounded peg. Keep proportions in mind so the hook can support light weight once installed.
- Form the hook – Roll a thick piece of clay and shape it into your chosen design. If creating a hook that curves outward, make sure the base is thicker than the tip for strength.
- Create mounting space – Press a keyhole shape or flat backing area into the rear of the hook. This allows it to sit flush against the wall after installation.
- Refine the surface – Smooth fingerprints and cracks with a damp fingertip. Clean edges make the finished hook look intentional, not lumpy.
- Dry or bake fully – Let air-dry clay cure completely or bake polymer clay according to instructions. Don’t rush this step since strength matters here.
- Paint and seal – Paint in bold, modern colors or color-blocked designs. Seal with a protective finish to prevent chipping over time.
Why It Works
Wall hooks are small but impactful. They add personality to entryways, bathrooms, or bedrooms without overwhelming the space. Plus, they’re a great way to sneak color into practical areas that usually get ignored.
5. Polymer Clay Earrings That Actually Look Boutique
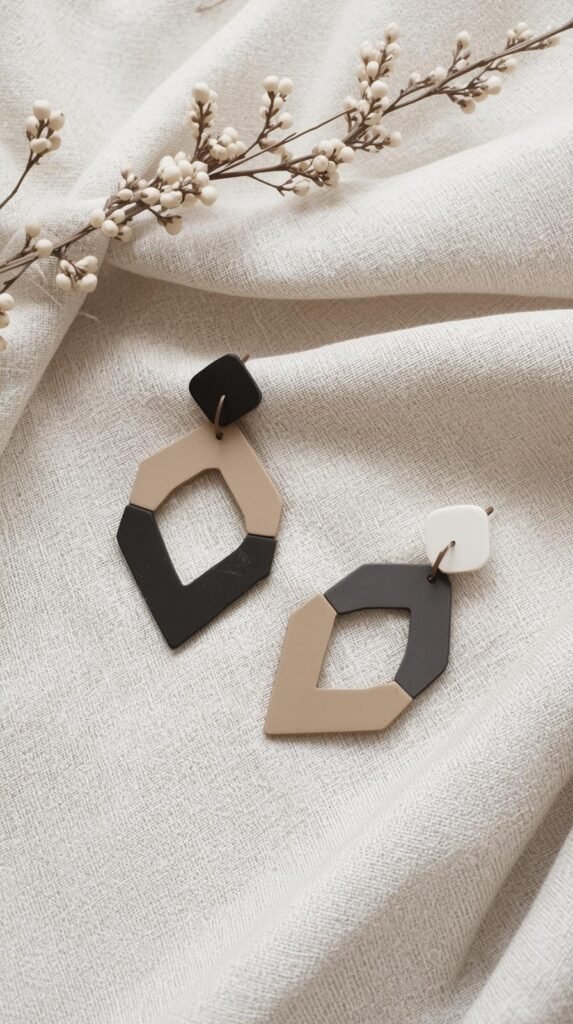
Polymer clay earrings are popular for a reason. They’re lightweight, customizable, and can look shockingly high-end when done right. The key is bold shapes, intentional color pairings, and clean finishes. Think arches, half-moons, stacked shapes, or abstract cutouts that feel trendy but wearable. These are perfect if you want a project that feels both creative and gift-worthy.
How to Make It
- Condition the polymer clay – Knead the clay until it’s soft and smooth. This prevents cracking and makes cutting shapes much easier.
- Roll and cut shapes – Roll the clay to an even thickness, then use cutters or a blade to create your earring shapes. Keep pairs consistent in size and shape.
- Add texture or color detail – Press subtle texture into the surface or combine two colors for marbling or layering. Keep designs simple for a polished look.
- Poke holes before baking – Use a needle tool or toothpick to create holes for jump rings. This step is much easier before baking.
- Bake and cool completely – Bake according to the clay’s instructions and allow the pieces to cool fully before handling.
- Assemble and finish – Lightly sand edges if needed, attach hardware, and seal with a matte or satin finish if desired.
Why It Works
These earrings feel like a “real” finished product. They’re wearable, sellable, and endlessly customizable. Once you get the hang of shape and color, it’s easy to make sets that look like they came straight from a boutique.
6. Clay Bead Bracelets With a Modern Twist
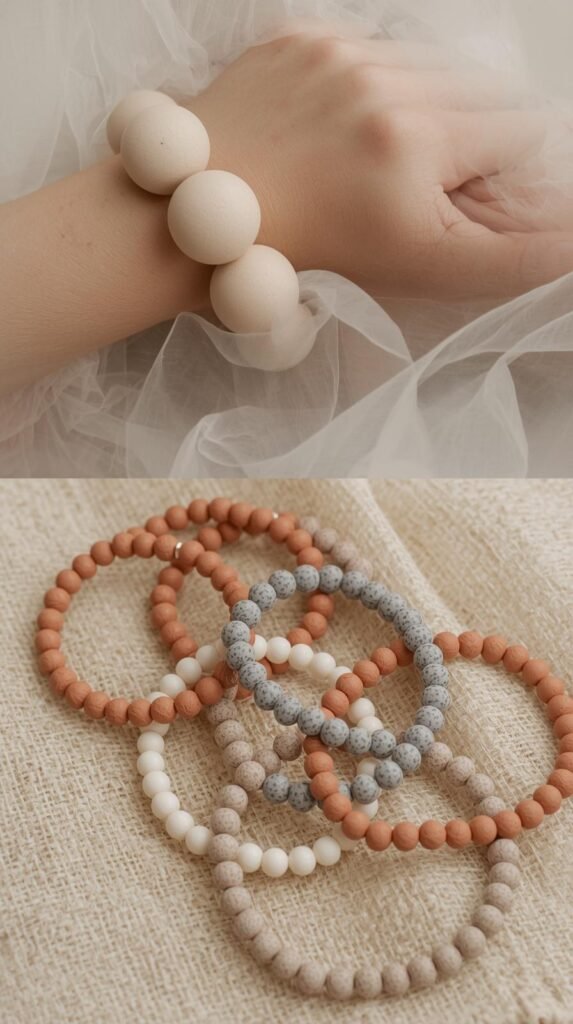
Clay bead bracelets are nostalgic in the best way, but this version feels updated and intentional. Instead of tiny beads and rainbow chaos, think oversized shapes, curated color palettes, and mixed finishes. These bracelets feel playful without looking juvenile, which makes them great for both everyday wear and gifting.
How to Make It
- Prepare the clay – Knead your clay until soft and smooth. Choose two to three colors that work well together for a more modern look.
- Form the beads – Roll small portions of clay into balls, ovals, or abstract shapes. Slight imperfections are fine and actually add character.
- Create stringing holes – Use a skewer or toothpick to poke holes through each bead. Gently twist to widen the opening slightly so elastic or cord fits easily later.
- Dry or bake completely – Let air-dry beads cure fully or bake polymer clay according to package directions. Make sure they’re fully hardened before moving on.
- Paint or seal if needed – If using air-dry clay, paint beads once dry and seal them. Polymer clay beads can be sealed for extra durability or left as-is.
- Assemble the bracelet – Thread beads onto elastic cord, knot securely, and hide the knot inside a bead if possible.
Why It Works
These bracelets are quick, satisfying, and endlessly customizable. Once you make one, you’ll want to experiment with different color combos and bead shapes. They’re also a great low-pressure way to use leftover clay.
7. Funky Clay Magnets
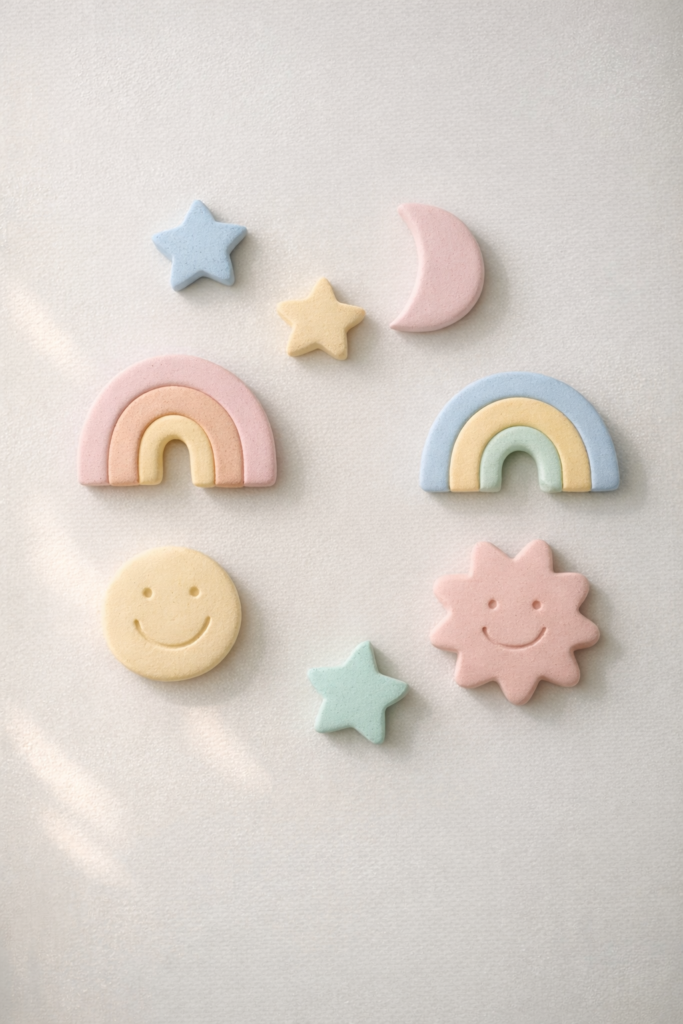
Funky clay magnets are pure fun. They’re small, low-commitment, and perfect for experimenting with color, pattern, and shape. From abstract blobs to smiley faces, fruit shapes, or mini art pieces, these magnets instantly make your fridge or workspace feel more playful. This is also a great project if you want something finished fast with minimal supplies.
How to Make It
- Shape your designs – Roll out small portions of clay and form flat shapes about ¼ inch thick. Keep the backs as flat as possible so they sit flush once magnets are attached.
- Refine the edges – Smooth cracks and fingerprints using a damp fingertip or soft tool. Clean edges help the finished magnets look intentional.
- Dry or bake fully – Let air-dry clay cure completely or bake polymer clay according to instructions. Allow pieces to cool fully before painting or assembling.
- Paint with personality – Use bright colors, graphic lines, or simple illustrations. Let each layer dry before adding details.
- Seal the surface – Apply a clear sealer to protect the paint and give the magnets a polished finish.
- Attach the magnets – Glue strong craft magnets to the back using a heavy-duty adhesive. Let cure fully before using.
Why It Works
Magnets are the perfect test playground for creativity. They’re forgiving, fast, and instantly useful. Plus, they’re great for kids, gifts, or using up small clay scraps without overthinking the design.
8. Clay Picture Frame Accents
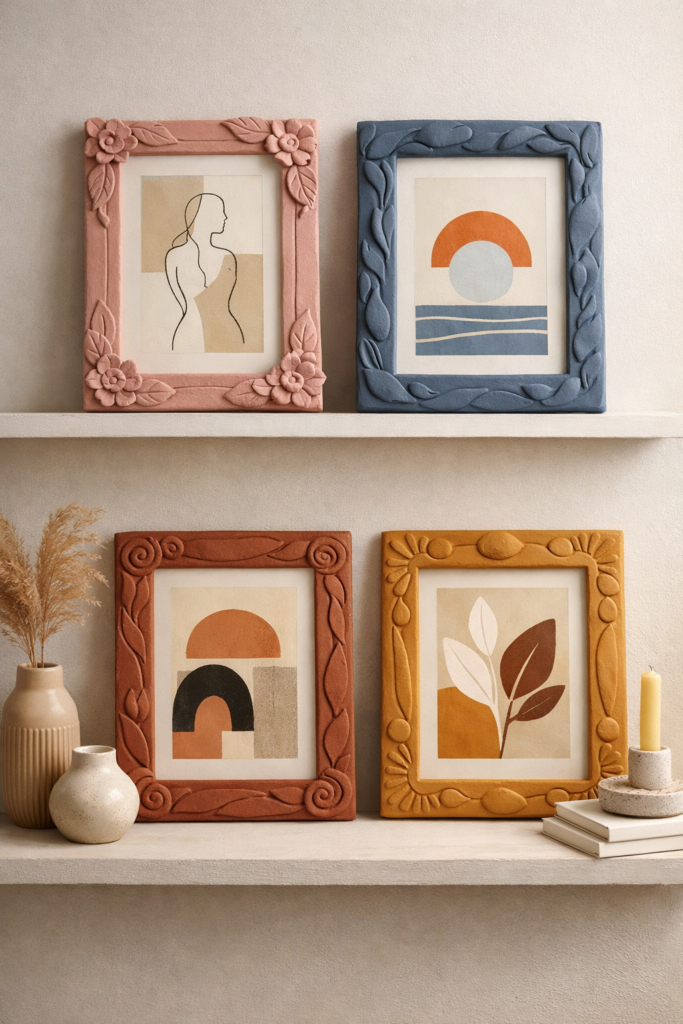
This project is all about taking something basic and making it feel custom. Clay picture frame accents let you upgrade plain frames with texture, color, and personality. You’re not remaking the whole frame. You’re adding sculpted details that turn it into a statement piece. Think wavy borders, raised dots, arches, or playful trim that feels artsy and intentional.
How to Make It
- Start with a simple frame – Choose a basic wood or MDF frame with flat edges. Clean the surface so the clay adheres well.
- Roll and shape the clay – Roll thin clay ropes or flat strips depending on the look you want. Thicker clay works better for raised, sculptural details.
- Attach the clay accents – Press the clay directly onto the frame, working in sections. Blend seams gently with your fingers so everything looks cohesive.
- Refine the design – Smooth cracks and fingerprints with a damp fingertip. Step back occasionally to make sure the design feels balanced.
- Dry or bake carefully – If using air-dry clay, allow it to cure fully on the frame. For polymer clay, only use frames that can handle low oven heat or remove accents and reattach later.
- Paint and seal – Paint in bold, trendy colors or playful patterns. Seal once dry to protect the surface and finish.
Why It Works
Picture frame accents instantly elevate everyday decor. They’re customizable, creative, and make even simple photos or art prints feel intentional and display-worthy.
9. Abstract Clay Sculptures for Shelves
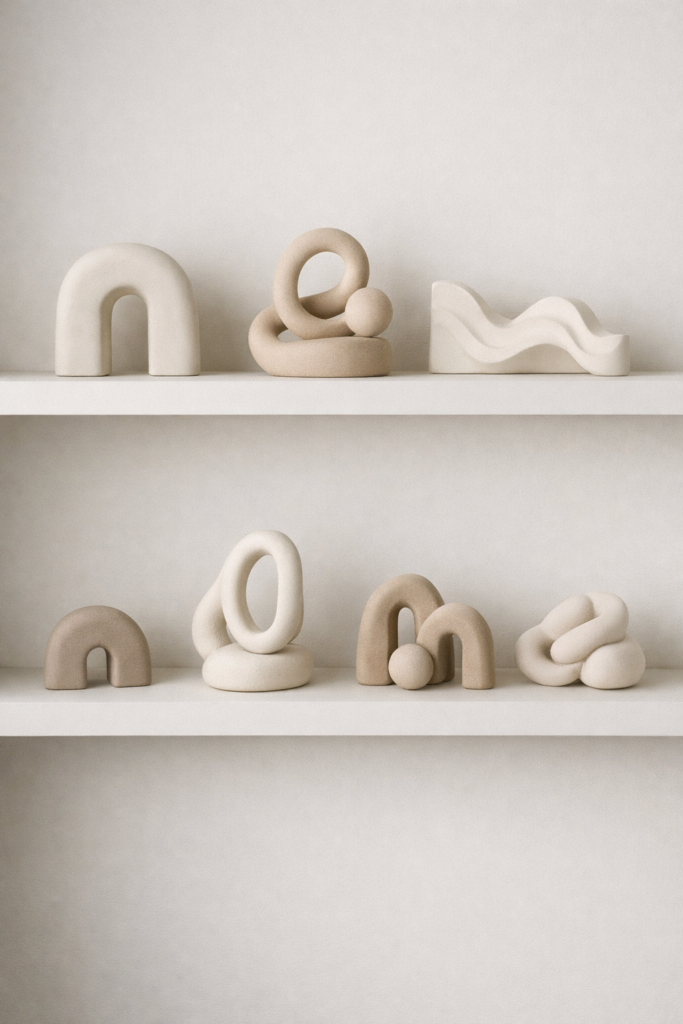
Abstract clay sculptures are where you get to let go of perfection and just create. These pieces are meant to feel artistic, sculptural, and a little unexpected. Think stacked forms, loops, arches, or soft curves in bold, trendy colors. They look amazing styled on shelves, side tables, or desks and instantly give your space a modern, gallery-inspired vibe.
How to Make It
- Choose a simple concept – Decide on one main shape or idea before you start. Loops, stacked blobs, or curved forms work best and are easier to balance.
- Build the base first – Form a sturdy base shape that can support the rest of the sculpture. Flatten the bottom slightly so it sits securely.
- Add sculptural elements – Attach additional shapes by gently pressing them together and blending the seams. Work slowly and support pieces as you build upward.
- Refine the silhouette – Smooth cracks and fingerprints with a damp fingertip. Step back and view the piece from all angles to adjust proportions.
- Dry or bake completely – Allow air-dry clay to cure fully, rotating if needed. If using polymer clay, bake according to instructions and let cool fully.
- Paint and finish – Use solid, bold colors or subtle color blocking. Seal the piece to protect the surface and enhance the finish.
Why It Works
Abstract sculptures add personality without clutter. They’re a great way to experiment with form and color, and no two ever look the same. That one-of-a-kind feel is what makes them so addictive to create.
10. Personalized Clay Keychains
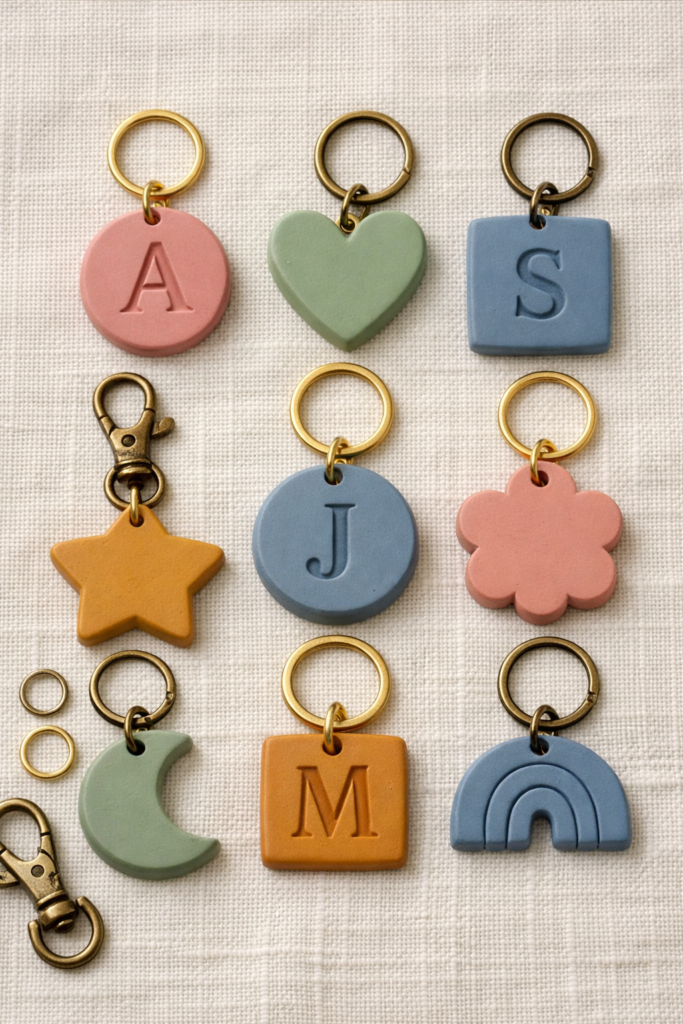
Personalized clay keychains are small, meaningful, and incredibly giftable. They’re perfect for names, initials, simple words, or charm-style shapes that feel custom without being complicated. This is a great project if you want something functional that still feels handmade and thoughtful.
How to Make It
- Plan the design – Decide on the shape and personalization before you start. Simple tags, circles, arches, or hearts work best and hold lettering well.
- Roll and cut the base – Roll clay to an even thickness and cut out your chosen shape. Keep edges clean for a polished look.
- Add lettering or details – Press letter stamps into the clay or carve letters carefully using a fine tool. You can also add small raised shapes or patterns.
- Create the keyring hole – Use a skewer or toothpick to poke a hole near the top. Make it slightly larger than the hardware to allow easy assembly later.
- Dry or bake fully – Let air-dry clay cure completely or bake polymer clay according to instructions. Allow pieces to cool fully.
- Paint and seal – Paint in bold colors or trendy neutrals, then seal for durability and longevity.
Why It Works
Keychains are quick projects with high emotional value. They’re easy to customize, fun to batch-make, and perfect for gifting, party favors, or even selling if you decide to go that route.
11. Clay Candle Holders
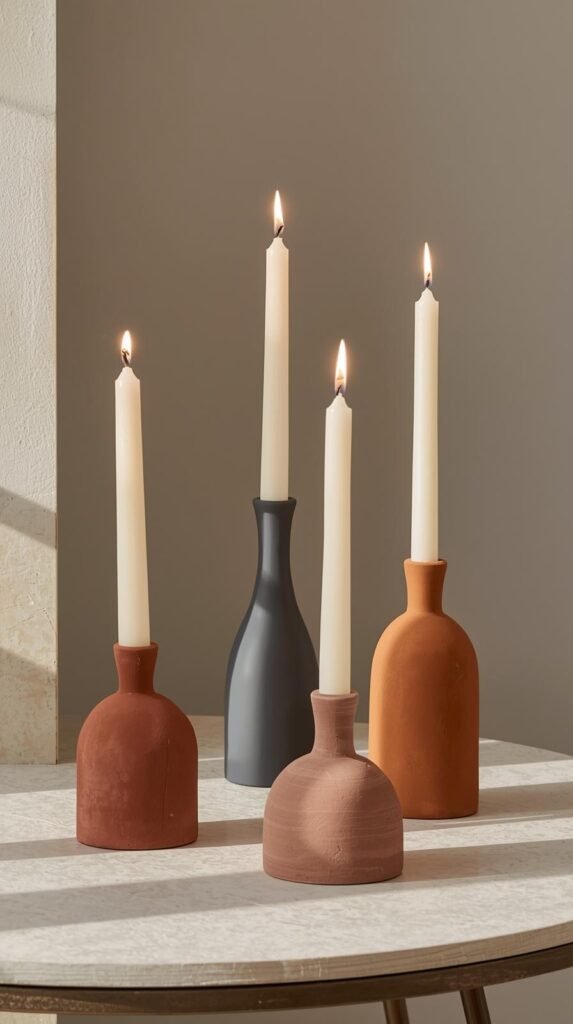
Clay candle holders are a small project with big visual payoff. Bold shapes, playful silhouettes, and bright colors turn a simple candle into a decor moment. These look amazing on shelves, dining tables, or nightstands and instantly make a space feel styled. The trick is keeping the design sturdy while still letting the shape feel fun and intentional.
How to Make It
- Choose your candle type – Decide whether you’re making a holder for a taper or a tealight. This determines the size and depth of the opening.
- Form a solid base – Shape a thick base from clay and flatten the bottom so it sits evenly. A stable base is key for safety and balance.
- Create the candle opening – Press the candle gently into the clay to create an indentation, then remove it carefully. Widen slightly so the candle fits easily after drying.
- Add sculptural detail – Build up arches, curves, or stacked forms around the base if desired. Blend seams well so everything feels cohesive.
- Dry or bake completely – Allow air-dry clay to cure fully or bake polymer clay according to instructions. Let cool completely before painting.
- Paint and seal – Paint in bold, trendy colors or playful color-blocked designs. Seal once dry to protect the surface and give it a finished look.
Why It Works
Candle holders feel elevated but are surprisingly easy to make. They’re perfect for experimenting with shape and color and look great styled alone or grouped together for extra impact.
12. Statement Clay Coasters
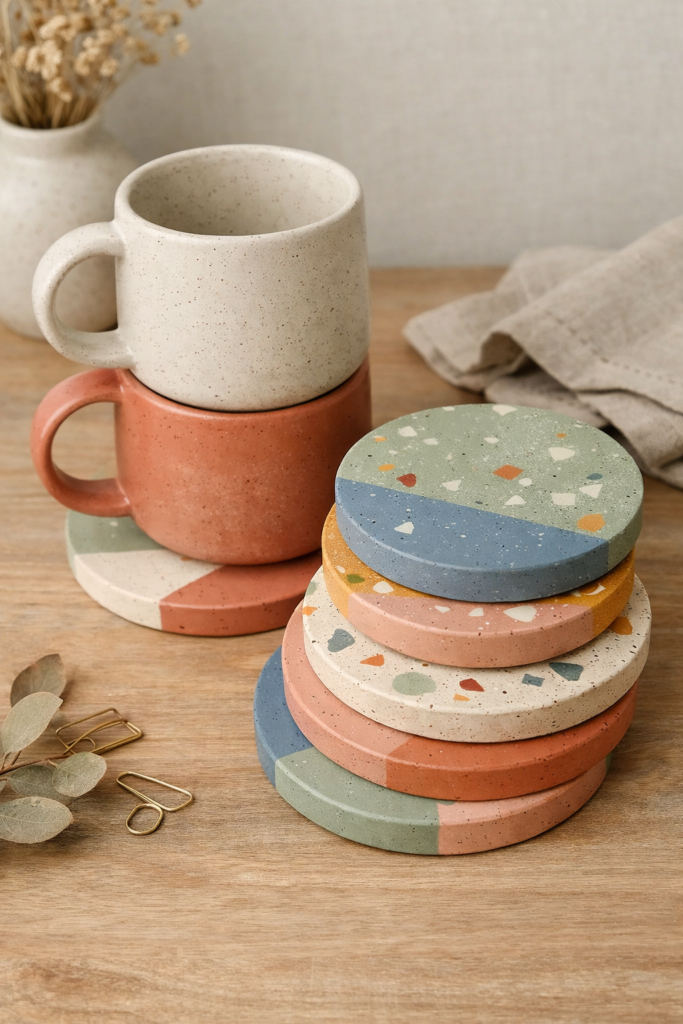
Clay coasters are one of those projects that feel both practical and design-forward. They protect your surfaces while adding color, texture, and personality to your space. Think bold shapes, terrazzo-inspired speckles, or graphic color blocking that makes even a simple drink setup feel styled. These are perfect if you want something useful that still feels creative.
How to Make It
- Roll the clay evenly – Roll your clay to about ¼ inch thick on a smooth surface. Even thickness helps prevent warping as it dries.
- Cut out coaster shapes – Use a round cutter, square template, or freehand shape. Rounded corners tend to hold up better over time.
- Add surface design – Press in terrazzo pieces, carve subtle patterns, or layer colors before drying. Keep designs flat so cups sit evenly.
- Smooth and refine – Use a damp fingertip to smooth edges and surface imperfections. This step gives a clean, polished finish.
- Dry or bake completely – Let air-dry clay cure fully or bake polymer clay according to instructions. Flip halfway if needed to reduce warping.
- Paint and seal – Paint in bold colors or leave raw if using polymer clay. Seal thoroughly, especially if the coasters will be used regularly.
Why It Works
Statement coasters are functional decor at its best. They’re easy to batch-make, great for gifting, and a fun way to play with color and pattern without committing to a large project.
13. Clay Incense Holders

Clay incense holders are simple, calming, and surprisingly stylish. They’re a great way to add a small ritual moment to your space while also bringing in color and shape. From long, minimal trays to sculptural arches or playful curves, these pieces feel intentional without being fussy. They work especially well on nightstands, shelves, or meditation corners.
How to Make It
- Choose the holder style – Decide whether you want a flat tray, a curved channel, or a sculptural form. Flat designs are the easiest for beginners.
- Roll and shape the base – Roll clay into a slab about ¼ inch thick. Cut a long oval, rectangle, or organic shape for the base.
- Create the incense hole – Use a skewer or toothpick to poke a small hole at one end. Angle it slightly so the incense stick stays upright.
- Add optional details – You can raise the edges slightly to catch ash or add subtle sculptural curves for visual interest.
- Dry or bake fully – Let air-dry clay cure completely or bake polymer clay according to instructions. Allow to cool fully.
- Paint and seal– Paint in bold, calming, or trendy colors. Seal well to protect the surface from ash and residue.
Why It Works
Incense holders are low-effort but high-impact. They’re quick to make, easy to customize, and add a peaceful, styled touch to everyday spaces without taking up much room.
14. Clay Wall Art Tiles
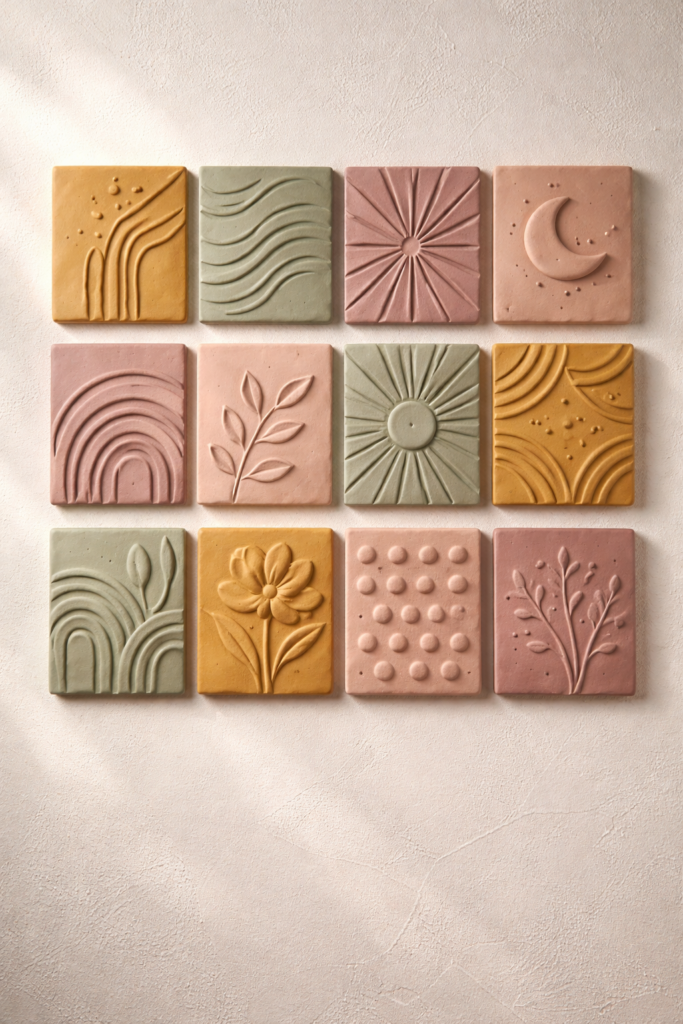
Clay wall art tiles are perfect if you love decor that feels handmade and intentional. These are small, flat pieces that you can hang solo or group together for a gallery-style moment. Bold colors, simple patterns, and sculpted texture make them feel modern and artsy without being overwhelming. They’re especially great for renters or anyone who wants impact without commitment.
How to Make It
- Decide on tile size and shape – Keep tiles small and lightweight. Squares, arches, or organic shapes all work well and are easy to hang.
- Roll and cut the clay – Roll clay to an even thickness and cut out your tile shapes. Keep edges clean for a polished finish.
- Add texture or design – Press in patterns, carve lines, or layer small clay shapes on top. Keep designs low-profile so tiles hang flat.
- Create hanging options – Poke small holes near the top or press a shallow groove on the back for hanging hardware.
- Dry or bake completely – Let air-dry clay cure fully or bake polymer clay according to instructions. Allow to cool completely.
- Paint and seal – Paint in bold, trendy colors or graphic patterns. Seal to protect the surface and enhance durability.
Why It Works
Wall art tiles let you experiment with texture and color on a small scale. They’re easy to mix and match and instantly make blank walls feel curated and creative.
15. Cute Clay Animal Figures
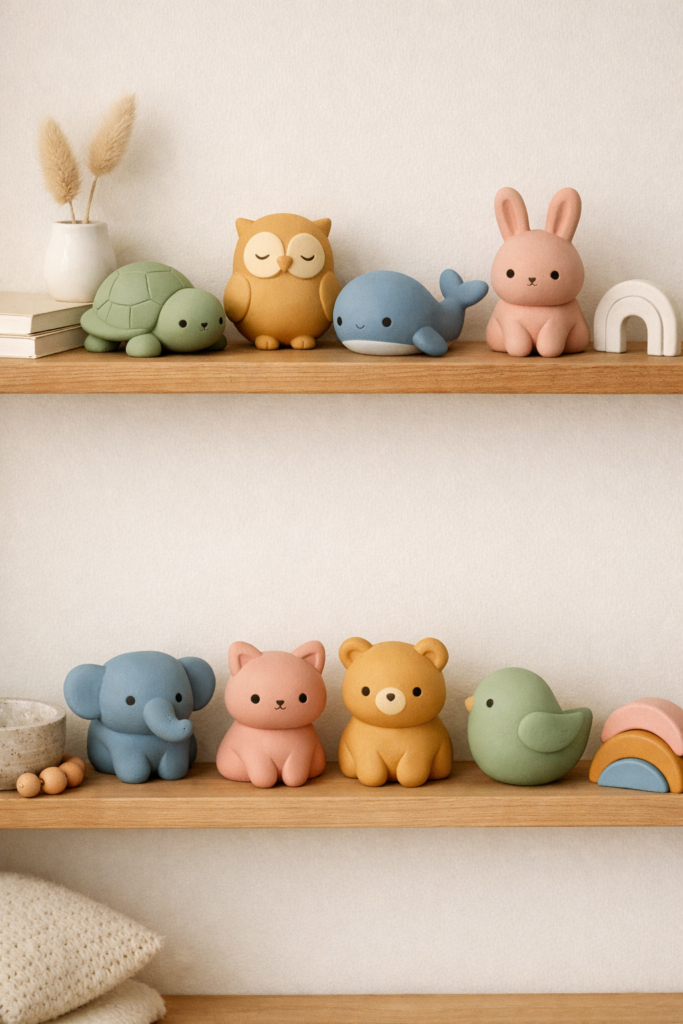
Cute clay animal figures are playful, charming, and impossible not to smile at. These don’t need to be realistic. Simple shapes, tiny details, and bold colors are what make them work. Think cats, frogs, birds, or abstract creatures that feel more decorative than toy-like. They’re perfect for shelves, desks, or gifting.
How to Make It
- Start with basic shapes – Break your animal down into simple forms like balls, ovals, and cylinders. This keeps the process easy and less intimidating.
- Assemble the body – Gently press shapes together to form the body, head, and limbs. Blend seams lightly so pieces feel connected.
- Add facial details – Use a toothpick or small tool to add eyes, noses, or texture. Keep features minimal for a cute, modern look.
- Stabilize the figure – Make sure the bottom is flat so the figure stands on its own. Adjust before drying or baking.
- Dry or bake completely – Allow air-dry clay to cure fully or bake polymer clay according to instructions. Let cool completely.
- Paint and seal – Paint in bright or pastel colors and seal once dry to protect the surface.
Why It Works
Animal figures are joyful and expressive without needing perfection. Each one has personality, which makes them especially fun to create and display.
16. Colorful Clay Drawer Knobs
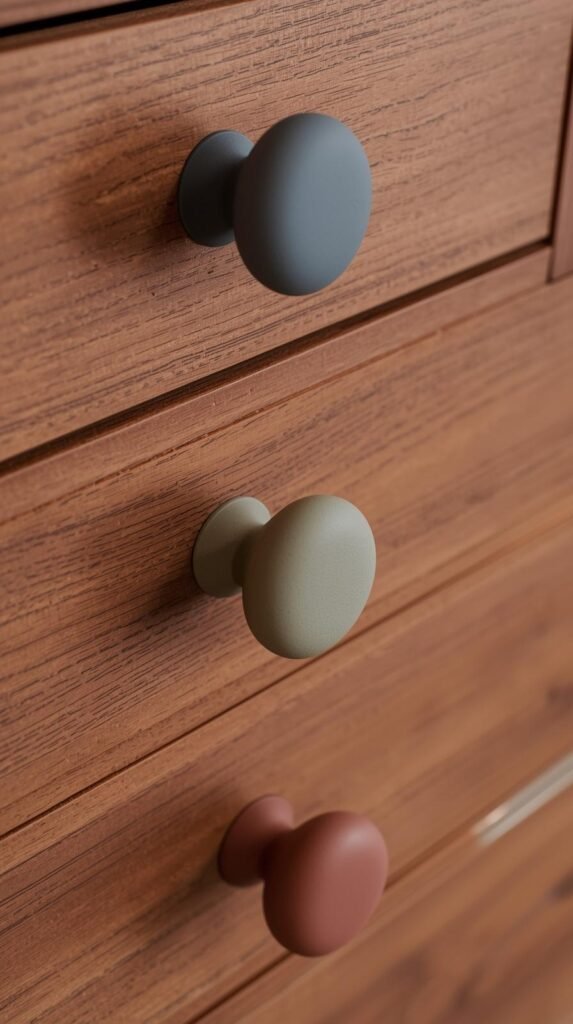
Clay drawer knobs are a sneaky-good upgrade. They instantly refresh dressers, nightstands, or storage pieces without paint or tools. Bold colors and playful shapes turn basic furniture into a statement, and because they’re small, this project feels very doable even for beginners.
How to Make It
- Decide on the knob shape – Choose a simple, chunky shape like a round, oval, or soft square. Thicker knobs hold up better and feel more substantial.
- Form the knob base – Shape the clay and flatten the back slightly so it sits flush against the drawer front.
- Create the screw hole – Use a skewer or straw to poke a centered hole straight through the back. Make sure it’s wide enough for the screw you’ll use later.
- Refine the shape – Smooth cracks and fingerprints with a damp fingertip. Check that all knobs are similar in size if making multiples.
- Dry or bake fully – Let air-dry clay cure completely or bake polymer clay according to instructions. Allow to cool fully.
- Paint and seal – Paint in bold, trendy colors and seal thoroughly for durability since these will be handled often.
Why It Works
Drawer knobs are small changes with big impact. They’re functional, fun, and an easy way to add color without committing to a full furniture makeover.
17. Clay Phone Stands
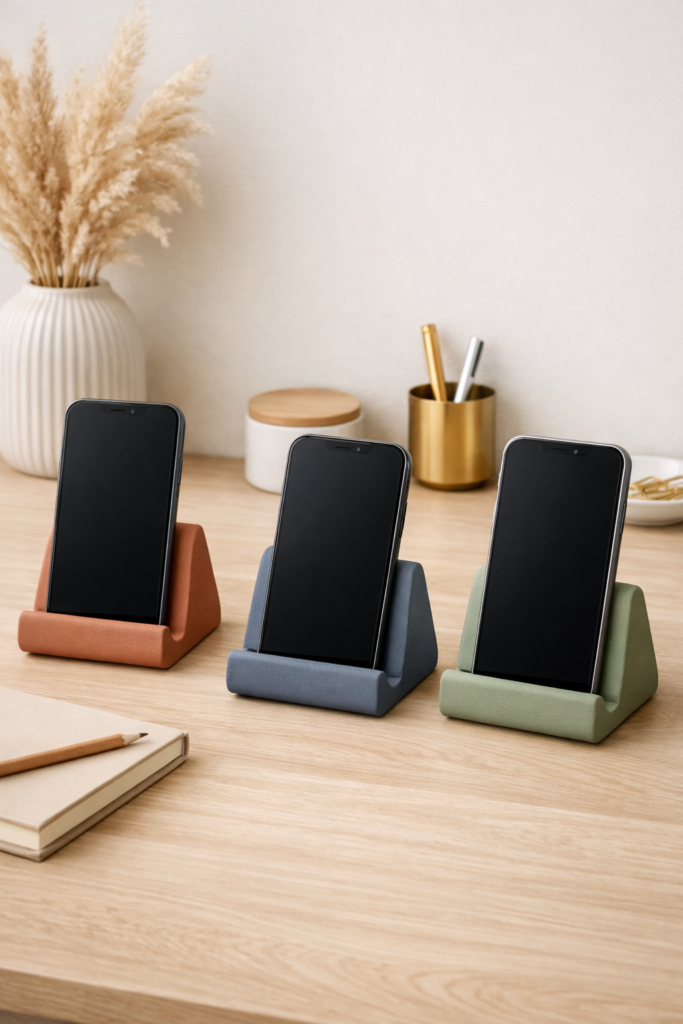
Clay phone stands are practical, modern, and surprisingly chic when done right. They’re perfect for desks, kitchen counters, or nightstands and make everyday phone use feel more intentional. Clean shapes with a pop of color keep these from looking bulky or DIY in a bad way. This is one of those projects you’ll actually use every single day.
How to Make It
- Plan the stand angle – Decide whether you want a vertical or slightly reclined stand. A gentle backward tilt works best for viewing.
- Form the base – Shape a thick, sturdy base that won’t tip easily. Flatten the bottom so it sits securely on flat surfaces.
- Create the phone groove – Press your phone gently into the clay to create a shallow groove, then remove it carefully. Widen slightly so it fits once dry.
- Add a back support – Build up a small ridge or curved support behind the groove to keep the phone upright.
- Dry or bake completely – Let air-dry clay cure fully or bake polymer clay according to instructions. Allow it to cool completely before handling.
- Paint and seal – Paint in bold, trendy colors or subtle color-blocked designs. Seal for durability and a finished look.
Why It Works
Phone stands are functional decor at its best. They’re easy to customize, quick to make, and feel genuinely useful instead of just decorative.
18. Clay Gift Toppers & Tags
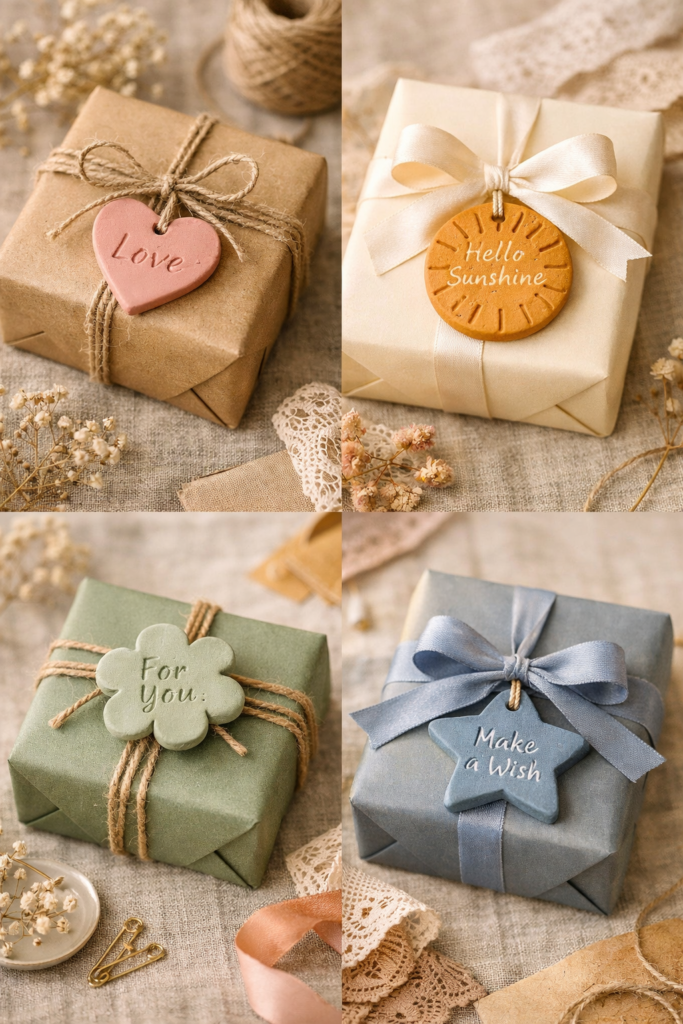
Clay gift toppers and tags are the kind of detail that makes a gift feel extra special. They’re reusable, customizable, and way more memorable than paper tags. You can keep them simple with initials and shapes or go playful with colors and mini designs that match the occasion. This is a great end-of-post project because it uses small amounts of clay and works for any season.
How to Make It
- Choose the tag shape – Simple shapes like circles, arches, or rectangles work best and are easy to personalize.
- Roll and cut the clay – Roll clay to an even thickness and cut out your shapes. Keep edges clean and smooth.
- Add personalization – Press in letters, numbers, or simple designs using stamps or a fine tool. You can also add raised details for texture.
- Create the string hole – Use a skewer or straw to poke a hole near the top of each tag. Make sure it’s large enough for ribbon or twine.
- Dry or bake fully – Let air-dry clay cure completely or bake polymer clay according to instructions. Allow pieces to cool fully.
- Paint and seal – Paint in bold or festive colors and seal once dry for durability.
Why It Works
These toppers elevate even the simplest gift. They’re easy to batch-make, great for using leftover clay, and something the recipient can reuse or keep as a keepsake.
Why Clay Crafts Are So Easy to Get Hooked On
Clay projects hit that sweet spot between relaxing and rewarding. You don’t need fancy tools, prior experience, or a huge time commitment to make something that looks cute, intentional, and totally display-worthy. From small functional pieces to playful decor and gifts, these ideas prove that clay is one of the most beginner-friendly ways to get creative without pressure. Pick one project, try it once, and don’t be surprised if you end up making three more right after.
If you’re brand new to working with clay or want to understand which type is best for your projects, start here: Everything You Need to Know About Air-Dry Clay. It breaks down what to use, how it works, and why it’s such a favorite for easy, low-stress DIYs.
Want to keep going? Save this post, come back to it often, and turn these ideas into your next creative obsession.

