Affiliate Disclosure – This post may contain affiliate links. That means if you click and make a purchase, Room Revival Studio may earn a small commission at no extra cost to you.
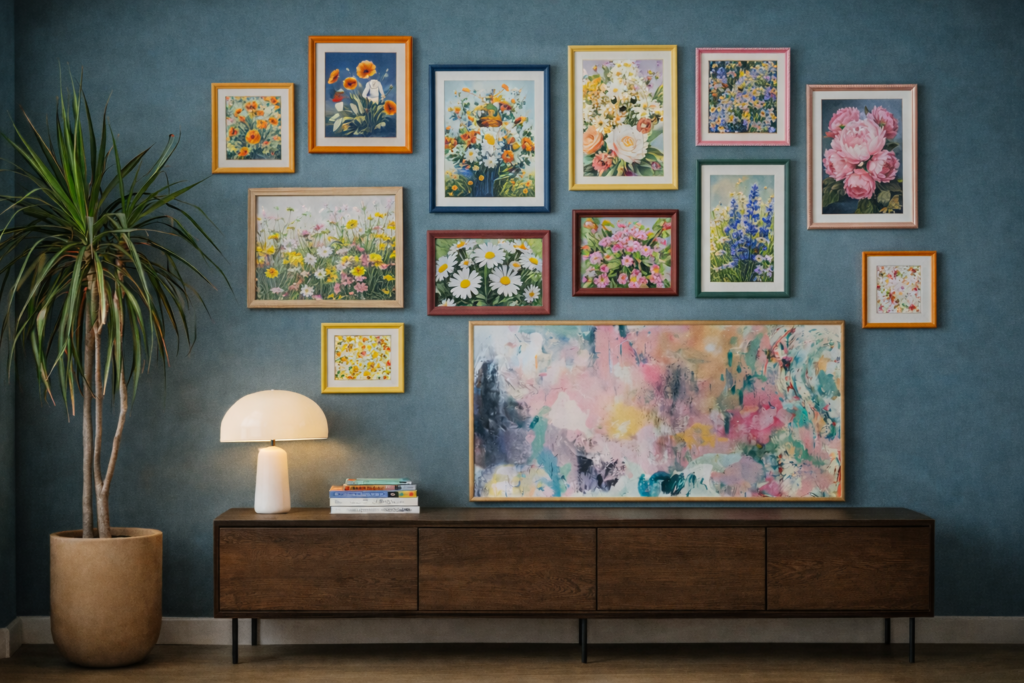
If you’ve ever bought a basic picture frame and thought this could look way better, you’re not alone. Most store-bought frames feel a little boring, especially when your photos deserve something more personal and creative.
The good news is a DIY picture frame makeover is one of the easiest craft projects you can do at home. With a little paint, texture, or fabric, a plain frame can turn into colorful DIY wall decor that completely changes the vibe of your space.
These homemade picture frame ideas are beginner-friendly, affordable, and surprisingly stylish. From bold stripes to textured clay designs, these DIY picture frame crafts will help you create frames that feel cozy, modern, and totally unique.
1. Painted Striped Picture Frames
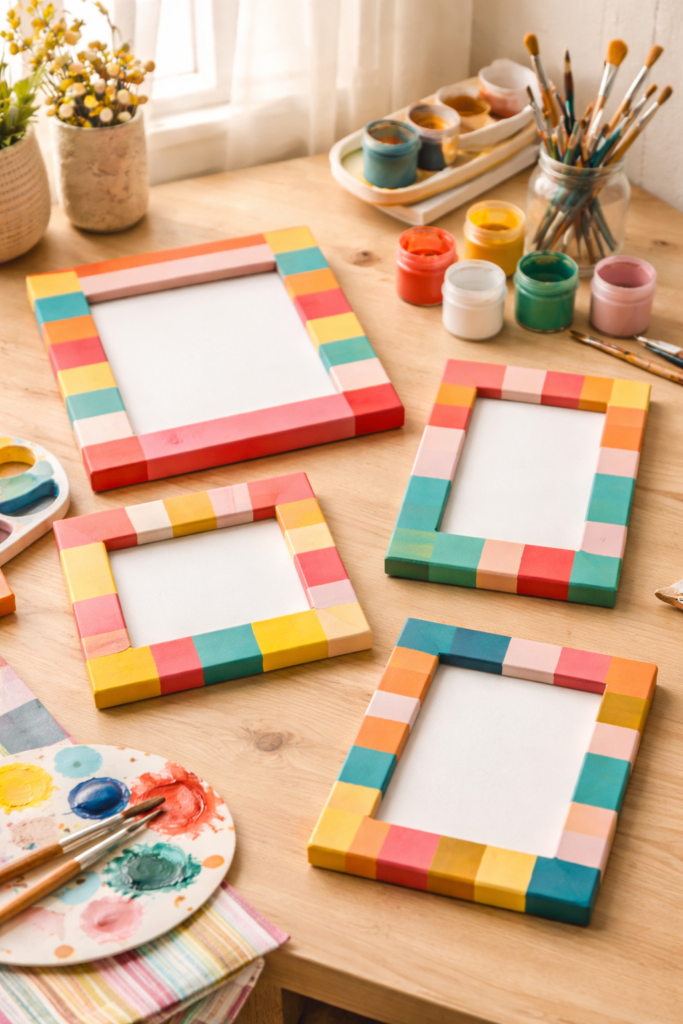
A Colorful DIY Picture Frame That Instantly Upgrades Basic Frames
Painted stripes are one of the easiest DIY picture frame crafts, but the finished result looks bright, playful, and surprisingly polished. A simple wooden frame becomes bold DIY wall decor with just a few colors of paint and some painter’s tape.
This project works especially well if you want your homemade picture frames to feel cheerful and modern. Stripes naturally add movement and personality, which makes photos stand out more on a wall. It is also a great way to coordinate frames with your room colors without buying expensive designer frames.
The best part about this DIY picture frame idea is how customizable it is. You can paint thick stripes, thin stripes, vertical patterns, or diagonal lines depending on the vibe you want.
How to Make It
- Start with a plain unfinished wooden picture frame and remove the glass and backing.
- Apply painter’s tape across the frame to create evenly spaced stripe patterns.
- Paint the exposed sections using acrylic craft paint in alternating colors.
- Allow the paint to dry completely before carefully peeling off the tape.
- Apply a light coat of clear craft sealant to protect the paint and give the frame a finished look.
Shop the Look
- Acrylic Craft Paint Set
- Painter’s Tape for Crafts
- Unfinished Wooden Picture Frames
- Clear Acrylic Sealer Spray
2. Air-Dry Clay Texture Frames
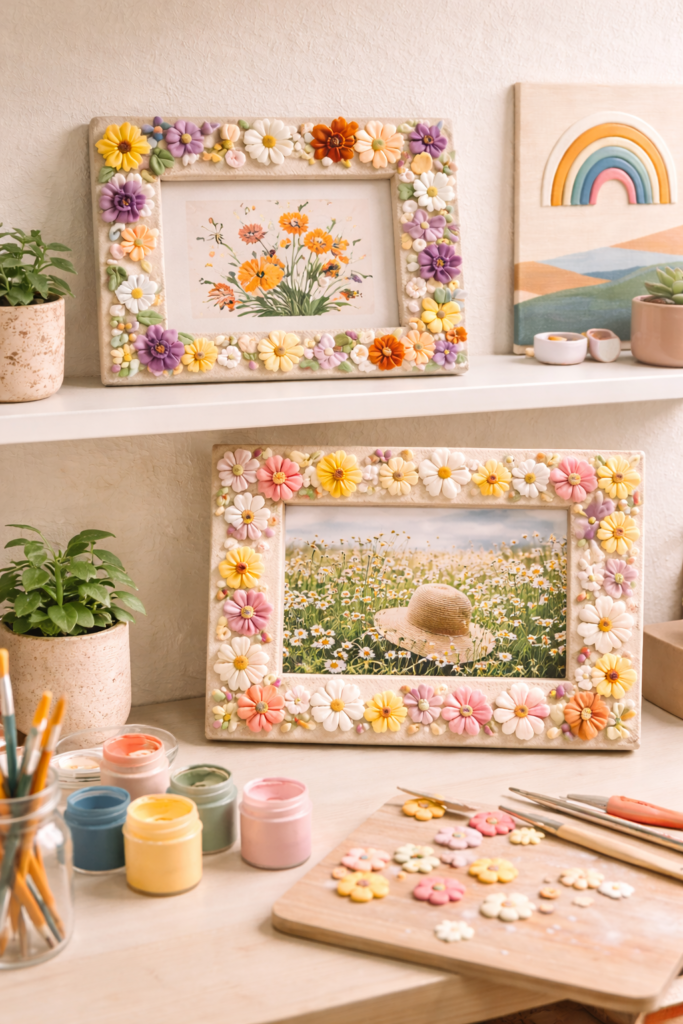
A Sculptural DIY Picture Frame That Adds Texture to Your Decor
If you want a DIY picture frame that feels artistic and handmade, air-dry clay is an easy way to add texture and dimension. Instead of a flat frame, this project creates raised shapes, soft curves, and sculptural details that make your photos look like part of a gallery display.
This is one of those DIY picture frame crafts that looks far more complicated than it actually is. Air-dry clay is beginner-friendly and easy to shape, which makes it perfect for creating organic patterns, floral designs, or playful textures. Once painted, the finished frame can look modern, boho, or colorful depending on the palette you choose.
These homemade picture frames work beautifully for gallery walls, desks, bookshelves, or nightstands where a little extra texture helps the space feel more layered and creative.
How to Make It
- Start with a plain wooden picture frame and remove the glass and backing.
- Roll small pieces of air-dry clay into shapes like dots, waves, flowers, or curved lines.
- Press the clay shapes gently onto the frame, spacing them evenly around the edges.
- Allow the clay to dry completely according to the package instructions.
- Once dry, paint the frame and clay design using acrylic paint.
- Finish with a clear craft sealant to protect the texture.
Shop the Look
- Air-Dry Clay for Crafts
- Unfinished Wooden Picture Frames
- Acrylic Craft Paint Set
- Clear Acrylic Sealer Spray
3. Fabric Wrapped Cozy Frames
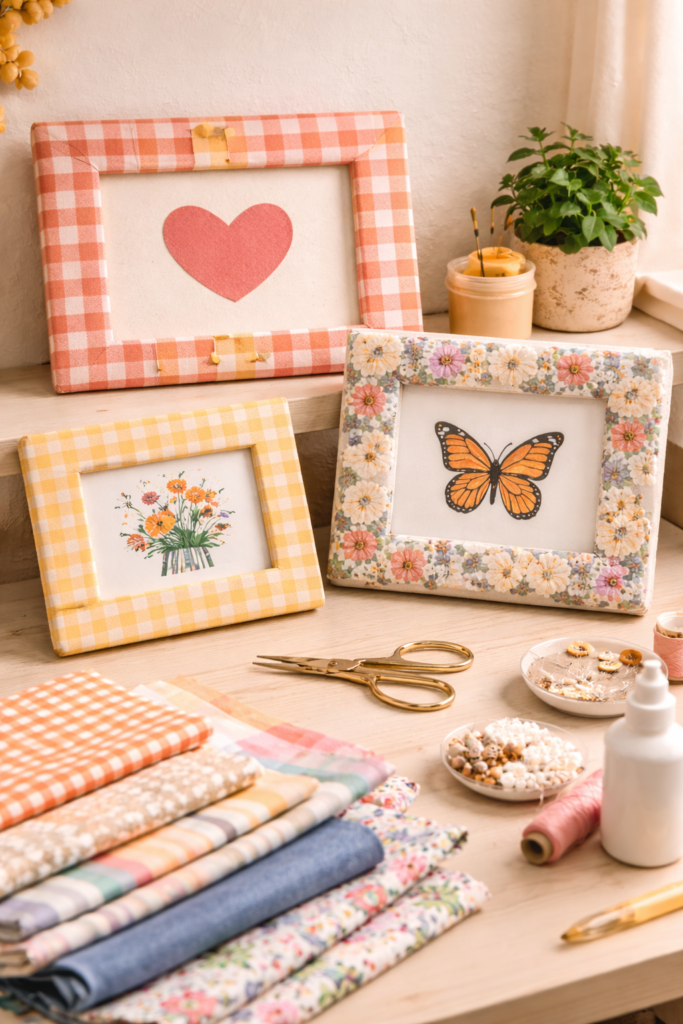
A Soft and Stylish Homemade Picture Frame Idea
Fabric-wrapped frames are one of the easiest homemade picture frame ideas if you want something colorful and cozy. Instead of paint, this project uses patterned fabric to transform a basic frame into textured DIY wall decor that feels warm and personal.
This craft works beautifully with bold prints like florals, stripes, gingham, or check patterns. It is also a great way to reuse leftover fabric from sewing projects. The fabric adds softness and visual texture, which makes photos feel more like part of your decor rather than just something sitting in a frame.
Because this DIY picture frame craft uses simple materials and basic wrapping techniques, it is perfect for beginners. The finished frames look especially good grouped together in a gallery wall with mixed patterns and colors.
How to Make It
- Start with a plain picture frame and remove the glass and backing.
- Lay your chosen fabric face down on a flat surface.
- Place the frame on top of the fabric and cut the fabric so it extends about 1–2 inches beyond the edges.
- Apply fabric glue or craft glue to the frame surface.
- Wrap the fabric tightly around the frame edges and press firmly to secure it.
- Trim any excess fabric and allow the glue to dry before reassembling the frame.
Shop the Look
- Colorful Craft Fabric Bundles
- Fabric Glue for Crafts
- Unfinished Wooden Picture Frames
- Fabric Scissors for Craft Projects
4. Pressed Flower Picture Frames
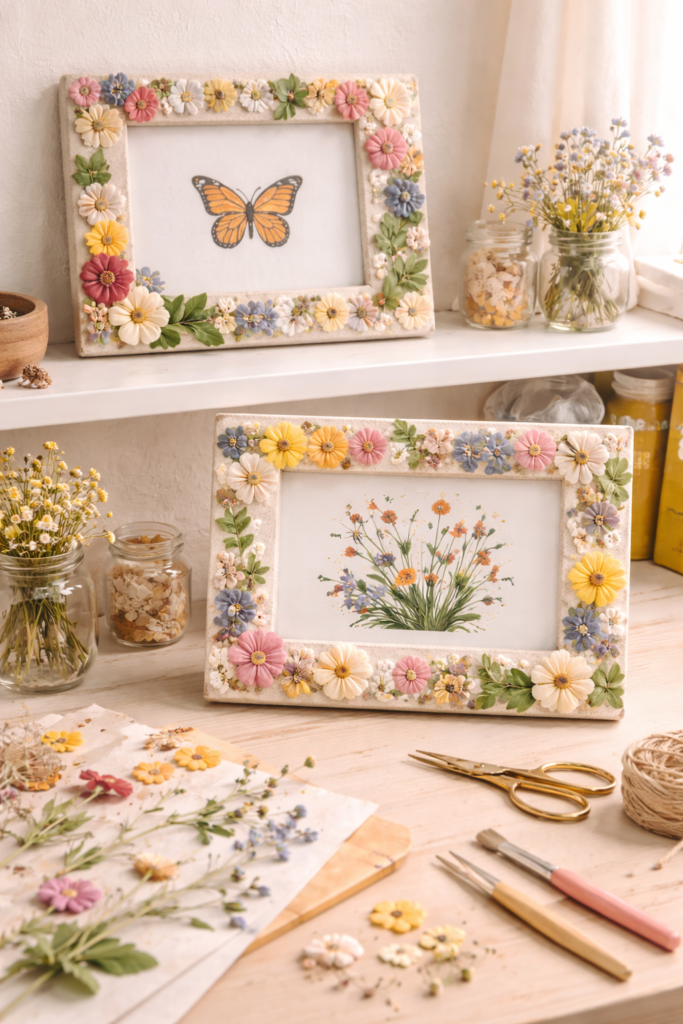
A Botanical DIY Picture Frame That Feels Light and Creative
Pressed flower frames are one of the prettiest DIY picture frame crafts you can make. Real flowers bring natural color, delicate texture, and a soft seasonal feel that turns a basic frame into eye-catching DIY wall decor.
This project works especially well if you love botanical decor or cottagecore-inspired crafts. The thin, preserved flowers create a layered design that feels both artistic and personal. Each frame ends up looking slightly different depending on the flowers and greenery you choose, which makes these homemade picture frames feel extra special.
Pressed flower designs look beautiful around family photos, travel pictures, or even simple art prints. They also make thoughtful handmade gifts.
How to Make It
- Start with a plain wooden picture frame and remove the glass and backing.
- Gather pressed flowers or dried botanicals such as daisies, ferns, or small leaves.
- Arrange the flowers around the frame edges until you like the layout.
- Use a small brush to apply Mod Podge or clear craft glue to attach each flower.
- Allow the glue to dry fully before applying a thin sealing coat to protect the flowers.
- Reassemble the frame once everything is dry.
Shop the Look
- Pressed Flowers for Crafts
- Mod Podge Craft Sealer
- Unfinished Wooden Picture Frames
- Fine Detail Craft Brushes
5. Beaded Boho Picture Frames
A Textured DIY Picture Frame with a Relaxed Boho Feel
Beaded frames are a fun way to add texture and personality to a basic DIY picture frame. Wooden craft beads create a playful, dimensional border that makes photos feel more decorative and styled. The round shapes naturally bring a relaxed boho vibe that works beautifully in cozy living spaces, creative studios, or gallery walls.
This is one of those DIY picture frame crafts that looks detailed but is surprisingly simple to make. The beads add depth and visual interest, which helps the frame stand out even when the rest of the decor is minimal. You can leave the beads natural for a warm wood look or paint them in bright colors for a more playful style.
These homemade picture frames look especially good when paired with travel photos, polaroids, or art prints that have warm tones and natural textures.
How to Make It
- Start with a plain wooden picture frame and remove the glass and backing.
- Lay out wooden craft beads around the frame edges to plan your design.
- Apply small dots of hot glue or strong craft glue along the frame border.
- Press the beads firmly into the glue, working your way around the frame.
- Allow the glue to dry completely before painting or sealing if desired.
- Reassemble the frame once everything is secure.
Shop the Look
- Wooden Craft Beads Assortment
- Hot Glue Gun for Crafts
- Unfinished Wooden Picture Frames
- Acrylic Craft Paint Set
6. Checkerboard Painted Frames
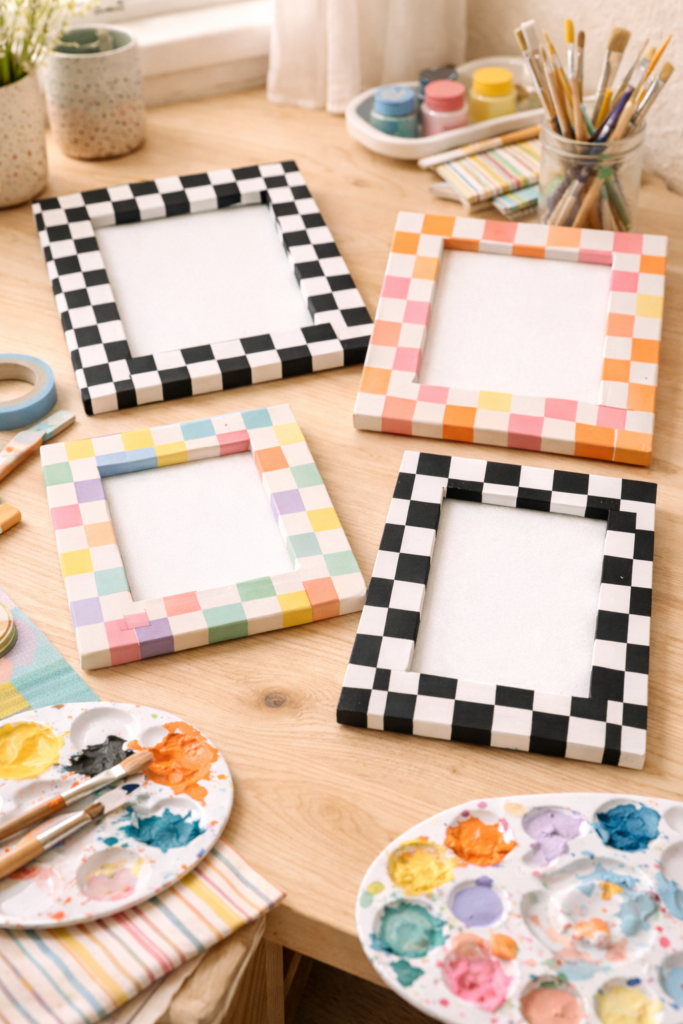
A Trendy DIY Picture Frame with Bold Pattern
Checkerboard patterns have become one of the most popular design trends in DIY wall decor, and they work surprisingly well on picture frames. A simple checker pattern instantly transforms a basic frame into something graphic, playful, and modern.
This DIY picture frame craft adds personality without requiring complicated tools or techniques. The alternating squares create visual contrast that draws attention to your photos while still feeling stylish and intentional. Depending on the colors you choose, the frame can look retro, colorful, or sleek and modern.
Checkerboard frames also look amazing as part of a gallery wall because the pattern adds movement and energy between simpler frames.
How to Make It
- Start with a plain wooden picture frame and remove the glass and backing.
- Use a ruler and pencil to lightly mark a grid pattern around the frame edges.
- Apply painter’s tape along the grid lines to keep the squares neat and even.
- Paint alternating squares using acrylic craft paint in two contrasting colors.
- Allow the paint to dry fully before carefully removing the tape.
- Finish with a clear craft sealant for durability.
Shop the Look
- Acrylic Craft Paint Set
- Painter’s Tape for Crafts
- Unfinished Wooden Picture Frames
- Clear Acrylic Sealer Spray
7. Rope Wrapped Coastal Frames
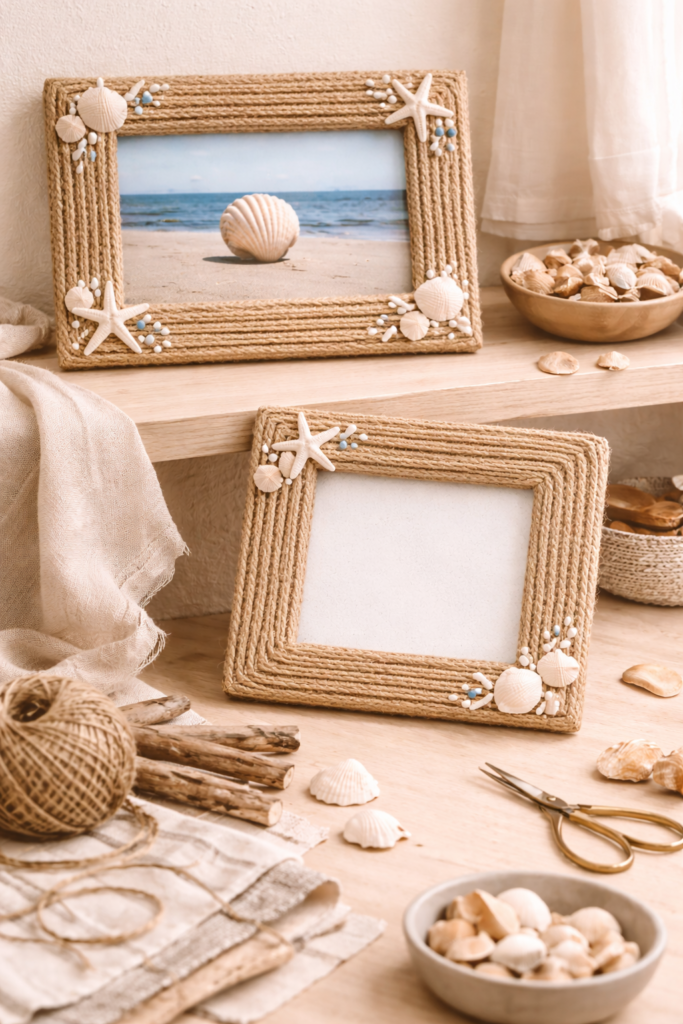
A Textured DIY Picture Frame with a Relaxed Coastal Feel
Rope-wrapped frames are a simple way to give a DIY picture frame natural texture and a relaxed coastal vibe. Wrapping jute or cotton rope around a plain frame creates a layered look that feels warm, organic, and slightly beach-inspired.
This homemade picture frame idea works especially well for vacation photos, nature prints, or family pictures taken outdoors. The rope adds subtle dimension and makes the frame feel handcrafted rather than store-bought. It also pairs beautifully with other natural decor elements like woven baskets, wood furniture, and linen textiles.
Because the technique is straightforward, this DIY picture frame craft is beginner-friendly and can be finished in under an hour.
How to Make It
- Start with a plain wooden picture frame and remove the glass and backing.
- Apply a thin line of hot glue along one edge of the frame.
- Press the end of jute rope into the glue and begin wrapping it tightly around the frame.
- Continue adding glue in small sections while wrapping the rope evenly around the entire frame.
- Trim the rope neatly once the frame is fully covered.
- Allow the glue to dry before reassembling the frame.
Shop the Look
- Natural Jute Rope for Crafts
- Hot Glue Gun for Crafts
- Unfinished Wooden Picture Frames
- Craft Scissors for Rope and Fabric
8. Mosaic Tile Frames

A Colorful DIY Picture Frame with Artistic Texture
Mosaic frames turn a basic DIY picture frame into a vibrant piece of art. Small tiles, glass pieces, or colorful ceramic fragments create a layered surface that feels creative and full of personality. The mix of shapes and colors makes every frame unique.
This DIY picture frame craft is perfect if you love bold decor and handmade projects. Mosaic designs naturally draw attention, which makes them great for highlighting special photos or artwork. The finished frame feels detailed and artistic, but the process itself is simple and beginner-friendly.
These homemade picture frames look especially beautiful in colorful interiors, craft rooms, or gallery walls where texture and pattern add visual interest.
How to Make It
- Start with a plain wooden picture frame and remove the glass and backing.
- Arrange mosaic tiles or small ceramic pieces around the frame to plan your design.
- Apply tile adhesive or strong craft glue to attach each piece to the frame.
- Leave small gaps between tiles for grout.
- Once the adhesive dries, spread grout over the frame and press it into the spaces between the tiles.
- Wipe away excess grout with a damp sponge and allow everything to dry fully.
Shop the Look
- Mosaic Tiles for Crafts
- Tile Adhesive for DIY Projects
- Grout for Mosaic Crafts
- Unfinished Wooden Picture Frames
9. Painted Arch Frames
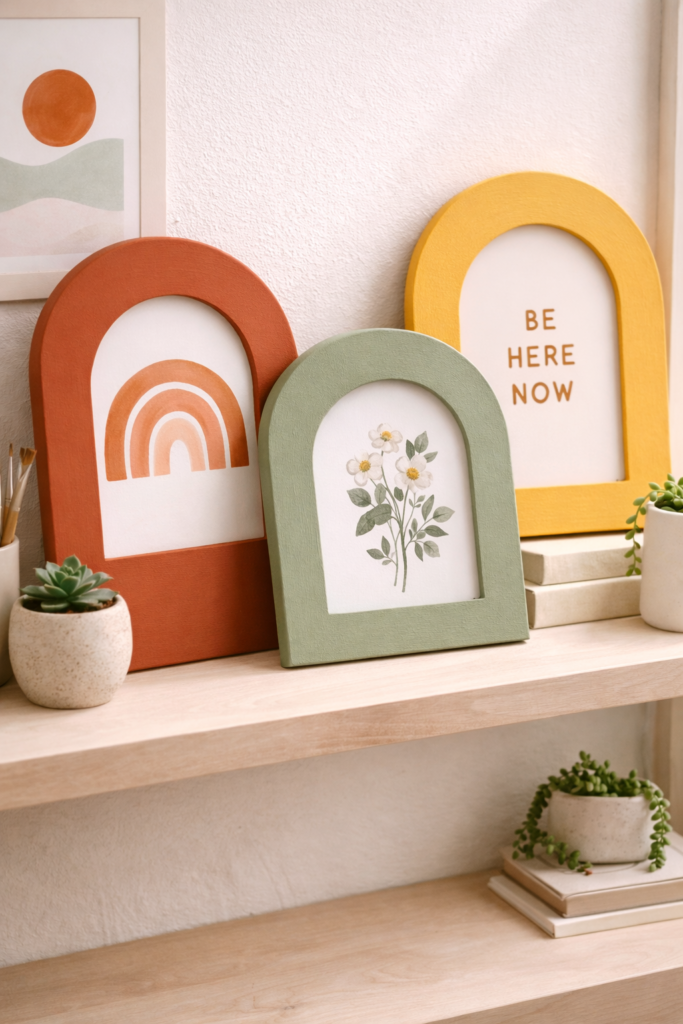
A Modern DIY Picture Frame with Soft Curves
Arched shapes have become a major trend in DIY wall decor, and they work beautifully with picture frames. Adding a painted arch design gives a basic frame a modern, architectural feel while still keeping the project simple and beginner-friendly.
This DIY picture frame idea is perfect if you want something colorful and contemporary without needing complicated tools. The curved shape naturally draws the eye toward the photo and creates a layered design that feels intentional and stylish. It also pairs nicely with minimalist decor, gallery walls, and creative workspaces.
These homemade picture frames look especially striking when you use bold paint colors that contrast with the photo or artwork inside the frame.
How to Make It
- Start with a plain wooden picture frame and remove the glass and backing.
- Paint the entire frame in a base color and allow it to dry.
- Lightly draw an arch shape on the frame or backing board using a pencil.
- Fill in the arch using a contrasting acrylic paint color.
- Apply a second coat if needed for full color coverage.
- Finish with a clear sealant to protect the paint and reassemble the frame.
Shop the Look
- Acrylic Craft Paint Set
- Paint Brushes for Craft Projects
- Unfinished Wooden Picture Frames
- Clear Acrylic Sealer Spray
10. Ribbon Trim Frames
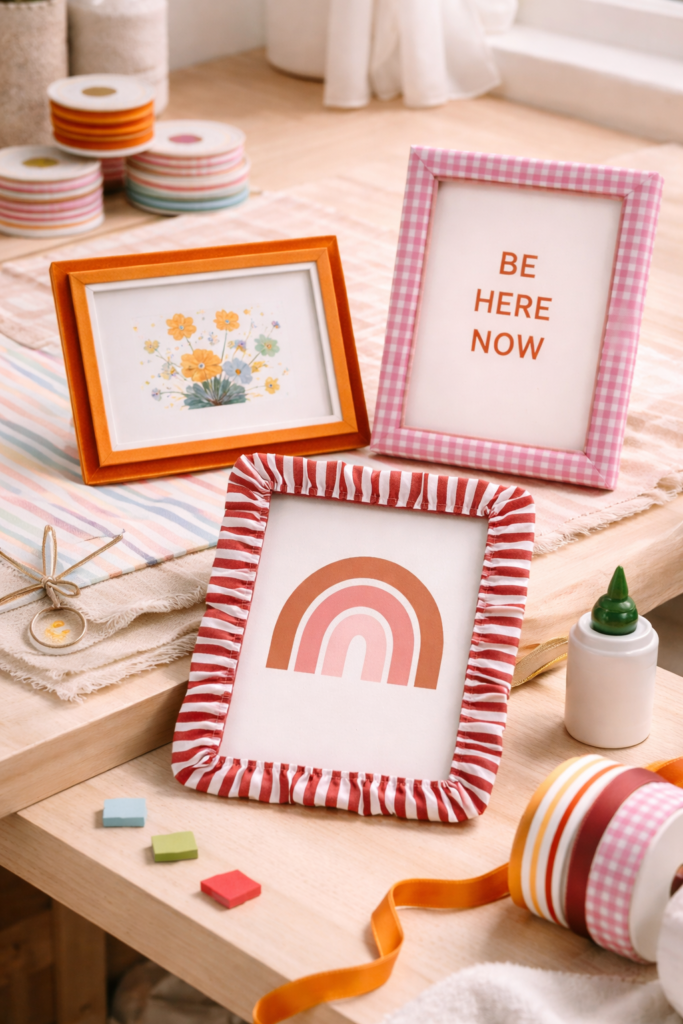
A Decorative DIY Picture Frame with Pattern and Color
Ribbon trim is a quick and creative way to transform a plain frame into eye-catching DIY wall decor. The layered fabric texture adds color and pattern without needing paint or complicated tools. With the right ribbon, a simple frame can instantly feel cozy, colorful, or even slightly vintage.
This DIY picture frame craft works especially well if you enjoy mixing patterns and textures in your decor. Striped ribbon, gingham, velvet, or embroidered trim can completely change the look of the frame. It’s also a great project for using leftover craft supplies.
Because the ribbon sits along the border of the frame, it naturally highlights the photo inside while giving the frame a finished, decorative edge. These homemade picture frames look beautiful on shelves, desks, or as part of a gallery wall.
How to Make It
- Start with a plain picture frame and remove the glass and backing.
- Measure and cut decorative ribbon to match the length of each frame edge.
- Apply fabric glue or hot glue along the outer border of the frame.
- Press the ribbon firmly onto the glued areas, aligning it neatly along the edges.
- Trim any extra ribbon at the corners for a clean finish.
- Allow the glue to dry before reassembling the frame.
Shop the Look
- Decorative Ribbon Assortment
- Fabric Glue for Crafts
- Hot Glue Gun for Crafts
- Unfinished Wooden Picture Frames
11. Layered Paper Collage Frames
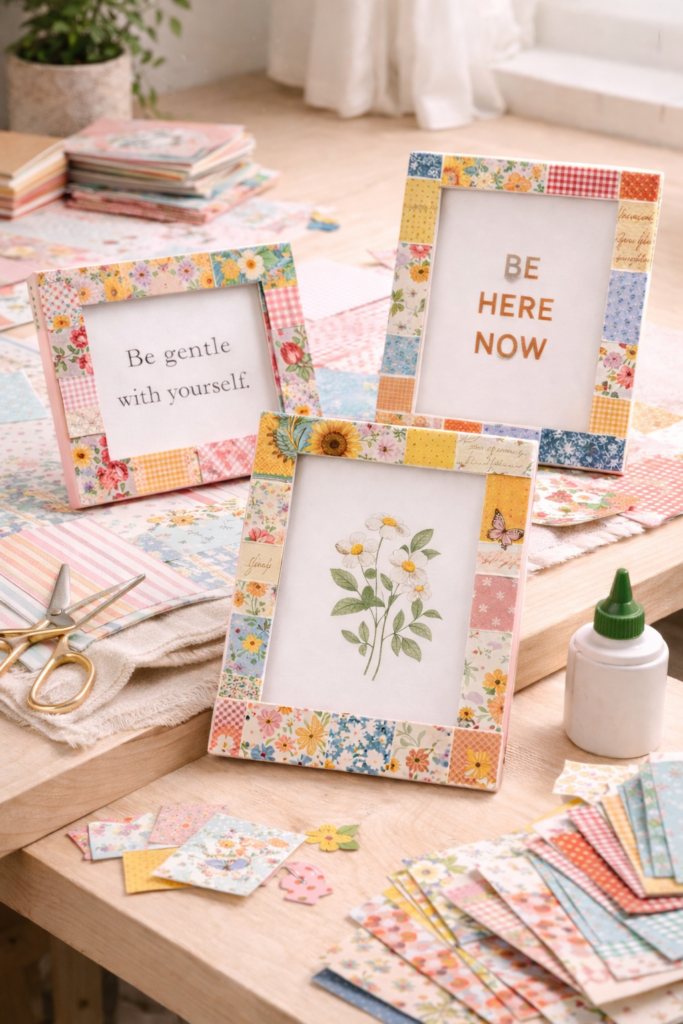
A Creative DIY Picture Frame with Colorful Layers
Paper collage frames are one of the most versatile DIY picture frame crafts because you can mix colors, prints, and textures to create something completely unique. Using scrapbook paper, magazine pages, or patterned craft paper turns a plain frame into vibrant DIY wall decor that feels artistic and personal.
This homemade picture frame idea works especially well if you enjoy bold patterns like florals, stripes, abstract prints, or vintage illustrations. The layered paper creates movement and visual depth, which makes the frame feel more like a piece of art than just a photo holder.
It’s also an easy way to coordinate frames with your room’s color palette. By choosing papers that match your decor, you can create frames that feel cohesive and intentional.
How to Make It
- Start with a plain wooden picture frame and remove the glass and backing.
- Cut scrapbook paper or magazine pages into small shapes or strips.
- Arrange the paper pieces on the frame to create a layered collage design.
- Apply Mod Podge or craft glue to attach each paper piece to the frame.
- Once the entire frame is covered, brush a thin layer of Mod Podge over the top to seal the design.
- Allow the frame to dry completely before reassembling it.
Shop the Look
- Scrapbook Paper Variety Pack
- Mod Podge Craft Sealer
- Craft Scissors for Paper Projects
- Unfinished Wooden Picture Frames
12. Pom-Pom Trim Frames
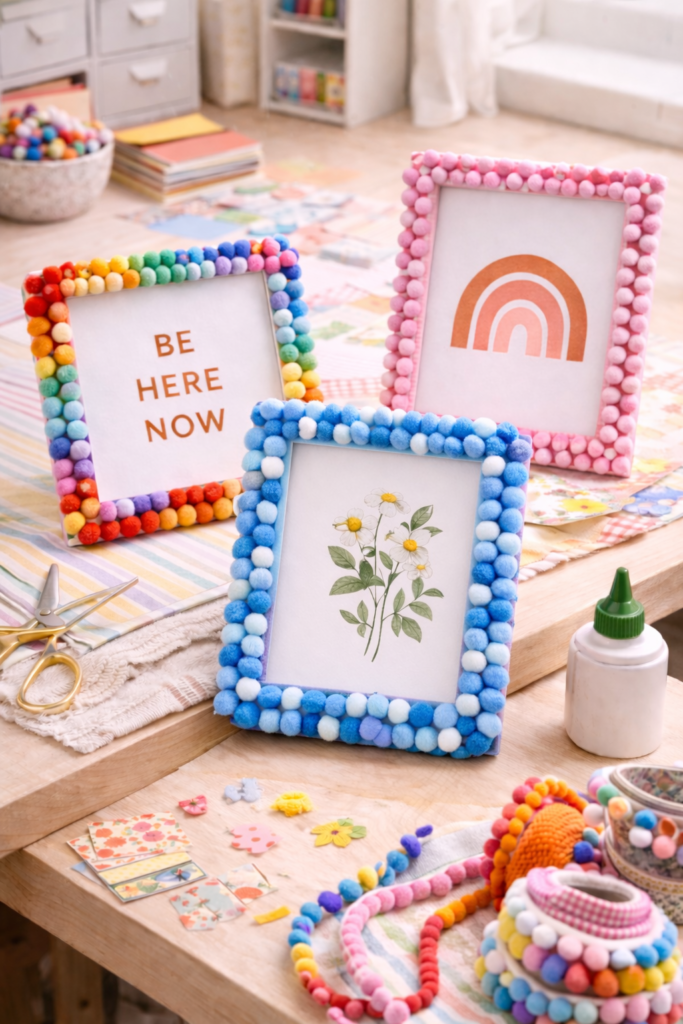
A Playful DIY Picture Frame with Colorful Texture
Pom-pom trim frames are one of the most cheerful DIY picture frame crafts you can make. The small round pom-poms create a soft, colorful border that instantly makes a frame feel playful and full of personality. It is an easy way to turn a plain frame into fun DIY wall decor that stands out.
This homemade picture frame idea works especially well for bright, creative spaces like craft rooms, kids’ rooms, or gallery walls with colorful prints. The pom-poms add movement and texture, which helps the frame feel lively and handmade.
Because pom-pom trim already comes attached to a ribbon strip, this DIY picture frame project is quick to assemble and beginner-friendly.
How to Make It
- Start with a plain wooden picture frame and remove the glass and backing.
- Measure and cut pom-pom trim to fit along each edge of the frame.
- Apply hot glue or strong craft glue along the frame border.
- Press the pom-pom trim into the glue, aligning it neatly along the edges.
- Trim the ends so the trim fits cleanly around the frame corners.
- Allow the glue to dry before reassembling the frame.
Shop the Look
- Colorful Pom-Pom Trim for Crafts
- Hot Glue Gun for Crafts
- Craft Scissors for Fabric and Trim
- Unfinished Wooden Picture Frames
13. Wood Burned Rustic Frames
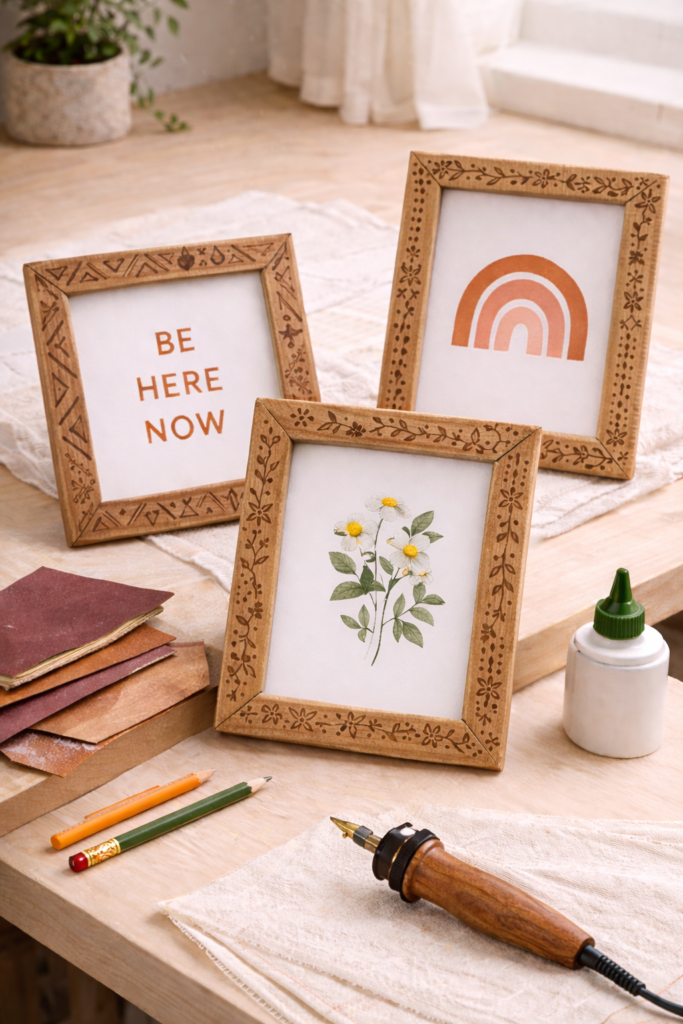
A Handmade DIY Picture Frame with Natural Detail
Wood burning adds subtle character and texture to a simple DIY picture frame. Instead of adding paint or fabric, this technique uses heat to create decorative lines, patterns, or illustrations directly in the wood. The result feels natural, rustic, and handcrafted.
This DIY picture frame craft works beautifully with simple geometric designs, botanical patterns, or small decorative borders around the edges of the frame. Because the design is burned into the wood, the finished frame has a warm, organic look that pairs nicely with cozy interiors and natural materials.
These homemade picture frames are perfect for displaying family photos, travel memories, or nature prints while adding a little handcrafted detail to your decor.
How to Make It
- Start with a plain unfinished wooden picture frame and remove the glass and backing.
- Lightly sketch your design onto the frame using a pencil.
- Heat up a wood burning tool according to the manufacturer’s instructions.
- Slowly trace over the pencil lines with the wood burner to create the design.
- Allow the frame to cool completely before wiping away any pencil marks.
- Apply a clear wood sealer to protect the design if desired.
Shop the Look
- Wood Burning Tool Kit for Crafts
- Unfinished Wooden Picture Frames
- Fine Sandpaper for Wood Crafts
- Clear Wood Sealer Spray
14. Resin Confetti Picture Frames
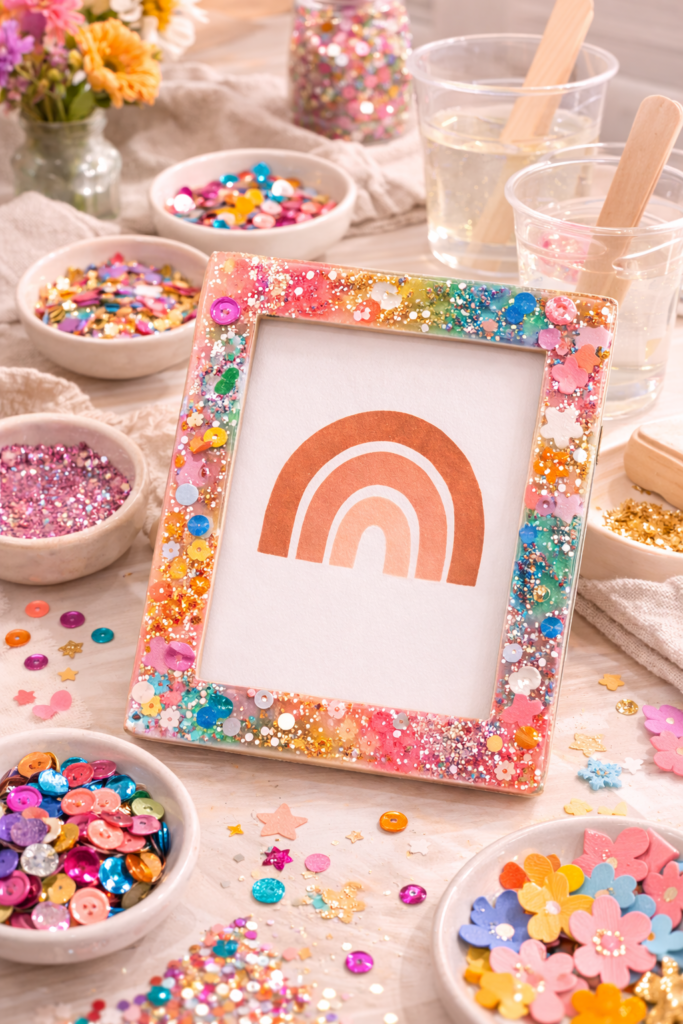
A Glossy DIY Picture Frame with Colorful Confetti Detail
Resin confetti frames are a fun way to turn a simple DIY picture frame into bold, glossy DIY wall decor. By sealing colorful glitter, sequins, or confetti under a clear resin layer, the frame gets a smooth glass-like finish that instantly feels modern and eye-catching.
This homemade picture frame idea works especially well for colorful interiors, craft rooms, and gallery walls that need a little sparkle. The confetti adds playful texture while the resin creates a sleek, polished surface that makes the frame feel professionally finished.
Because you can mix different shapes and colors of confetti, each DIY picture frame craft ends up looking unique and vibrant.
How to Make It
- Start with a plain wooden picture frame and remove the glass and backing.
- Sprinkle colorful confetti, glitter, or sequins along the frame edges.
- Mix a small batch of clear craft resin according to the package instructions.
- Carefully pour a thin layer of resin over the confetti to seal it in place.
- Use a craft stick to spread the resin evenly around the frame surface.
- Allow the resin to cure completely before reassembling the frame.
Shop the Look
- Clear Epoxy Resin for Crafts
- Colorful Craft Confetti Mix
- Unfinished Wooden Picture Frames
- Disposable Resin Mixing Cups and Sticks
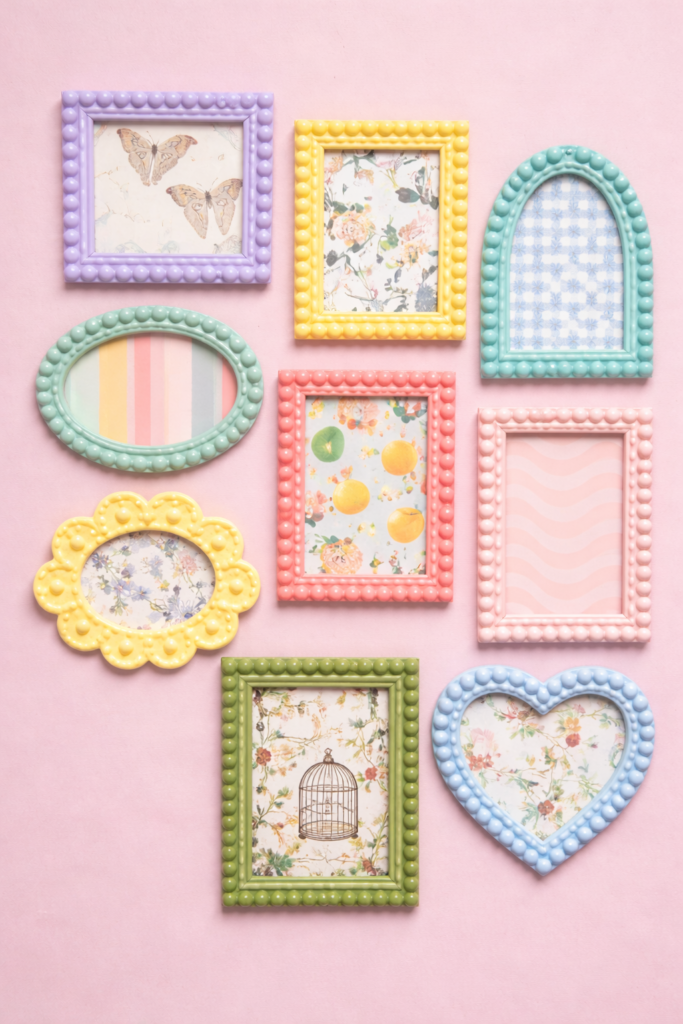
Bring Your Walls to Life With DIY Picture Frames
A simple frame can become something completely unique with a little creativity. These DIY picture frame ideas show how easy it is to turn everyday materials into colorful, textured, and personal decor pieces.
From painted stripes and clay textures to fabric patterns and seasonal decorations, these DIY picture frame crafts prove that homemade projects can look stylish and intentional. Mixing different styles together also makes gallery walls feel more layered and interesting.
If you enjoy creative framing projects, you may also love experimenting with custom mat boards. Next read: 12 DIY Fabric Mat Board Ideas That Look Custom
This guide shows how to upgrade picture mats using fabric, patterns, and textures so your framed photos feel even more polished and personalized.