
Affiliate Disclosure – This post may contain affiliate links. That means I may earn a small commission if you purchase through these links, at no extra cost to you.
If you love crafts that double as home decor, clay trays are one of the easiest projects to try. They are simple to make, surprisingly versatile, and perfect for holding jewelry, keys, candles, or everyday essentials. The best part is you can shape and paint them in ways that feel completely custom to your space.
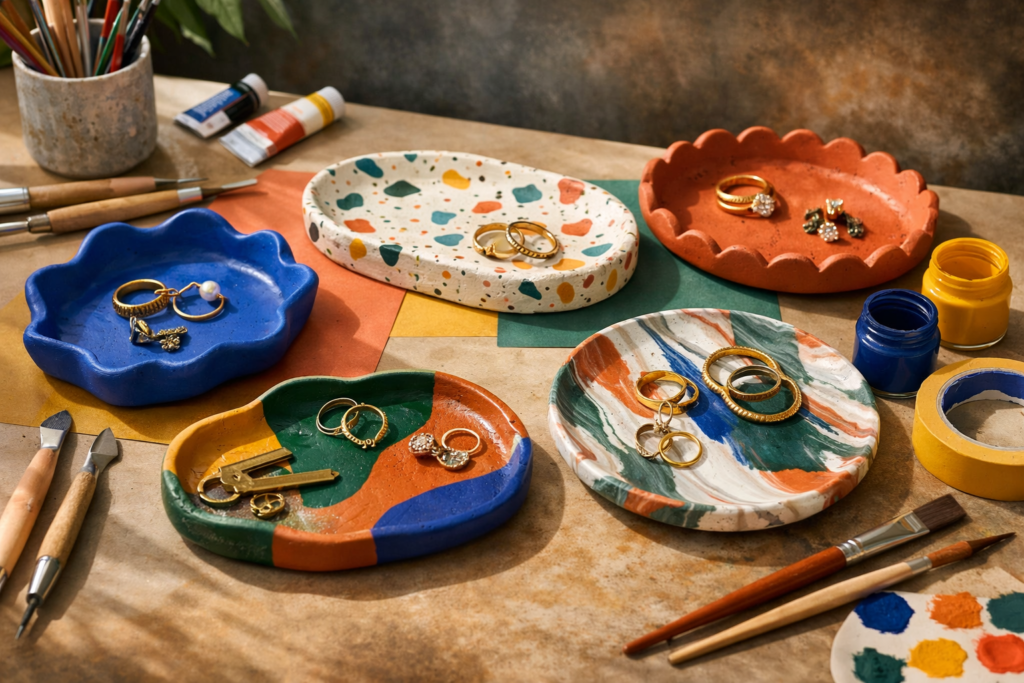
These clay tray ideas focus on colorful, modern designs that look polished enough to sit on a vanity, coffee table, or entryway console. From sculptural shapes to bold painted designs, these trays turn basic clay into small pieces of functional art.
If you have been wanting to try clay trays DIY, this list will give you plenty of creative inspiration to get started.
1. Wavy Edge Clay Trinket Tray
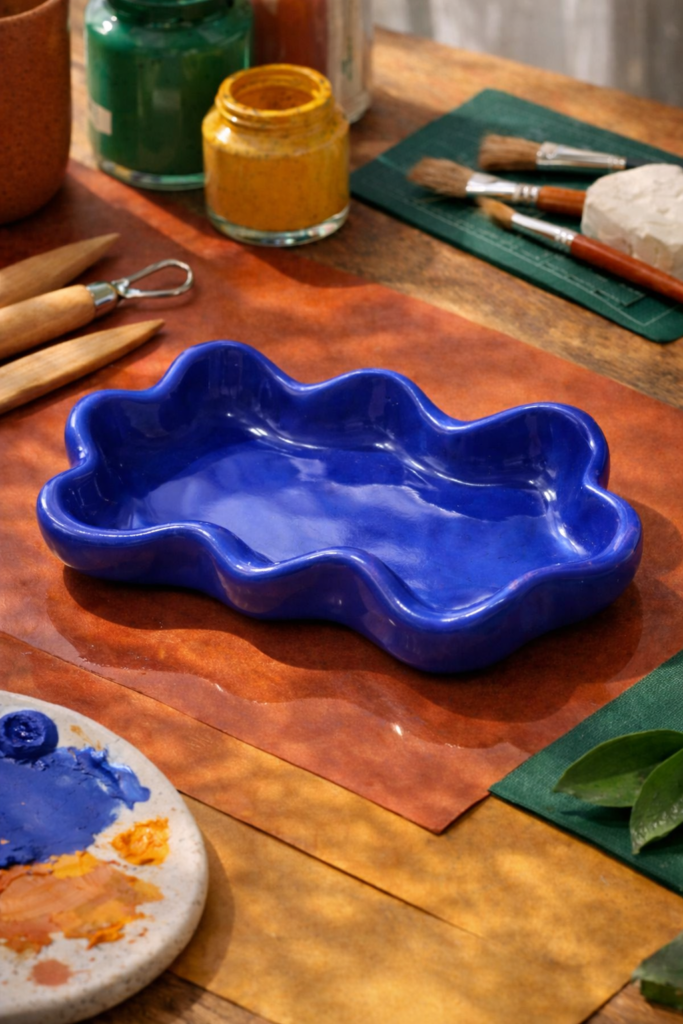
A wavy edge tray instantly feels modern and artistic. The soft curves give the tray movement, which makes it look more like a sculptural decor piece than a basic craft. This style works beautifully as a clay trinket tray for rings, earrings, or small accessories on a bedside table. Bold colors like cobalt blue, rust, olive green, or mustard yellow make the organic shape stand out even more. Once finished, the tray becomes a small statement piece that adds personality to any surface.
Step-by-Step Instructions
- Roll air dry clay to about ¼ inch thickness using a rolling pin.
- Cut a loose oval or rounded rectangle shape using a craft knife.
- Use your fingers to gently pinch sections of the edge upward to create soft waves.
- Smooth the surface and edges with a damp sponge or fingertip.
- Allow the tray to dry completely according to the clay instructions.
- Paint the tray with acrylic paint in your chosen color palette.
- Seal the tray with a gloss or satin sealant for durability.
Shop the Look
• Air Dry Clay
• Clay Rolling Pin
• Acrylic Paint Set
• Gloss Craft Sealant
2. Terrazzo Style Clay Art Tray
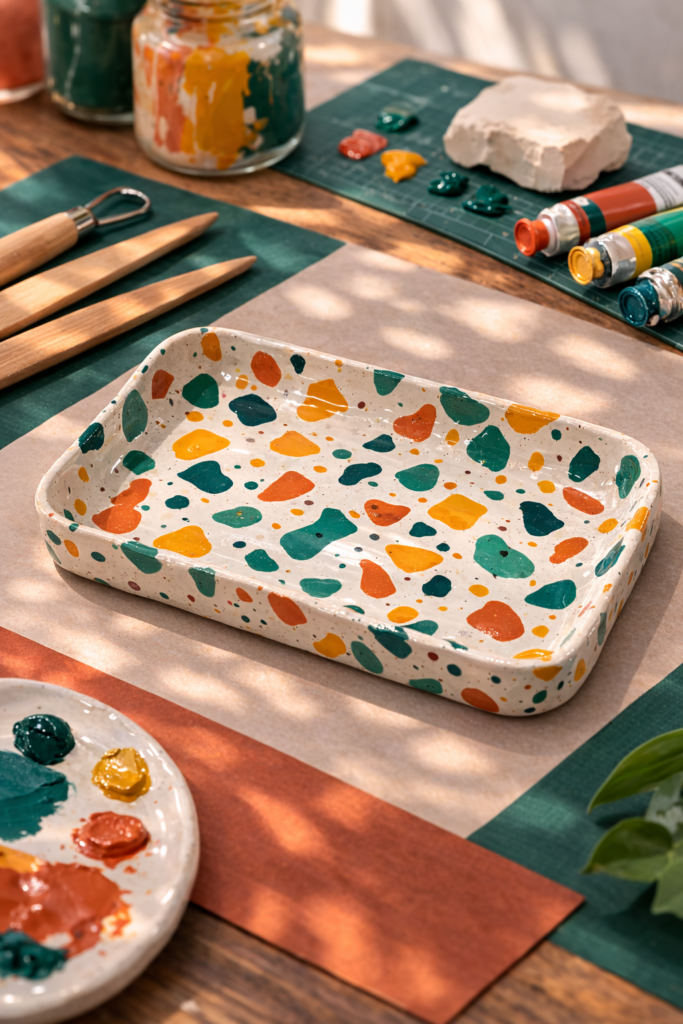
Terrazzo trays are one of the most eye-catching clay tray ideas because the colorful speckled pattern looks like designer stone. Instead of one solid color, this tray combines small clay pieces in different shades to create a playful mosaic effect. The finished surface feels modern, artistic, and full of personality, which makes it perfect as a clay art tray for a coffee table, vanity, or entryway. Bright tones like coral, teal, mustard, and forest green create that bold terrazzo look that feels trendy and decorative. Once sealed, the tray looks surprisingly polished and high-end.
Step-by-Step Instructions
- Roll a base sheet of air dry clay to about ¼ inch thickness.
- Roll small pieces of different colored clay into tiny chips.
- Scatter the colored pieces across the clay surface.
- Press the pieces into the clay gently with your fingers.
- Roll lightly over the surface again to embed the chips evenly.
- Cut your tray shape using a craft knife or round cutter.
- Slightly lift the edges to create a shallow tray form.
- Allow the tray to dry completely before sealing.
Shop the Look
• Air Dry Clay
• Clay Roller
• Craft Knife for Clay
• Acrylic Paint Set
3. Hand-Painted Pattern Clay Jewelry Tray
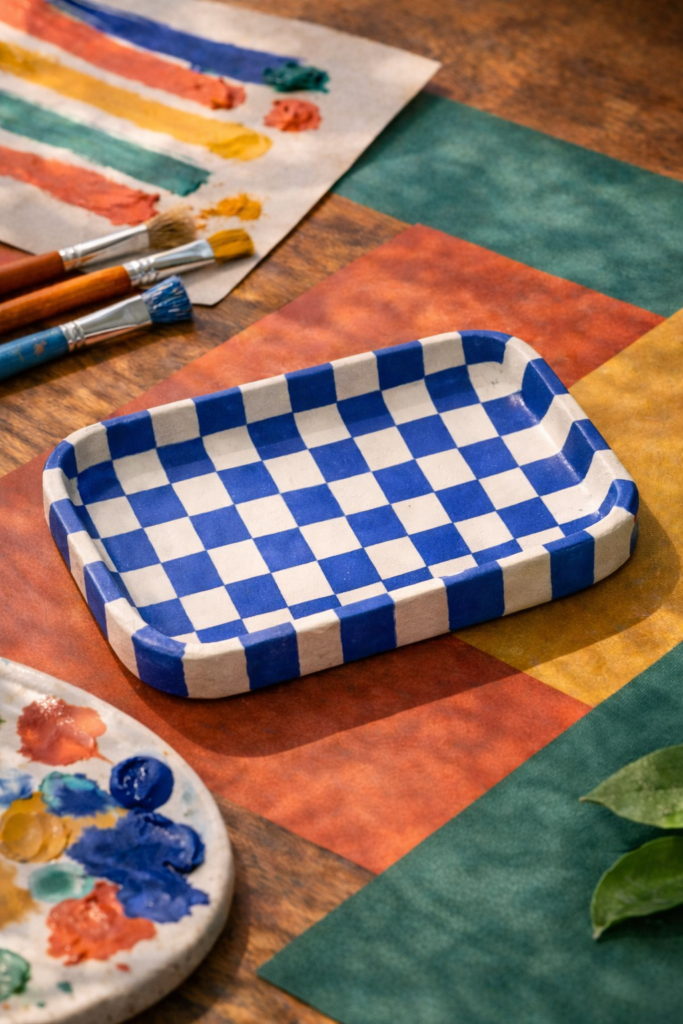
If you enjoy adding artistic details to your crafts, a hand-painted tray is one of the most creative clay trays DIY projects you can try. The tray shape stays simple, but the painted surface becomes the focal point. Think checkerboard patterns, bold stripes, abstract shapes, or playful brush strokes in vibrant colors like turquoise, burnt orange, magenta, and deep green. This style turns a basic tray into a decorative clay jewelry plate that looks beautiful on a vanity or dresser. Because the design is completely customizable, every tray ends up feeling unique and personal.
Step-by-Step Instructions
- Roll air dry clay to about ¼ inch thickness.
- Cut an oval, round, or rectangle tray shape using a craft knife.
- Gently lift the edges slightly to create a shallow tray.
- Smooth the surface with a damp fingertip or sponge.
- Allow the clay to dry completely according to package instructions.
- Paint patterns using acrylic paint or paint pens.
- Seal the painted surface with a clear craft sealant.
Shop the Look
• Air Dry Clay
• Acrylic Paint Pens
• Detail Paint Brush Set
• Clear Craft Sealant
4. Scalloped Edge Clay Jewelry Plate
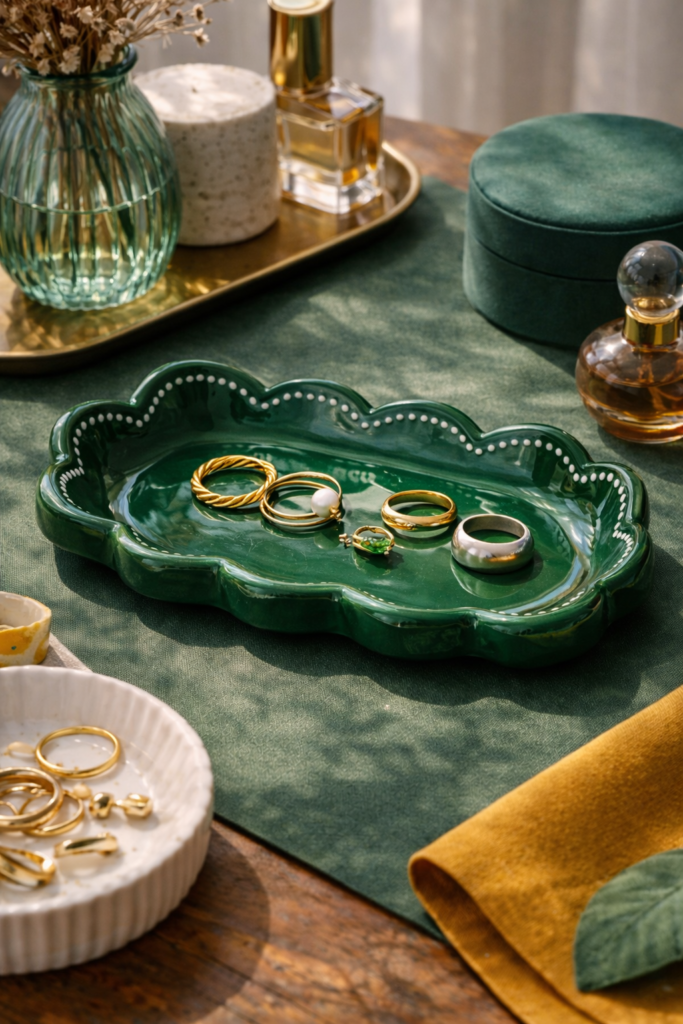
Scalloped edges instantly make a tray feel decorative and elevated. Instead of a straight rim, the edge forms soft repeating curves that give the tray a playful but polished look. This style works beautifully as a clay jewelry plate on a vanity or dresser because the curved edges frame rings and earrings in a really pretty way. Bright earthy tones like terracotta, jade green, sunflower yellow, or coral make the scalloped shape pop. Once sealed, this tray feels like a small handmade decor piece rather than a simple craft project.
Step-by-Step Instructions
- Roll air dry clay to about ¼ inch thickness.
- Cut a round tray shape using a craft knife or round cutter.
- Use a bottle cap or round tool to press evenly spaced half-circles along the edge to create scallops.
- Gently lift the outer rim slightly to create a shallow tray shape.
- Smooth the surface and edges with a damp sponge or fingertip.
- Allow the clay tray to dry completely.
- Paint the tray using acrylic paint in bold or earthy colors.
- Apply a clear sealant to protect the finish.
Shop the Look
• Air Dry Clay
• Clay Sculpting Tools
• Acrylic Paint Set
• Gloss Craft Sealant
5. Abstract Shape Clay Art Tray
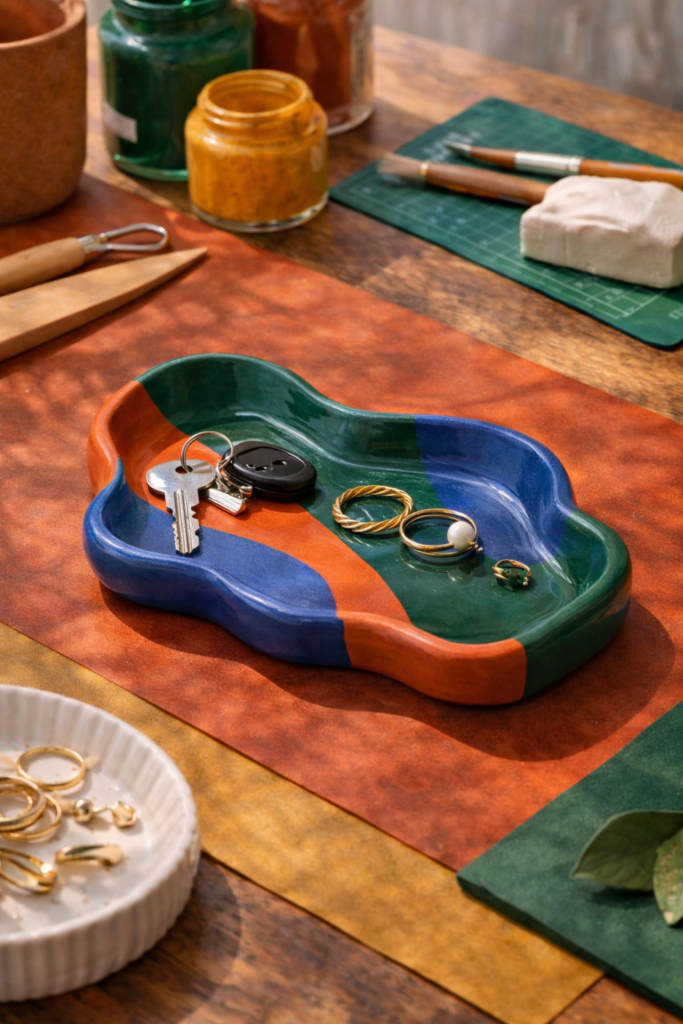
Abstract trays are perfect if you want a clay art tray that looks modern and a little unexpected. Instead of a perfect circle or rectangle, this tray uses irregular curves and freeform edges that feel sculptural and artistic. The shape alone gives the tray personality, especially when paired with bold colors like emerald green, burnt orange, cobalt, or deep plum. This style works beautifully as a catch-all tray for keys, jewelry, or small accessories on an entryway table or nightstand. Because every shape is handmade, each tray ends up looking like a small piece of functional art.
Step-by-Step Instructions
1. Roll air dry clay to about ¼ inch thickness.
2. Place small leaves or botanical pieces on the clay surface.
3. Use a rolling pin to gently press the leaves into the clay.
4. Carefully lift the leaves to reveal the texture imprint.
5. Cut the tray shape around the design using a craft knife.
6. Lift the edges slightly to form a shallow tray.
7. Allow the tray to dry completely.
8. Paint the surface and seal with a clear craft sealant.
Shop the Look
• Air Dry Clay
• Clay Rolling Pin
• Clay Sculpting Tools
• Clear Craft Sealant
6. Pressed Botanical Clay Tray
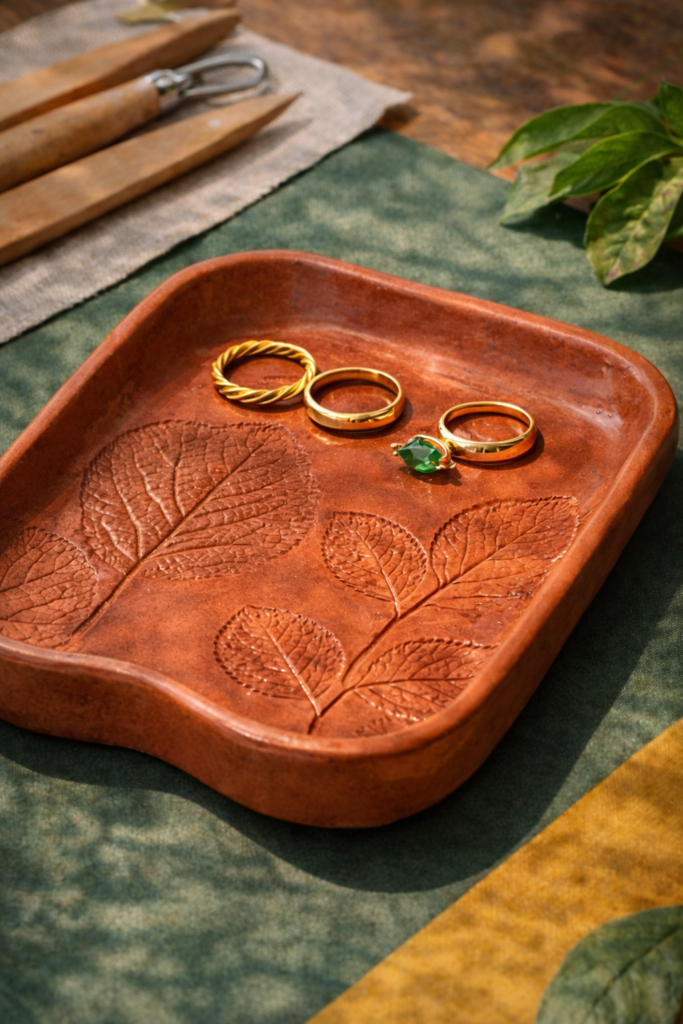
A pressed botanical tray combines natural textures with bold color, creating a tray that feels earthy but still modern. Leaves and small plants are pressed into the clay surface to leave delicate patterns that become part of the design. Once painted, the raised textures catch light and color beautifully, making the tray look detailed and artistic. This style works especially well as a clay trinket tray for rings, earrings, or small keepsakes. The finished piece feels handmade, organic, and decorative at the same time.
Step-by-Step Instructions
- Roll air dry clay to about ¼ inch thickness.
- Place small leaves or botanical pieces on the clay surface.
- Use a rolling pin to gently press the leaves into the clay.
- Carefully lift the leaves to reveal the texture imprint.
- Cut the tray shape around the design using a craft knife.
- Lift the edges slightly to form a shallow tray.
- Allow the tray to dry completely.
- Paint the surface and seal with a clear craft sealant.
Shop the Look
• Air Dry Clay
• Clay Rolling Pin
• Clay Sculpting Tools
• Clear Craft Sealant
7. Two-Tone Color Block Clay Tray
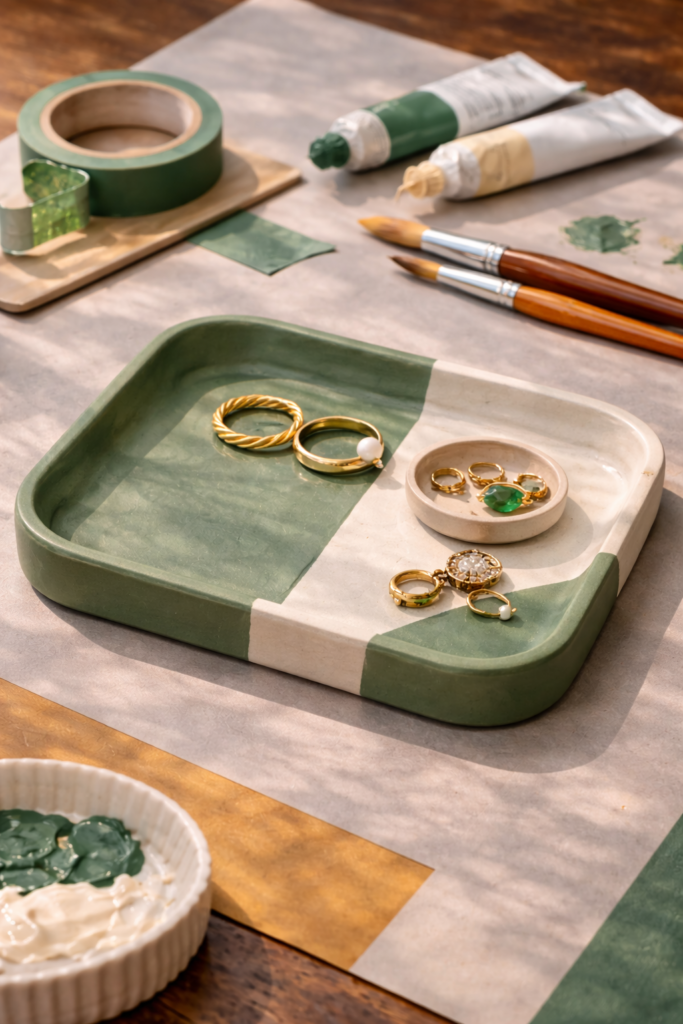
Color blocking is one of the easiest ways to make air dry clay trays look modern and graphic. Instead of one solid color, bold painted sections create contrast and visual interest. Think combinations like coral and teal, cobalt and mustard, or olive and burnt orange. The clean color divisions make the tray feel contemporary while still playful. This type of clay art tray works beautifully on desks, vanities, or coffee tables where the color can stand out against other decor.
Step-by-Step Instructions
1. Roll air dry clay to about ¼ inch thickness.
2. Cut a round, oval, or rectangular tray shape using a craft knife.
3. Lift the edges slightly to form a shallow tray.
4. Smooth the surface and edges with a damp sponge.
5. Allow the tray to dry completely.
6. Use painter’s tape to divide the tray into color sections.
7. Paint each section with acrylic paint in contrasting colors.
8. Seal the tray with a clear craft sealant.
Shop the Look
• Air Dry Clay
• Painter’s Tape
• Acrylic Paint Set
• Clear Craft Sealant
8. Ring Holder Clay Tray
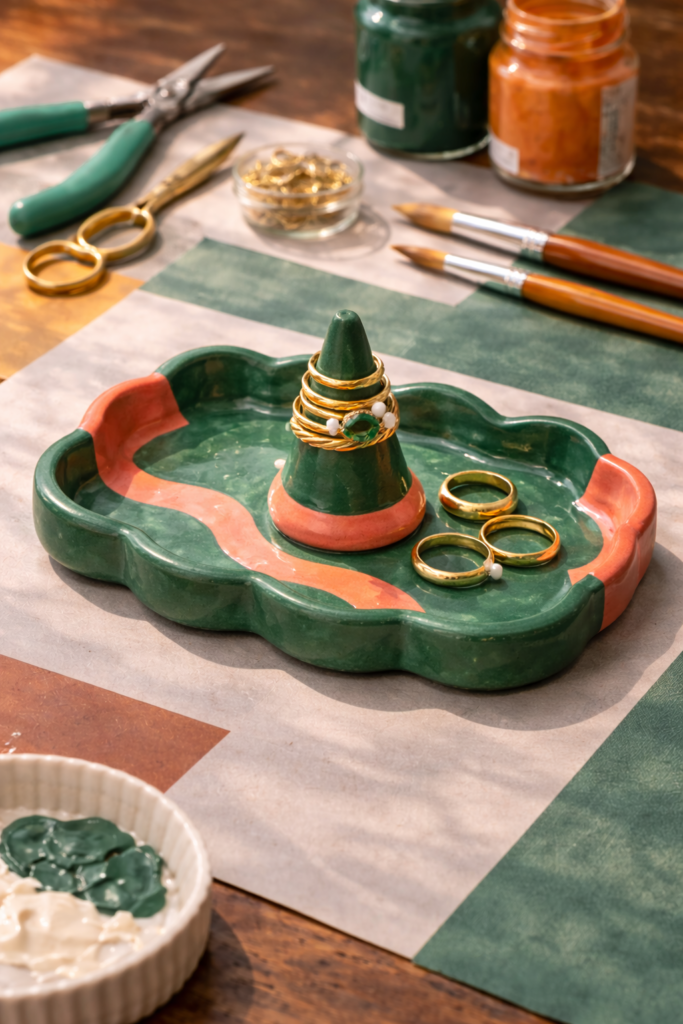
A ring holder tray adds a smart functional detail to your clay project. Instead of just a flat tray, this design includes a small cone in the center that keeps rings neatly stacked and easy to grab. The tray base can hold earrings, necklaces, or small accessories, making it perfect for dressers, vanities, or nightstands. Bold colors like emerald, coral, mustard, or deep teal give the tray a modern decorative feel. This jewelry tray DIY idea turns a simple craft into something both practical and stylish.
Step-by-Step Instructions
1. Roll air dry clay to about ¼ inch thickness for the tray base.
2. Cut a round or oval shape using a craft knife.
3. Slightly lift the edges to form a shallow tray.
4. Roll a small piece of clay into a cone shape for the ring holder.
5. Score the bottom of the cone and the tray surface where it will attach.
6. Press the cone firmly into the center of the tray and smooth the seam.
7. Allow the tray to dry completely according to the clay instructions.
8. Paint the tray and cone using acrylic paint.
9. Seal the surface with a clear craft sealant.
Shop the Look
• Air Dry Clay
• Clay Sculpting Tools
• Acrylic Paint Set
• Gloss Craft Sealant
9. Marble Effect Clay Jewelry Tray
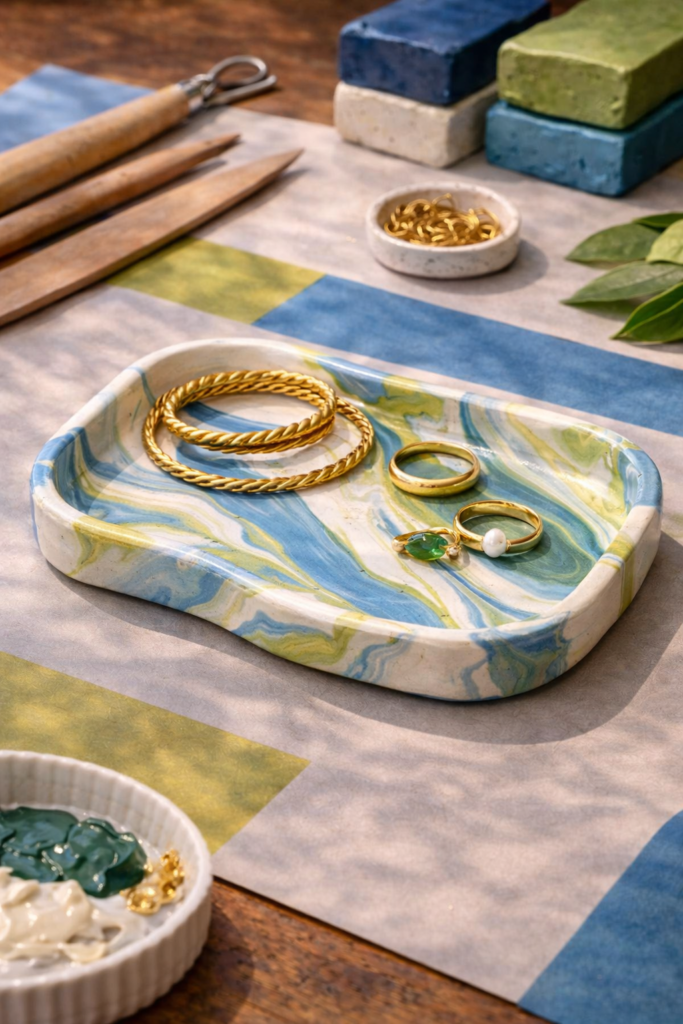
A marble effect tray is one of the most beautiful clay tray ideas because the swirling pattern mimics real stone. By blending two or three clay colors together, you can create soft organic veining that looks high-end and artistic. This technique works especially well with combinations like white and terracotta, deep green and cream, or black and rust. The finished tray feels polished and decorative while still being easy to make at home. It works perfectly as a clay jewelry plate for rings, bracelets, or everyday accessories.
Step-by-Step Instructions
1. Roll small pieces of different colored clay into long ropes.
2. Twist the clay ropes together to begin creating the marble pattern.
3. Fold and twist the clay a few times to create natural veining.
4. Roll the clay flat to about ¼ inch thickness.
5. Cut the tray shape using a craft knife or round cutter.
6. Gently lift the edges slightly to form the tray.
7. Allow the clay to dry completely.
8. Seal the tray with a gloss or satin craft sealant.
Shop the Look
• Air Dry Clay
• Clay Rolling Pin
• Craft Knife for Clay
• Gloss Craft Sealant
10. Mini Catch-All Clay Tray
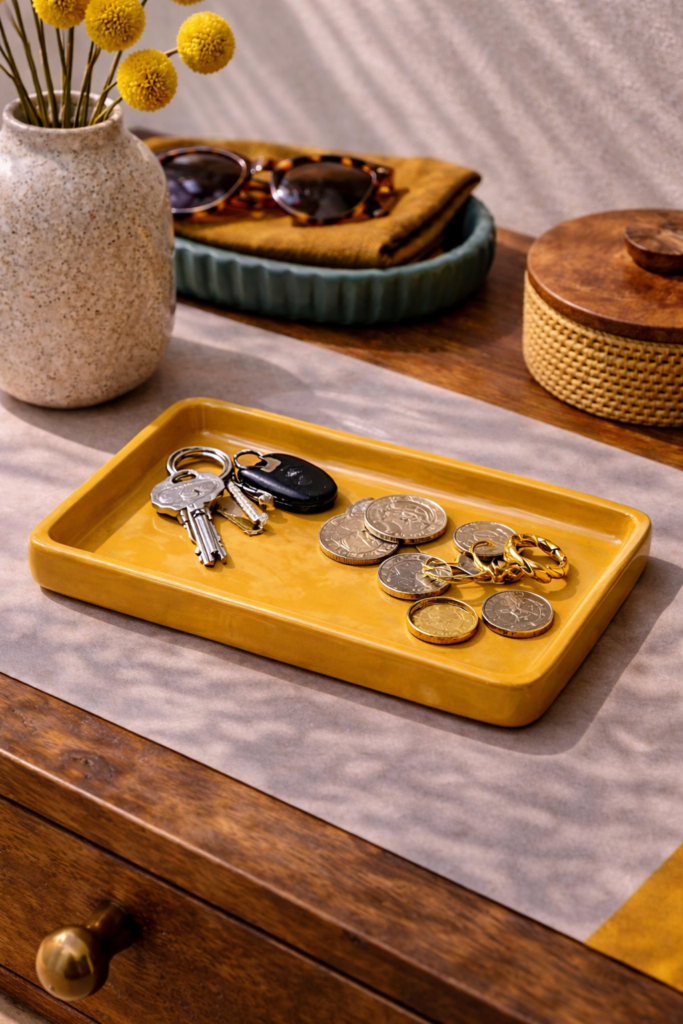
Mini catch-all trays are small but incredibly useful. These compact air dry clay trays are perfect for holding keys, coins, lip balm, or small everyday essentials that tend to clutter countertops. Because they are smaller, they are also quick to make and ideal for beginners trying their first trinket tray clay DIY project. Bright colors like coral, teal, mustard, or cobalt give the tray a playful modern vibe that stands out on an entryway table or desk. Despite the simple design, these trays look stylish and practical at the same time.
Step-by-Step Instructions
1. Roll air dry clay to about ¼ inch thickness.
2. Cut a small rectangle, oval, or rounded square shape using a craft knife.
3. Gently lift the edges slightly to create a shallow tray.
4. Smooth the surface and edges with a damp sponge or fingertip.
5. Allow the clay tray to dry completely.
6. Paint the tray using bold or earthy acrylic paint colors.
7. Seal the tray with a clear craft sealant.
Shop the Look
• Air Dry Clay
• Clay Rolling Pin
• Acrylic Paint Set
• Clear Craft Sealant
11. Textured Clay Tray
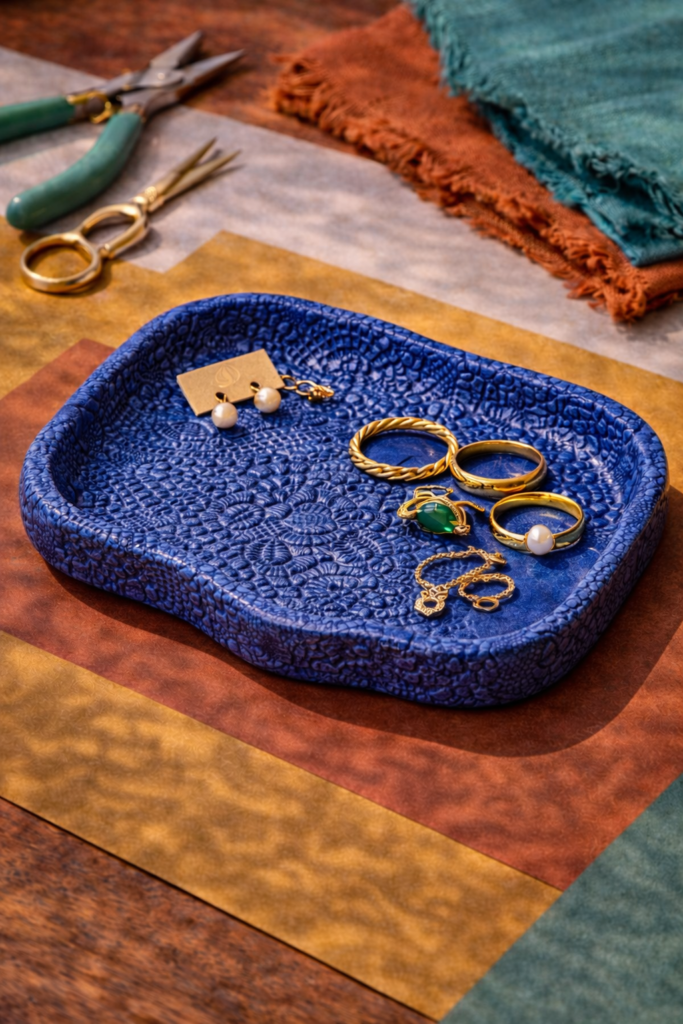
A textured tray adds depth and visual interest without requiring complicated shapes. By pressing fabric, lace, or textured tools into the clay, you can create beautiful patterns that become part of the tray surface. Once painted, the raised details catch light and color in a really striking way. This style works especially well as a clay art tray on vanities, coffee tables, or desks where the texture becomes a subtle focal point. With bold paint colors, the finished tray feels modern, artistic, and completely handmade.
Step-by-Step Instructions
1. Roll air dry clay to about ¼ inch thickness.
2. Place textured fabric, lace, or a texture roller on the clay surface.
3. Roll gently to press the pattern into the clay.
4. Remove the fabric or texture tool carefully.
5. Cut the tray shape using a craft knife.
6. Lift the edges slightly to create a shallow tray form.
7. Allow the tray to dry completely.
8. Paint the tray and apply a clear craft sealant.
Shop the Look
• Air Dry Clay
• Textured Clay Roller
• Acrylic Paint Set
• Clear Craft Sealant
12. Painted Clay Jewelry Plate
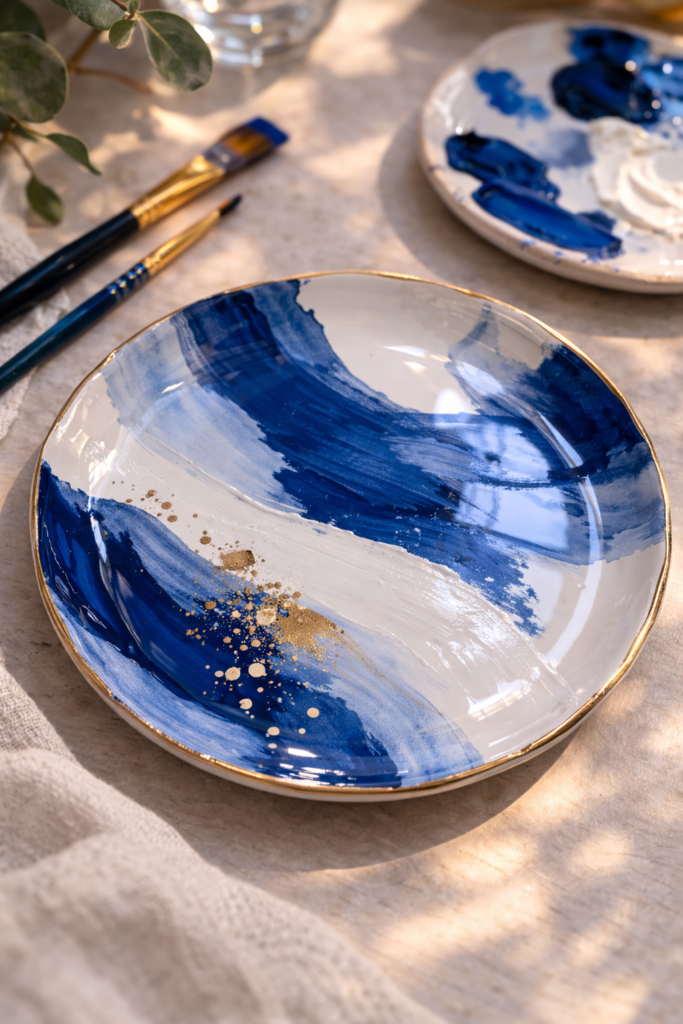
A painted clay tray turns a simple DIY project into a small piece of functional art. Instead of focusing on complex shapes, this design highlights bold painted patterns and expressive brush strokes. Think abstract shapes, modern stripes, layered colors, or playful geometric designs in shades like cobalt blue, rust, emerald, coral, or mustard. The finished piece feels creative and decorative while still being practical for everyday use. As a clay jewelry plate, it works beautifully for holding rings, bracelets, and small accessories on a vanity or bedside table.
Step-by-Step Instructions
1. Roll air dry clay to about ¼ inch thickness.
2. Cut a round or oval tray shape using a craft knife.
3. Gently lift the edges to create a shallow tray.
4. Smooth the surface and edges with a damp sponge or fingertip.
5. Allow the tray to dry completely according to the clay instructions.
6. Paint abstract designs or patterns using acrylic paint or paint pens.
7. Apply a clear sealant to protect the paint and finish.
Shop the Look
• Air Dry Clay
• Acrylic Paint Set
• Detail Paint Brush Set
• Gloss Craft Sealant
Clay trays are one of those DIY projects that are both simple and surprisingly stylish. With just a few basic tools and some creativity, you can turn air dry clay into decorative trays that hold jewelry, keys, candles, or everyday essentials. The best part is that every tray can be completely unique depending on the shapes, textures, and colors you choose.
Whether you prefer bold painted designs, sculptural edges, or textured patterns, these clay tray ideas make it easy to create small decor pieces that feel modern and personal. Handmade trays also make thoughtful gifts and are a great way to experiment with different clay trays DIY techniques.
If you enjoyed these projects, you might also love exploring more beginner-friendly clay crafts here: 17 Polymer Clay Ideas for Beginners

